JSON Support with SageMaker Clarify
This notebook’s CI test result for us-west-2 is as follows. CI test results in other regions can be found at the end of the notebook.
Contents
Overview
Amazon SageMaker Clarify helps improve your machine learning models by detecting potential bias and helping explain how these models make predictions. The fairness and explainability functionality provided by SageMaker Clarify takes a step towards enabling AWS customers to build trustworthy and understandable machine learning models. The product comes with the tools to help you with the following tasks.
Measure biases that can occur during each stage of the ML lifecycle (data collection, model training and tuning, and monitoring of ML models deployed for inference).
Generate model governance reports targeting risk and compliance teams and external regulators.
Provide explanations of the data, models, and monitoring used to assess predictions for input containing data of various modalities like numerical data, categorical data, text, and images.
Learn more about SageMaker Clarify here. This sample notebook walks you through:
Key terms and concepts needed to understand SageMaker Clarify
The incremental updates required to prepare a model for bias measurement and explaining
Preprocessing, Training, Model Deploy
Measuring the pre-training bias of a dataset and post-training bias of a model
Explaining the importance of the various new input features on the model’s decision
In particular, this will showcase:
Clarify’s support for JSON input datasets, and a model with JSON inputs and outputs
In doing so, the notebook will first train a Linear Learner model using a training dataset, then use SageMaker Clarify to analyze a test dataset with JSON as the model input/output.
Prerequisites and Data
If you are using SageMaker Notebook Instances, please use the conda_python3 kernel.
Initialize SageMaker
[ ]:
# Upgrade dependencies
!pip install sagemaker botocore boto3 awscli --upgrade
[ ]:
import sagemaker
import pandas as pd

# SageMaker session bucket is used to upload the dataset, model and model training logs
sess = sagemaker.Session()
region = sess.boto_region_name
bucket = sess.default_bucket()
print(f"Bucket: {bucket}")

# Define the IAM role
role = sagemaker.get_execution_role()
print(f"Execution Role: {role}")
Download Data
We use the popular Adult Census Dataset from the UCI Machine Learning Repository\(^{[1]}\). The data is already split between a training dataset (adult.train) and test dataset (adult.test) in the Data Folder.
The dataset files are available in a public s3 bucket which we download below and are in a CSV format.
\(^{[1]}\)Dua, D. and Graff, C. (2019). UCI Machine Learning Repository. Irvine, CA: University of California, School of Information and Computer Science.
[ ]:
import os
import boto3

s3_client = boto3.client("s3")

# Training dataset
if not os.path.isfile("adult.data"):
    s3_client.download_file(
        f"sagemaker-example-files-prod-{region}",
        "datasets/tabular/uci_adult/adult.data",
        "adult.data",
    )
    print("adult.data saved!")
else:
    print("adult.data already on disk.")

# Test dataset
if not os.path.isfile("adult.test"):
    s3_client.download_file(
        f"sagemaker-example-files-prod-{region}",
        "datasets/tabular/uci_adult/adult.test",
        "adult.test",
    )
    print("adult.test saved!")
else:
    print("adult.test already on disk.")
Loading the data
From the UCI repository of machine learning datasets, this database contains 14 features concerning demographic characteristics of 45,222 rows (32,561 for training and 12,661 for testing). The task is to predict whether a person has a yearly income that is more or less than $50,000.
Here are the features and their possible values. Categorical values are listed, continuous columns are noted as such.:
Age: continuous.
Workclass: Private, Self-emp-not-inc, Self-emp-inc, Federal-gov, Local-gov, State-gov, Without-pay, Never-worked.
Fnlwgt: continuous (the number of people the census takers believe that observation represents).
Education: Bachelors, Some-college, 11th, HS-grad, Prof-school, Assoc-acdm, Assoc-voc, 9th, 7th-8th, 12th, Masters, 1st-4th, 10th, Doctorate, 5th-6th, Preschool.
****Education-num**: continuous.
Marital-status: Married-civ-spouse, Divorced, Never-married, Separated, Widowed, Married-spouse-absent, Married-AF-spouse.
Occupation: Tech-support, Craft-repair, Other-service, Sales, Exec-managerial, Prof-specialty, Handlers-cleaners, Machine-op-inspct, Adm-clerical, Farming-fishing, Transport-moving, Priv-house-serv, Protective-serv, Armed-Forces.
Relationship: Wife, Own-child, Husband, Not-in-family, Other-relative, Unmarried.
Ethnic group: White, Asian-Pac-Islander, Amer-Indian-Eskimo, Other, Black.
Sex: Female, Male.
Note: this data is extracted from the 1994 Census and enforces a binary option on Sex
Capital-gain: continuous.
Capital-loss: continuous.
Hours-per-week: continuous.
Native-country: United-States, Cambodia, England, Puerto-Rico, Canada, Germany, Outlying-US(Guam-USVI-etc), India, Japan, Greece, South, China, Cuba, Iran, Honduras, Philippines, Italy, Poland, Jamaica, Vietnam, Mexico, Portugal, Ireland, France, Dominican-Republic, Laos, Ecuador, Taiwan, Haiti, Columbia, Hungary, Guatemala, Nicaragua, Scotland, Thailand, Yugoslavia, El-Salvador, Trinadad&Tobago, Peru, Hong, Holand-Netherlands.
The target label is the last column in the CSV files:
Target: <=50,000, >$50,000.
Or “50K” for short
[ ]:
# Columns of the dataset, in order, including the Target label
adult_columns = [
    "Age",
    "Workclass",
    "fnlwgt",
    "Education",
    "Education-Num",
    "Marital Status",
    "Occupation",
    "Relationship",
    "Ethnic group",
    "Sex",
    "Capital Gain",
    "Capital Loss",
    "Hours per week",
    "Country",
    "Target",
]

# Load the CSV dataset files
training_data = pd.read_csv(
    "adult.data", names=adult_columns, sep=r"\s*,\s*", engine="python", na_values="?"
).dropna()
testing_data = pd.read_csv(
    "adult.test", names=adult_columns, sep=r"\s*,\s*", engine="python", na_values="?", skiprows=1
).dropna()

display(training_data.head())
display(testing_data.head())
Preprocessing
The data needs to be converted into a format our Linear Learner model can process.
Encoding
Machine Learning models that process categorical columns (e.g. Occupation) typically require them to be encoded into numerical values. This allows the model to generically and universally handle any categorical values.
Below, we take all categorical columns of the training and test datasets, and encode (or map) them to numerical values between 0 to number of categories for the respective column. We also change the position of the label column (Target column) to the first position as per the expectation of the Linear Learner model.
[ ]:
from sklearn import preprocessing


def number_encode_features(df):
    """Encodes non-numerical categorical columns to numerical labels.

    This is because our model expects encoded categories.

    :return: Mapping from column to the LabelEncoder, which can be used to reverse transform the
        encoded categories to original categories if needed, or to map a category to its encoding.
    """
    encoders = {}
    for column in df.columns:
        if df.dtypes[column] == object:
            encoders[column] = preprocessing.LabelEncoder()
            df[column] = encoders[column].fit_transform(df[column].fillna("None"))
    return encoders


# Our Linear Learner model expects the label to be in the first column
training_data = pd.concat([training_data["Target"], training_data.drop(["Target"], axis=1)], axis=1)
_ = number_encode_features(training_data)
training_data.to_csv("train_data.csv", index=False, header=False)

# We will use the testing_data dataset to run the Clarify job later on.  This dataset includes
# labels already for each record.  Clarify would also work if labels are omitted from the
# input dataset, and will instead invoke the model endpoint for inference requests to get the label.
testing_data = pd.concat([testing_data["Target"], testing_data.drop(["Target"], axis=1)], axis=1)
_ = number_encode_features(testing_data)
testing_data.to_csv("test_data.csv", index=False, header=False)
test_features = testing_data.drop(["Target"], axis=1)

display(training_data.head(15))
display(testing_data.head())
JSON Dataset
As we are showcasing Clarify’s support of JSON input datasets, here we convert the DataFrame datasets into a JSON array of key-value pairs for each record.
[ ]:
import json
import numpy as np


class NpEncoder(json.JSONEncoder):
    def default(self, obj):
        if isinstance(obj, np.integer):
            return int(obj)
        if isinstance(obj, np.floating):
            return float(obj)
        if isinstance(obj, np.ndarray):
            return obj.tolist()
        return super(NpEncoder, self).default(obj)


def csv_to_json(df, output):
    res = []
    for i, row in df.iterrows():
        r = {}
        for col in adult_columns:
            r[col] = row[col]
        res.append(r)
    with open(output, "w") as f:
        json.dump(res, f, indent=4, cls=NpEncoder)
    return res


json_training_data = csv_to_json(training_data, "adult.data.json")
json_test_data = csv_to_json(testing_data, "adult.test.json")
print(json_training_data[:5])
print(json_test_data[:5])
Upload Dataset to s3
Let’s upload the datasets we preprocessed above to s3, and specify the model artifacts output location as well
[ ]:
from sagemaker.s3 import S3Uploader

# S3 key prefix for the datasets
prefix = "sagemaker/DEMO-sagemaker-clarify-json-e2e"

s3_train_data = "s3://{}/{}/train".format(bucket, prefix)
s3_test_data = "s3://{}/{}/test".format(bucket, prefix)

# Linear Learner model can take CSV files as input for training
train_uri = S3Uploader.upload("train_data.csv", s3_train_data)
test_data_uri = S3Uploader.upload("test_data.csv", s3_test_data)

# Linear Learner inference can use JSON, so we will save the test dataset JSON to
# showcase using Clarify with both JSON input dataset, and JSON model input/output
json_train_uri = S3Uploader.upload("adult.data.json", s3_train_data)
json_test_data_uri = S3Uploader.upload("adult.test.json", s3_test_data)

print(f"Saved training data to {s3_train_data}")
print(f"Saved test data to {s3_test_data}")

# Model artifacts output location
s3_model_output_location = "s3://{}/{}/output".format(bucket, prefix)
print(f"Model artifacts will be saved to {s3_model_output_location}")
Training
Now that we have our datasets, we can train a Linear Learner model.
First we fetch the Linear Learner container which will be used for training the model.
[ ]:
container = sagemaker.image_uris.retrieve(region=region, framework="linear-learner")
print("Using SageMaker Linear Learner container: {} ({})".format(container, region))
Then we setup our Estimator to use the Linear Learner container, an instance type and instance count for the training job, and the hyperparameters for the algorithm. See more hyperparameter details and tuning in the documentation.
The training job will take the training dataset (via the s3 uri) we uploaded to s3 above. Optionally, Linear Learner can take a validation dataset for calibration and a test dataset for a test score.
Here we’ll trigger the training job, which may take a few minutes.
[ ]:
linear = sagemaker.estimator.Estimator(
    container,
    role,
    instance_count=1,
    instance_type="ml.c4.xlarge",
    output_path=s3_model_output_location,
    sagemaker_session=sess,
)
# See Linear Learner documentation for hyperparameters
linear.set_hyperparameters(
    feature_dim=len(adult_columns) - 1,
    predictor_type="binary_classifier",
    mini_batch_size=200,
)


# Linear Learner uses CSV datasets for training
train_data = sagemaker.inputs.TrainingInput(
    train_uri,
    distribution="FullyReplicated",
    content_type="text/csv",
    s3_data_type="S3Prefix",
)
# Optional: add test dataset for test score
test_data = sagemaker.inputs.TrainingInput(
    test_data_uri,
    distribution="FullyReplicated",
    content_type="text/csv",
    s3_data_type="S3Prefix",
)
linear.fit({"train": train_data, "test": test_data})
Deploy Model
Let’s deploy the model and spin up an endpoint for inferences.
Note: You could also just create the model with `create_model() <https://sagemaker.readthedocs.io/en/stable/api/training/estimators.html#sagemaker.estimator.EstimatorBase.create_model>`__ and skip the inference validation steps below. When you spin up the SageMaker Clarify processing job, a shadow, or temporary endpoint can be spun up for the duration of the job.
Note: If you did not explicit specify a model_name in the Estimator, the model_name will be a concatenation of the container + timestamp, which should be the same as the endpoint name.
[ ]:
predictor = linear.deploy(initial_instance_count=1, instance_type="ml.m4.xlarge")
print(f"\nEndpoint name: {predictor.endpoint_name}")
[Optional] Verifying JSON Inferences
This Notebook will showcase supporting a model that has JSON input/output for inference requests. We verify below that our model indeed can handle JSON inference requests, and output JSON responses. The inference request follows the common structure for JSON and the response follows documented formats.
You should see prediction results below, containing a list of scores and predicted labels. We also display the real results to sanity check our model’s performance (it’s not great for the model and dataset due to the data quality and/or other factors, but we won’t dive into that here).
[ ]:
import json
from sagemaker.serializers import JSONSerializer
from sagemaker.deserializers import JSONDeserializer

# Serializer for model input, deserializer for model output
predictor.serializer = JSONSerializer()
predictor.deserializer = JSONDeserializer()

instances = []
for i, row in test_features[:20].iterrows():
    instances.append({"features": row.tolist()})

response = predictor.predict({"instances": instances})
print(json.dumps(response, indent=2))
display(testing_data.head(20))
SageMaker Clarify
Now, let’s use SageMaker Clarify to measure pre-training bias metrics on the dataset, post-training bias metrics on the model, and explaining the importance of the dataset’s features on the model’s decisions!
We initialize a `SageMakerClarifyProcessor <https://sagemaker.readthedocs.io/en/stable/api/training/processing.html#sagemaker.clarify.SageMakerClarifyProcessor>`__ and specify the instance count and type for the Clarify job. (Note: increasing the instance count allows for parallel processing with spark).
Then, we can specify various configurations for the Clarify job using Config objects from the SageMaker Python SDK. Alternatively, you can specify an `analysis_config.json via the ProcessingInput and ProcessingOutput APIs <https://docs.aws.amazon.com/sagemaker/latest/dg/clarify-processing-job-configure-parameters.html>`__.
[ ]:
from sagemaker import clarify

clarify_processor = clarify.SageMakerClarifyProcessor(
    role=role, instance_count=1, instance_type="ml.m5.xlarge", sagemaker_session=sess
)
The `DataConfig <https://sagemaker.readthedocs.io/en/stable/api/training/processing.html#sagemaker.clarify.DataConfig>`__ communicates information of the data I/O to SageMaker Clarify. We specify where to find the input dataset, where to store the output, the target column (label), the header names, and the dataset type. Check the documentation for supported dataset types.
Here we set the input dataset to the JSON dataset we created earlier. JSON datasets require headers to have the label as the last element, and a features JMESPath set to extract the feature values from the dataset (this must result in a 2D array of feature values - see the DataConfig documentation for more details).
[ ]:
# Model artifacts output location
clarify_s3_output_location = "s3://{}/{}/clarify/output".format(bucket, prefix)
print(f"Clarify output will be saved to {clarify_s3_output_location}")

# For JSON/JSON Lines, the label header should be the last entry in the `headers` field
headers = training_data.columns[1:].to_list() + [training_data.columns[0]]
print(headers)

# Note: JMESPath uses double quotes `""` for strings, but python can use single quotes `''`,
# so we make sure this is valid JMESPath by converting all single quotes to double quotes
features_jmespath = f"[*]{adult_columns[0:-1]}".replace("'", '"')
print(features_jmespath)

data_config = clarify.DataConfig(
    s3_data_input_path=json_test_data_uri,
    s3_output_path=clarify_s3_output_location,
    features=features_jmespath,
    label="[*].Target",
    headers=headers,
    dataset_type="application/json",  # JSON input dataset
)
The `ModelConfig <https://sagemaker.readthedocs.io/en/stable/api/training/processing.html#sagemaker.clarify.ModelConfig>`__ communicates information about your trained model. Here we specify the endpoint_name of the inference endpoint we deployed above. If you had instead used `create_model() <https://sagemaker.readthedocs.io/en/stable/api/training/estimators.html#sagemaker.estimator.EstimatorBase.create_model>`__, you will need to specify the model_name, instance_count and
instance_type for SageMaker Clarify to spin up a shadow endpoint for the Clarify job (this would be useful if you want to avoid additional traffic to a production endpoint).
We also specify the model’s input (content_type) and output (accept_type) formats. Here is where we show SageMaker Clarify supports JSON based model I/O. Check the AWS or Python SDK documentation for all supported model input and output types.
We will need to set a content_template to denote the outer structure of the JSON request for the model input, and a record_template to denote per-record JSON structure. Again, see the AWS or Python SDK documentation for more details on these parameters, including concrete examples. For our model, we will want to construct JSON that looks like this (the common inference
format):
{
    "instances": [
        // First record
        {"features": [ <row 0 values> ]},
        // Second record
        {"features": [ <row 1 values> ]}
        ...
    ]
}
[ ]:
model_config = clarify.ModelConfig(
    endpoint_name=predictor.endpoint_name,  # Reuse model endpoint created above
    content_type="application/json",  # Model input format
    accept_type="application/json",  # Model output format
    content_template='{"instances":$records}',  # Outer JSON structure
    record_template='{"features":$features}',  # per record is just a list of features
)
The `ModelPredictedLabelConfig <https://sagemaker.readthedocs.io/en/stable/api/training/processing.html#sagemaker.clarify.ModelPredictedLabelConfig>`__ provides information on the format of the model prediction outputs. For our use case, we specify how to find the label and probability score in the predictions.
If you ran the [Optional] Verifying JSON Inferences section above, you can see for each inference, the model outputs a JSON structure with a predicted_label and score. Since it’s a list of predictions, we use the expression below to fetch the fields for each prediction. See the `ModelPredictedLabelConfig documentation <https://sagemaker.readthedocs.io/en/stable/api/training/processing.html#sagemaker.clarify.ModelPredictedLabelConfig>`__
for more details.
[ ]:
predictions_config = clarify.ModelPredictedLabelConfig(
    label="predictions[*].predicted_label", probability="predictions[*].score"
)
For measuring Bias metrics, we specify a `BiasConfig <https://sagemaker.readthedocs.io/en/stable/api/training/processing.html#sagemaker.clarify.BiasConfig>`__ which contains information about what the sensitive columns (facets) are, what the sensitive features (facet_values_or_threshold) may be, and what the desirable (positive) outcomes are (label_values_or_threshold).
For our dataset, the positive outcome is incoming >$50K, which we encoded as 1. Sex is the sensitive column and Female respondents (encoded as 0) are the sensitive group.
[ ]:
bias_config = clarify.BiasConfig(
    label_values_or_threshold=[1], facet_name="Sex", facet_values_or_threshold=[0], group_name="Age"
)
For explaining predictions, we specify a `SHAPConfig <https://sagemaker.readthedocs.io/en/stable/api/training/processing.html#sagemaker.clarify.SHAPConfig>`__ (Note: see documentation for other explanation methods).
SageMaker Clarify uses the Kernel SHAP algorithm to explain the contribution that each input feature makes to the final decision. This requires a baseline (or background dataset). If not provided, a baseline is calculated automatically by SageMaker Clarify using K-means or K-prototypes in the input dataset. Baseline dataset type shall be the same as dataset_type of our DataConfig, and baseline
samples shall only include features. By definition, baseline should either be a S3 URI to the baseline dataset file, or an in-place list of samples. In this case we chose the latter, and put the first sample of the test dataset to the list.
[ ]:
# Baseline should be in the same format as the dataset
shap_config = clarify.SHAPConfig(
    baseline=[dict(zip(test_features.columns, test_features.iloc[0].values.tolist()))],
    num_samples=15,
    agg_method="mean_abs",
    save_local_shap_values=True,
)
Run SageMaker Clarify Processing Job
Using our configuration objects created above, let’s trigger a SageMaker Clarify Processing Job to run bias metrics measurements and explainability analysis.
Note: you can individually run pre-training, post-training, and explainability processing jobs separately via other functions on the SageMakerClarifyProcessor object such as `run_bias() <https://sagemaker.readthedocs.io/en/stable/api/training/processing.html#sagemaker.clarify.SageMakerClarifyProcessor.run_bias>`__,
`run_pre_training_bias() <https://sagemaker.readthedocs.io/en/stable/api/training/processing.html#sagemaker.clarify.SageMakerClarifyProcessor.run_pre_training_bias>`__, `run_post_training_bias() <https://sagemaker.readthedocs.io/en/stable/api/training/processing.html#sagemaker.clarify.SageMakerClarifyProcessor.run_post_training_bias>`__,
`run_explainability() <https://sagemaker.readthedocs.io/en/stable/api/training/processing.html#sagemaker.clarify.SageMakerClarifyProcessor.run_explainability>`__.
The SageMaker Clarify analysis output files will be in the s3_output_path we specified in DataConfig. If you are using SageMaker Studio, visual reports will also be available which we will walk through below.
[ ]:
clarify_processor.run_bias_and_explainability(
    data_config=data_config,
    model_config=model_config,
    explainability_config=shap_config,
    bias_config=bias_config,
    model_predicted_label_config=predictions_config,
)
Viewing SageMaker Clarify Results
You can view the SageMaker Clarify results with:
SageMaker Studio Experiments tab
Downloading the output files locally
1. SageMaker Studio Experiments
Navigate to the SageMaker Resources tab and select Experiments and trials
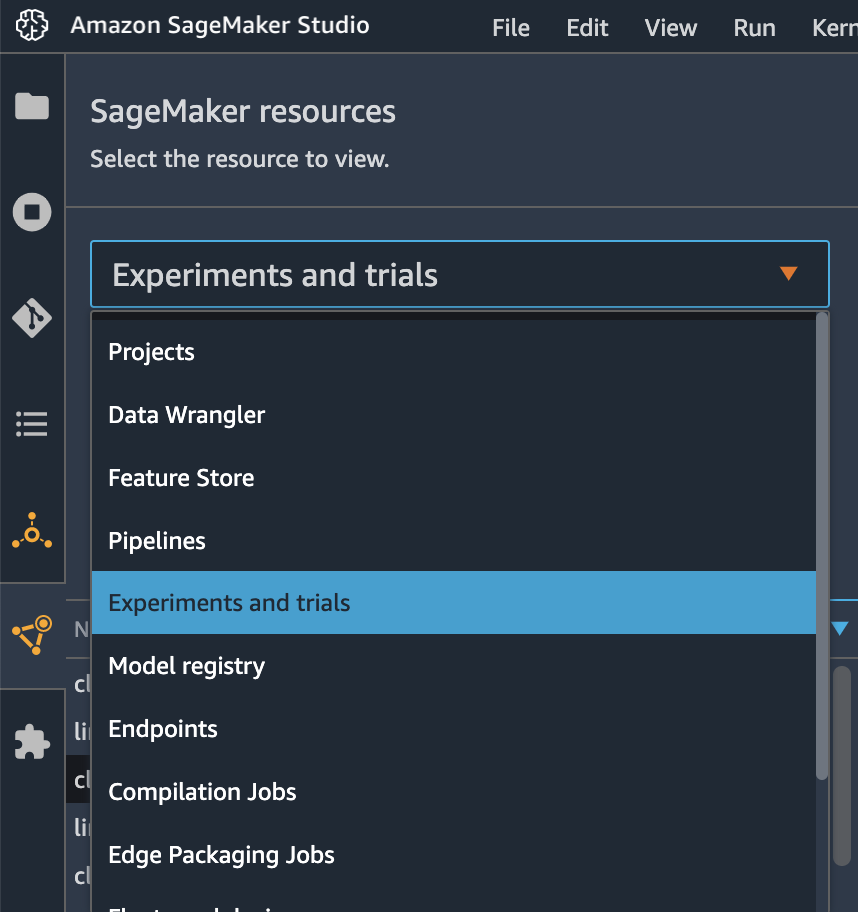
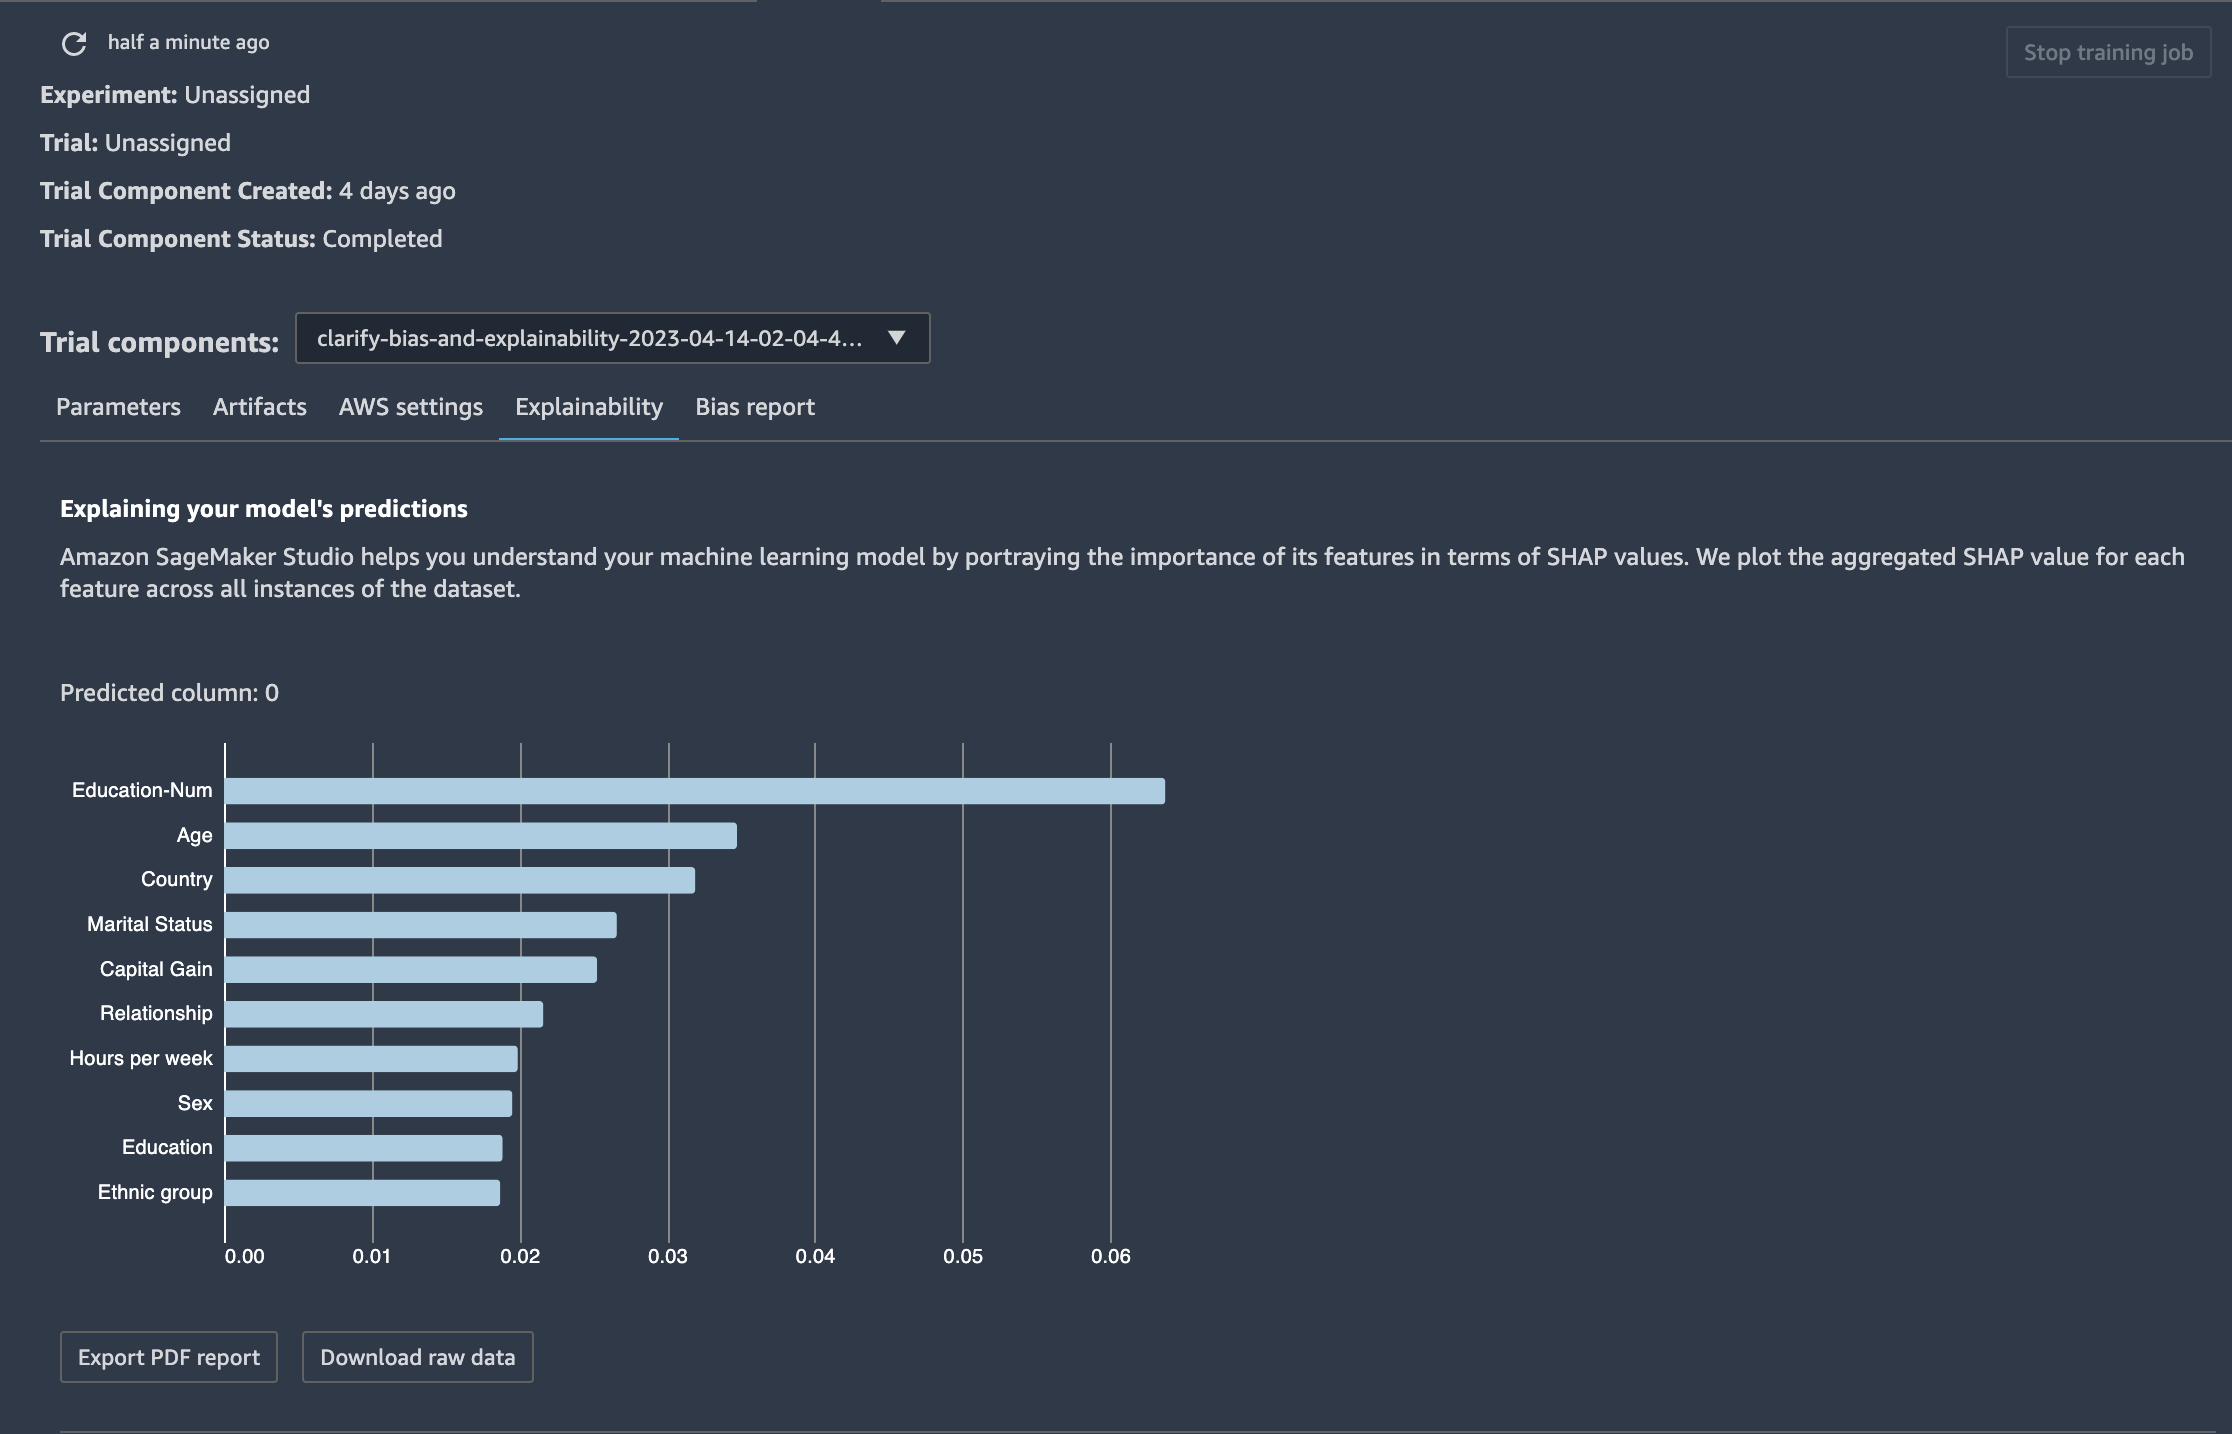
You should be able to find the Clarify job you just ran in the list of jobs and explore the various outputs such as the Explainability Report or Bias Report.
2. Downloading SageMaker Clarify Output Files
Let’s download the Clarify job output files from the s3 output location we specified in DataConfig
[ ]:
!mkdir clarify_output
s3 = boto3.client("s3")
for s3_key in s3.list_objects(Bucket=bucket, Prefix=prefix + "/clarify/output")["Contents"]:
    s3_object = s3_key["Key"]
    if not s3_object.endswith("/"):
        s3.download_file(bucket, s3_object, "clarify_output/" + s3_object.split("/")[-1])
You should then be able to view the analysis results files in clarify_output/:
explanations_shap: Local Explanations results and baseline
analysis_config.json: the analysis_config.json used for the SageMaker Clarify job
analysis.json: analysis results in JSON format. This is also printed as the output during the SageMaker Clarify Processing job
report.html/report.ipynb/report.pdf: a nicely visualized report document of the analysis, including plots, graphs, and tables - in HTML, Notebook, and PDF formats
The Local Explanations output file will contain local SHAP values for each combination of facet and model output label:
[ ]:
local_explanations = pd.read_csv("clarify_output/out.csv")
local_explanations.head(10)
We can also take a look at the report.pdf file which provides a comprehensive analysis report.
For programmatically accessing the analysis results, analysis.json may be more fitting.
[ ]:
from IPython.display import IFrame

IFrame(src="clarify_output/report.html", width=1000, height=1000)
Cleanup
Finally, don’t forget to clean up the resources we created for this demo!
[ ]:
predictor.delete_model()
predictor.delete_endpoint()
Notebook CI Test Results
This notebook was tested in multiple regions. The test results are as follows, except for us-west-2 which is shown at the top of the notebook.