Comparing model metrics with SageMaker Pipelines and SageMaker Model Registry
This notebook’s CI test result for us-west-2 is as follows. CI test results in other regions can be found at the end of the notebook.
SageMaker Model Registry
SageMaker Model Registry is a central location where customers can manage their machine learning models, compare different model versions and visualize metrics. It’s a registry with which data scientists can register machine learning models with relevant metadata and metrics, and from which machine learning engineers or DevOps engineers can deploy machine learning models. In larger MLOps systems, a model registry is usually where the teams in charge of deploying machine learning models, meet the teams in charge of developing and training machine learning models.

MLOps
MLOps, or Machine Learning Operations, is the concept of applying DevOps practices on the lifecycle of a machine learning model. Among many other things, MLOps usually consists of two workflows that sits on either side of a machine learning model registry; one to train a model and one to deploy a model. A model registry is a central location to manage machine learning models, where ML engineers and data scientists can compare different model versions, visualize metrics, and decide which versions to accept and which to reject. Ideally, approving a new version of a model triggers a pipeline that ultimately deploys the model into production.
From a high-level perspective, it can look like this.
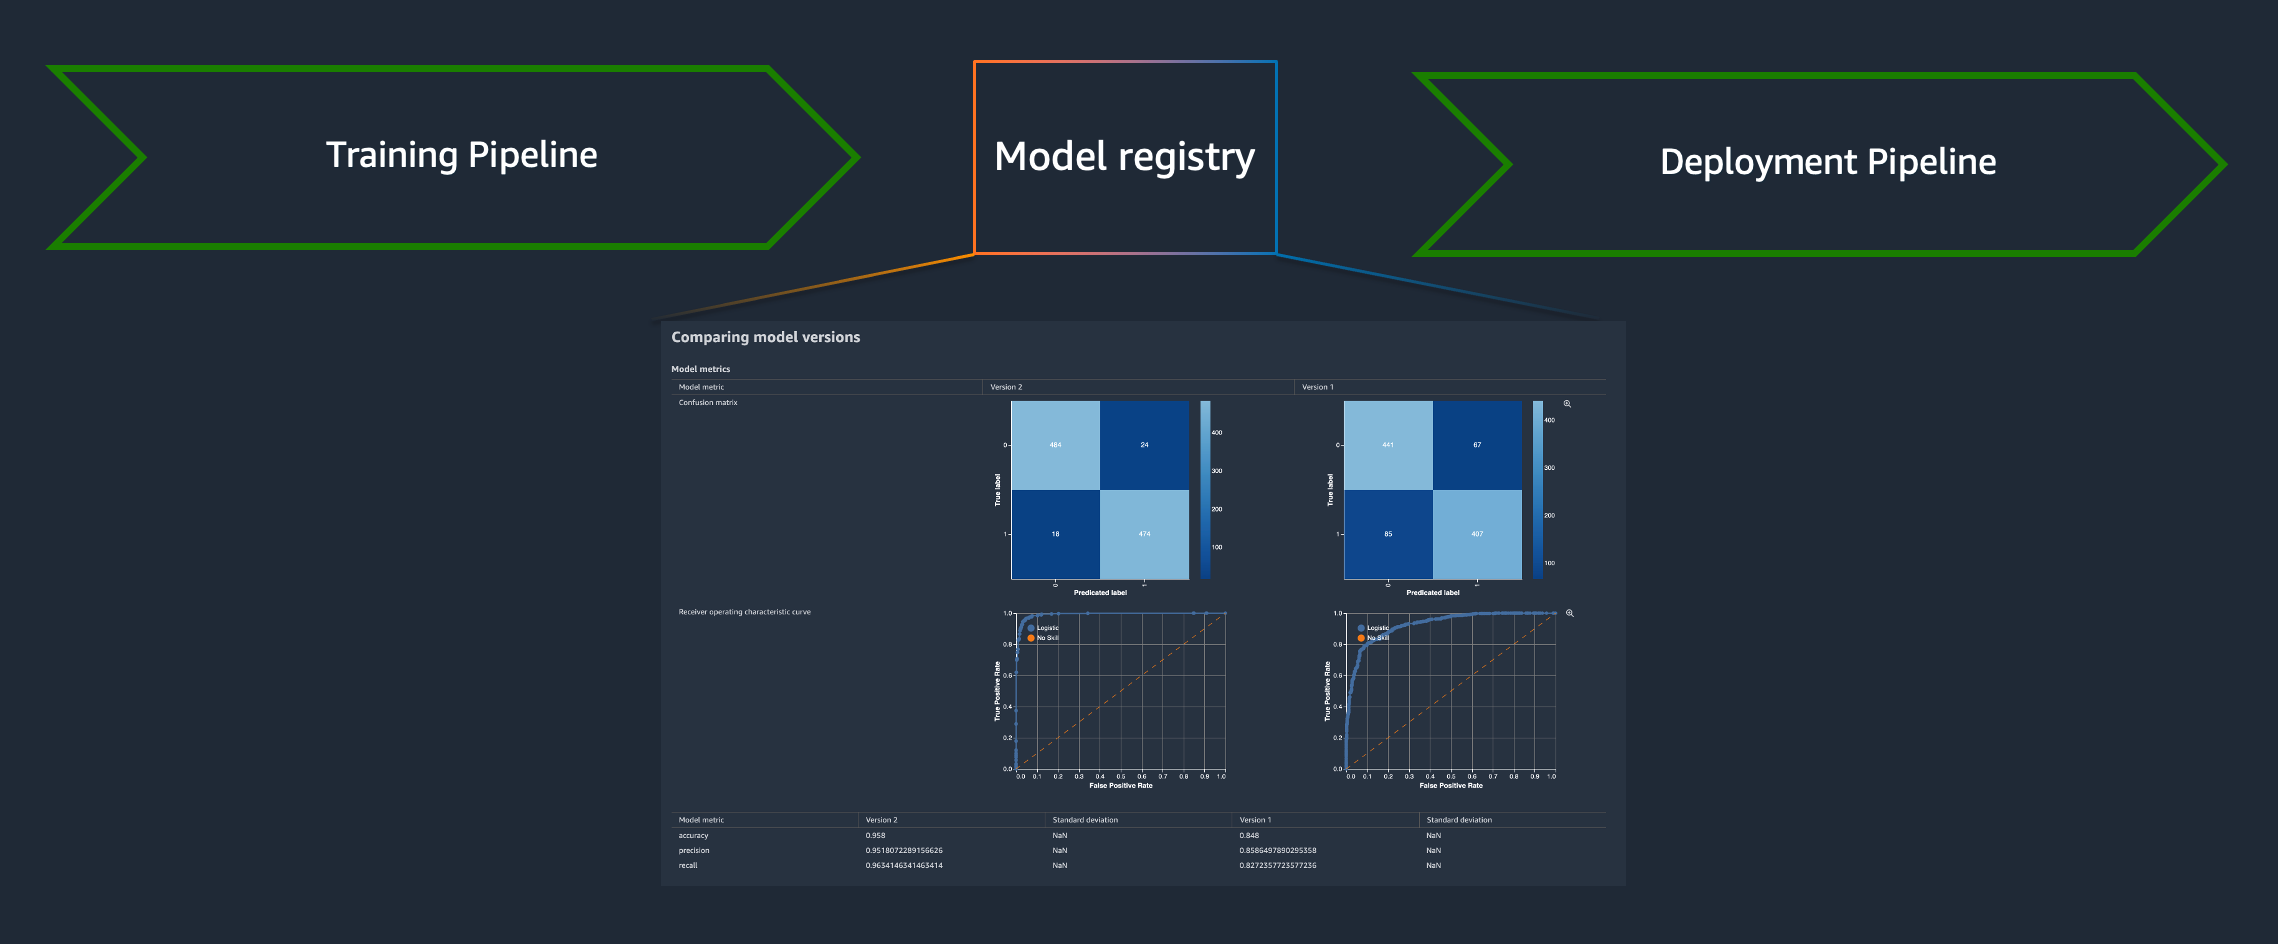
The deployment pipeline is what is most similar to traditional CI/CD methods, propagating an artifact through a pipeline that performs testing and if the tests are successful, deploys them. Any CI/CD tools can be used for the deployment, but to automate the entire machine learning model lifecycle, a pipeline on “the other side” of the model registry is required as well. A pipeline that ultimately produces a new machine learning model and registers it with the model registry. A SageMaker Pipeline.
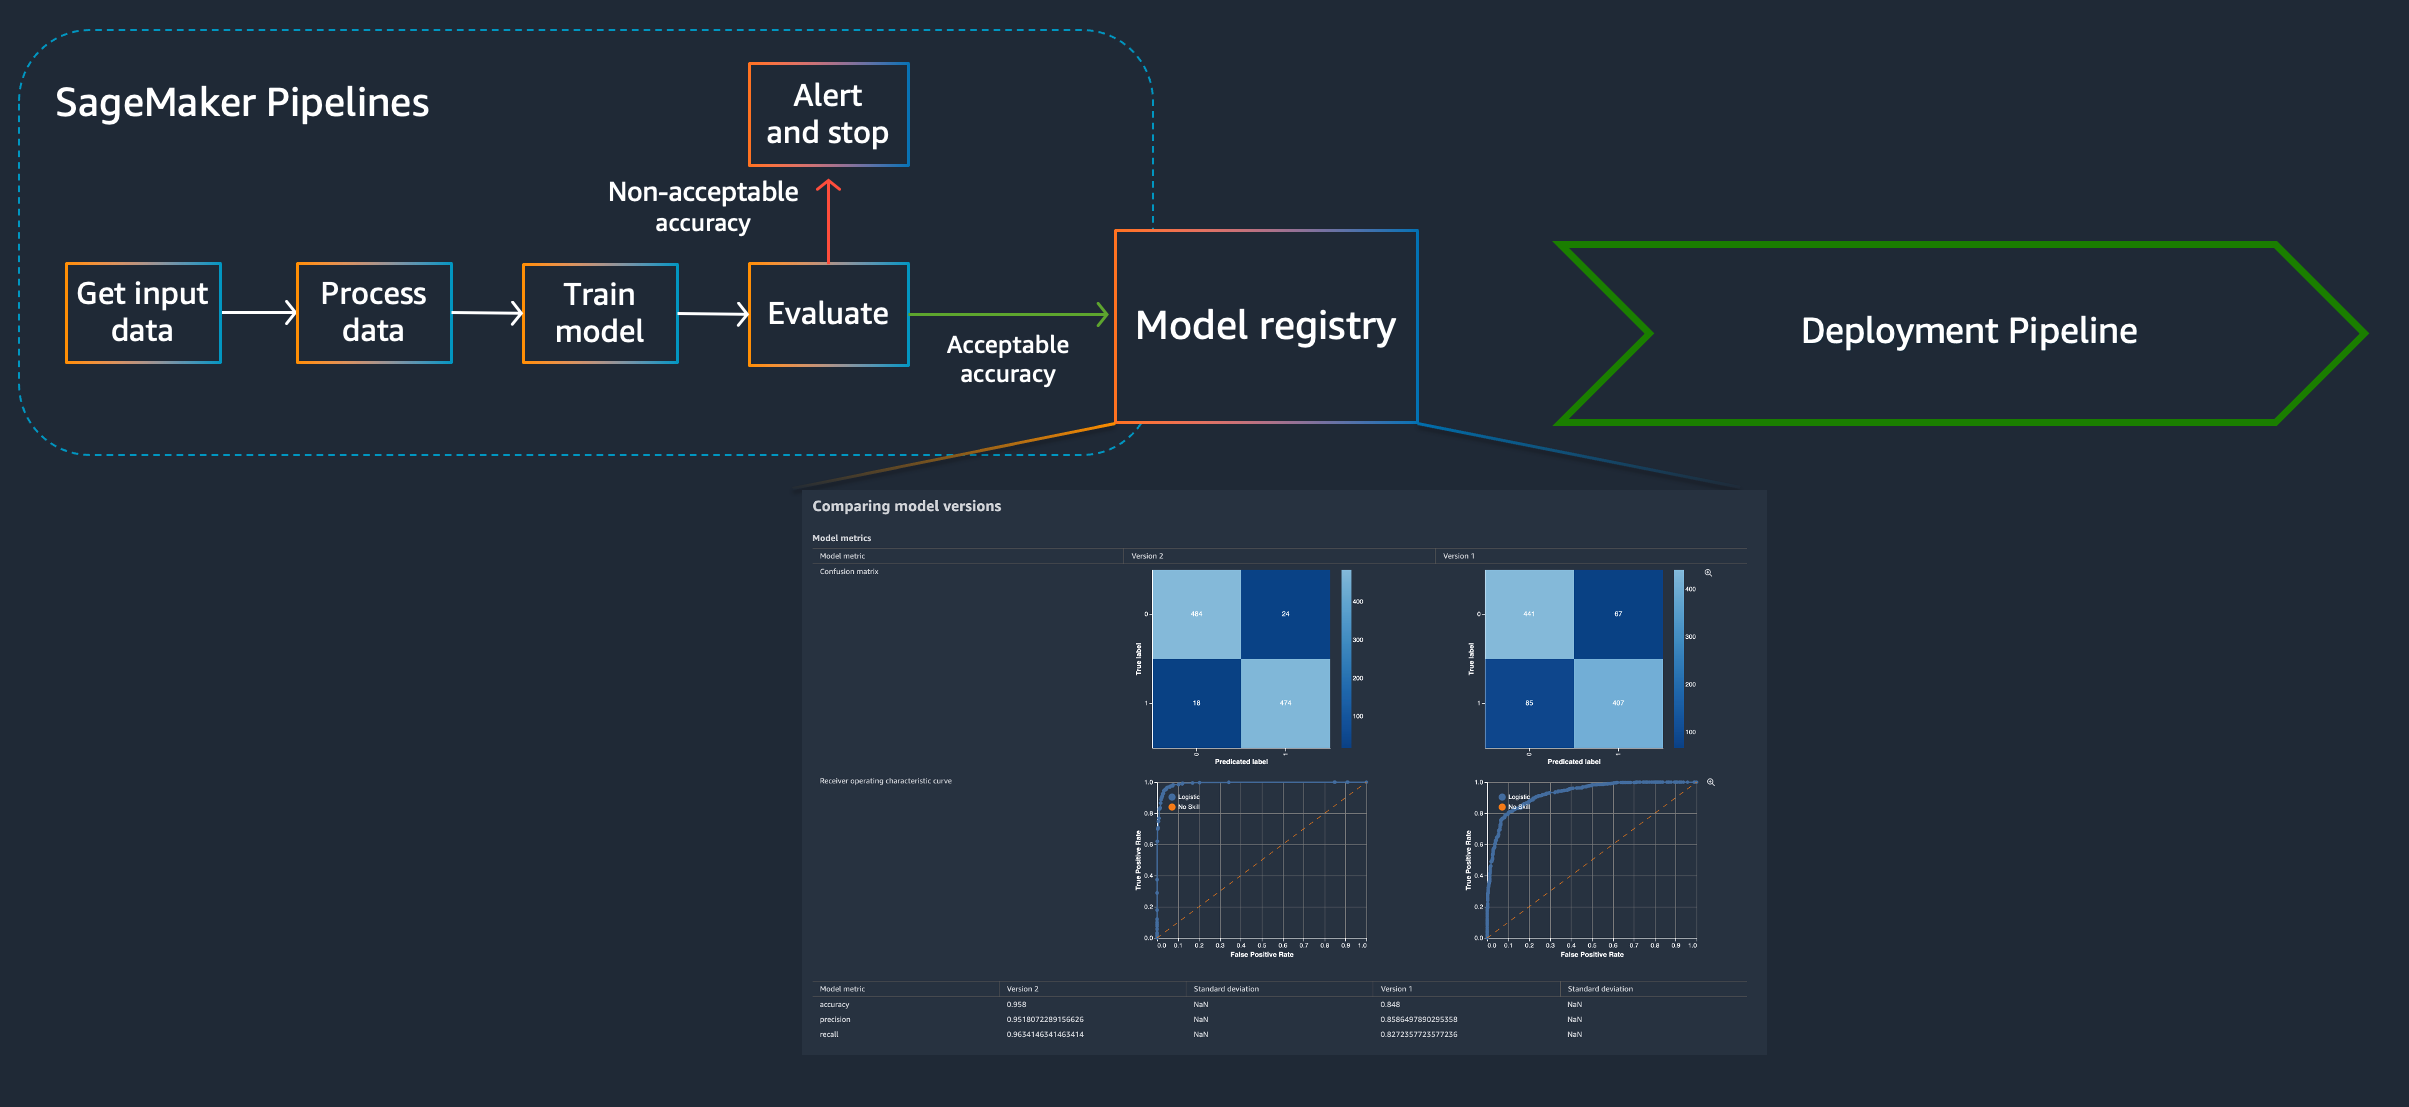
This notebook, demonstrate how SageMaker Pipelines can be used to create a reusable machine learning pipeline that preprocesses, trains, evaluates and registers a machine learning model with the SageMaker Model Registry for visualization and comparison of different model versions.
Amazon SageMaker Pipelines
Amazon SageMaker Pipelines is a purpose-built, easy-to-use CI/CD service for machine learning. With SageMaker Pipelines, customers can create machine learning workflows with an easy-to-use Python SDK, and then visualize and manage workflows using Amazon SageMaker Studio.
SageMaker Pipeline steps and parameters
SageMaker pipelines works on the concept of steps. The order steps are executed in is inferred from the dependencies each step have. If a step has a dependency on the output from a previous step, it’s not executed until after that step has completed successfully.
SageMaker Pipeline Parameters are input parameters specified when triggering a pipeline execution. They need to be explicitly defined when creating the pipeline and contain default values.
To know more about the type of steps and parameters supported, check out the SageMaker Pipelines Overview.
SageMaker Pipeline DAG
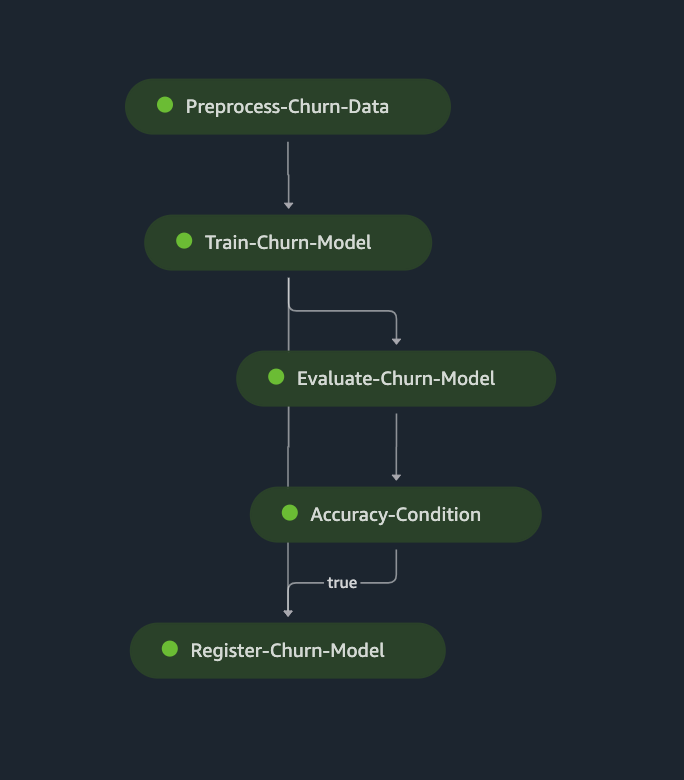
When creating a SageMaker Pipeline, SageMaker creates a Direct Acyclic Graph, DAG, that customers can visualize in Amazon SageMaker Studio. The DAG can be used to track pipeline executions, outputs and metrics. In this notebook, a SageMaker pipeline with the following DAG is created:
Predict customer churn with XGboost
Data
This notebook uses a synthetic dataset.
This dataset contains information about phone carrier customers, such as customer location, phone number, number of phone calls etc.
Overview
Disclaimer This notebook was created using Amazon SageMaker Studio and the Python3(DataScience) kernel. SageMaker Studio is required for the visualizations of the DAG and model metrics to work.
The purpose of this notebook is to demonstrate how SageMaker Pipelines can be used to preprocess, train, evaluate and push new machine learning models into the SageMaker model registry for version comparison. All scripts to preprocess the data and evaluate the trained model have been prepared in advance and are available here: - preprocess.py - evaluate.py.
Table of contents
Define parameters In this section the parameters of the pipeline are defined.
Preprocess step In this section an SKLearnProcessor is created and used in a Preprocess step.
Train step In this section the SageMaker managed XGboost container is downloaded and an Estimator object and Training step are created.
Evaluate model step In this section a ScriptProcessor is created, used in a Processing step to compute some evaluation metrics of the previously trained model.
Condition step In this section a condition step is defined, using the metrics from the evaluation step.
Register model step In this section a register model step is created, where the trained model is registered with the SageMaker Model Registry.
Create SageMaker Pipeline In the last section, the SageMaker pipeline is created and all steps orchestrated before executing the pipeline.
[ ]:
!pip install -U sagemaker==2.91.1 --quiet # Ensure correct version of SageMaker is installed
[ ]:
import sagemaker
import sagemaker.session
[ ]:
session = sagemaker.session.Session()
region = session.boto_region_name
role = sagemaker.get_execution_role()
bucket = session.default_bucket()
[ ]:
model_package_group_name = "Churn-XGboost"  # Model name in model registry
prefix = "sagemaker/Churn-xgboost"  # Prefix to S3 artifacts
pipeline_name = "ChurnPipeline"  # SageMaker Pipeline name
[ ]:
# Upload the raw datasets to S3
large_input_data_uri = session.upload_data(
    path="dataset/large/churn-dataset.csv", key_prefix=prefix + "/data/large"
)
small_input_data_uri = session.upload_data(
    path="dataset/small/churn-dataset.csv", key_prefix=prefix + "/data/small"
)
test_data_uri = session.upload_data(path="dataset/test/test.csv", key_prefix=prefix + "/data/test")

print("Large data set uploaded to ", large_input_data_uri)
print("Small data set uploaded to ", small_input_data_uri)
print("Test data set uploaded to ", test_data_uri)
Pipeline input parameters
Pipeline Parameters are input parameter when triggering a pipeline execution. They need to be explicitly defined when creating the pipeline and contain default values.
[ ]:
from sagemaker.workflow.parameters import (
    ParameterInteger,
    ParameterString,
)

# How many instances to use when processing
processing_instance_count = ParameterInteger(name="ProcessingInstanceCount", default_value=1)

# What instance type to use for processing
processing_instance_type = ParameterString(
    name="ProcessingInstanceType", default_value="ml.m5.large"
)

# What instance type to use for training
training_instance_type = ParameterString(name="TrainingInstanceType", default_value="ml.m5.xlarge")

# Where the input data is stored
input_data = ParameterString(
    name="InputData",
    default_value=small_input_data_uri,
)

# What is the default status of the model when registering with model registry.
model_approval_status = ParameterString(
    name="ModelApprovalStatus", default_value="PendingManualApproval"
)
In the first step an sklearn processor is created, used in the ProcessingStep.
[ ]:
from sagemaker.sklearn.processing import SKLearnProcessor
from sagemaker.processing import ProcessingInput, ProcessingOutput
from sagemaker.workflow.steps import ProcessingStep
from sagemaker.workflow.functions import Join
from sagemaker.workflow.execution_variables import ExecutionVariables

# Create SKlearn processor object,
# The object contains information about what instance type to use, the IAM role to use etc.
# A managed processor comes with a preconfigured container, so only specifying version is required.
sklearn_processor = SKLearnProcessor(
    framework_version="0.23-1",
    role=role,
    instance_type=processing_instance_type,
    instance_count=processing_instance_count,
    base_job_name="churn-processing-job",
)

# Use the sklearn_processor in a Sagemaker pipelines ProcessingStep
step_preprocess_data = ProcessingStep(
    name="Preprocess-Churn-Data",
    processor=sklearn_processor,
    inputs=[
        ProcessingInput(source=input_data, destination="/opt/ml/processing/input"),
    ],
    outputs=[
        ProcessingOutput(
            output_name="train",
            source="/opt/ml/processing/train",
            destination=Join(
                on="/",
                values=[
                    "s3://{}".format(bucket),
                    prefix,
                    ExecutionVariables.PIPELINE_EXECUTION_ID,
                    "train",
                ],
            ),
        ),
        ProcessingOutput(
            output_name="validation",
            source="/opt/ml/processing/validation",
            destination=Join(
                on="/",
                values=[
                    "s3://{}".format(bucket),
                    prefix,
                    ExecutionVariables.PIPELINE_EXECUTION_ID,
                    "validation",
                ],
            ),
        ),
        ProcessingOutput(
            output_name="test",
            source="/opt/ml/processing/test",
            destination=Join(
                on="/",
                values=[
                    "s3://{}".format(bucket),
                    prefix,
                    ExecutionVariables.PIPELINE_EXECUTION_ID,
                    "test",
                ],
            ),
        ),
    ],
    code="preprocess.py",
)
In the second step, the train and validation output from the precious processing step are used to train a model. The XGBoost container is retrieved and then an XGBoost estimator is created, on which hyper parameters are specified before the training step is created.
[ ]:
from sagemaker.inputs import TrainingInput
from sagemaker.workflow.steps import TrainingStep
from sagemaker.estimator import Estimator

# Fetch container to use for training
image_uri = sagemaker.image_uris.retrieve(
    framework="xgboost",
    region=region,
    version="1.2-2",
    py_version="py3",
    instance_type="ml.m5.xlarge",
)

# Create XGBoost estimator object
# The object contains information about what container to use, what instance type etc.
xgb_estimator = Estimator(
    image_uri=image_uri,
    instance_type=training_instance_type,
    instance_count=1,
    role=role,
    disable_profiler=True,
)

xgb_estimator.set_hyperparameters(
    max_depth=5,
    eta=0.2,
    gamma=4,
    min_child_weight=6,
    subsample=0.8,
    objective="binary:logistic",
    num_round=25,
)

# Use the xgb_estimator in a Sagemaker pipelines ProcessingStep.
# NOTE how the input to the training job directly references the output of the previous step.
step_train_model = TrainingStep(
    name="Train-Churn-Model",
    estimator=xgb_estimator,
    inputs={
        "train": TrainingInput(
            s3_data=step_preprocess_data.properties.ProcessingOutputConfig.Outputs[
                "train"
            ].S3Output.S3Uri,
            content_type="text/csv",
        ),
        "validation": TrainingInput(
            s3_data=step_preprocess_data.properties.ProcessingOutputConfig.Outputs[
                "validation"
            ].S3Output.S3Uri,
            content_type="text/csv",
        ),
    },
)
When a model a trained, it’s common to evaluate the model on unseen data before registering it with the model registry. This ensures the model registry isn’t cluttered with poorly performing model versions. To evaluate the model, create a ScriptProcessor object and use it in a ProcessingStep.
Note that a separate preprocessed test dataset is used to evaluate the model, and not the output of the processing step. This is only for demo purposes, to ensure the second run of the pipeline creates a model with better performance. In a real-world scenario, the test output of the processing step would be used.
[ ]:
from sagemaker.processing import ScriptProcessor
from sagemaker.workflow.properties import PropertyFile

# Create ScriptProcessor object.
# The object contains information about what container to use, what instance type etc.
evaluate_model_processor = ScriptProcessor(
    image_uri=image_uri,
    command=["python3"],
    instance_type=processing_instance_type,
    instance_count=processing_instance_count,
    base_job_name="script-churn-eval",
    role=role,
)

# Create a PropertyFile
# A PropertyFile is used to be able to reference outputs from a processing step, for instance to use in a condition step.
# For more information, visit https://docs.aws.amazon.com/sagemaker/latest/dg/build-and-manage-propertyfile.html
evaluation_report = PropertyFile(
    name="EvaluationReport", output_name="evaluation", path="evaluation.json"
)

# Use the evaluate_model_processor in a Sagemaker pipelines ProcessingStep.
step_evaluate_model = ProcessingStep(
    name="Evaluate-Churn-Model",
    processor=evaluate_model_processor,
    inputs=[
        ProcessingInput(
            source=step_train_model.properties.ModelArtifacts.S3ModelArtifacts,
            destination="/opt/ml/processing/model",
        ),
        ProcessingInput(
            source=test_data_uri,  # Use pre-created test data instead of output from processing step
            destination="/opt/ml/processing/test",
        ),
    ],
    outputs=[
        ProcessingOutput(
            output_name="evaluation",
            source="/opt/ml/processing/evaluation",
            destination=Join(
                on="/",
                values=[
                    "s3://{}".format(bucket),
                    prefix,
                    ExecutionVariables.PIPELINE_EXECUTION_ID,
                    "evaluation-report",
                ],
            ),
        ),
    ],
    code="evaluate.py",
    property_files=[evaluation_report],
)
If the trained model meets the model performance requirements a new model version is registered with the model registry for further analysis. To attach model metrics to the model version, create a ModelMetrics object using the evaluation report created in the evaluation step. Then, create the RegisterModel step.
[ ]:
from sagemaker.model_metrics import MetricsSource, ModelMetrics
from sagemaker.workflow.step_collections import RegisterModel

# Create ModelMetrics object using the evaluation report from the evaluation step
# A ModelMetrics object contains metrics captured from a model.
model_metrics = ModelMetrics(
    model_statistics=MetricsSource(
        s3_uri=Join(
            on="/",
            values=[
                step_evaluate_model.arguments["ProcessingOutputConfig"]["Outputs"][0]["S3Output"][
                    "S3Uri"
                ],
                "evaluation.json",
            ],
        ),
        content_type="application/json",
    )
)

# Crete a RegisterModel step, which registers the model with Sagemaker Model Registry.
step_register_model = RegisterModel(
    name="Register-Churn-Model",
    estimator=xgb_estimator,
    model_data=step_train_model.properties.ModelArtifacts.S3ModelArtifacts,
    content_types=["text/csv"],
    response_types=["text/csv"],
    inference_instances=["ml.t2.medium", "ml.m5.xlarge", "ml.m5.large"],
    transform_instances=["ml.m5.xlarge"],
    model_package_group_name=model_package_group_name,
    approval_status=model_approval_status,
    model_metrics=model_metrics,
)
Adding conditions to the pipeline is done with a ConditionStep. In this case, we only want to register the new model version with the model registry if the new model meets an accuracy condition.
[ ]:
from sagemaker.workflow.conditions import ConditionGreaterThanOrEqualTo
from sagemaker.workflow.condition_step import ConditionStep
from sagemaker.workflow.functions import JsonGet

# Create accuracy condition to ensure the model meets performance requirements.
# Models with a test accuracy lower than the condition will not be registered with the model registry.
cond_gte = ConditionGreaterThanOrEqualTo(
    left=JsonGet(
        step_name=step_evaluate_model.name,
        property_file=evaluation_report,
        json_path="binary_classification_metrics.accuracy.value",
    ),
    right=0.7,
)

# Create a Sagemaker Pipelines ConditionStep, using the condition above.
# Enter the steps to perform if the condition returns True / False.
step_cond = ConditionStep(
    name="Accuracy-Condition",
    conditions=[cond_gte],
    if_steps=[step_register_model],
    else_steps=[],
)
Now that all pipeline steps are created, a pipeline is created.
[ ]:
from sagemaker.workflow.pipeline import Pipeline

# Create a Sagemaker Pipeline.
# Each parameter for the pipeline must be set as a parameter explicitly when the pipeline is created.
# Also pass in each of the steps created above.
# Note that the order of execution is determined from each step's dependencies on other steps,
# not on the order they are passed in below.
pipeline = Pipeline(
    name=pipeline_name,
    parameters=[
        processing_instance_type,
        processing_instance_count,
        training_instance_type,
        model_approval_status,
        input_data,
    ],
    steps=[step_preprocess_data, step_train_model, step_evaluate_model, step_cond],
)
Submit pipeline, and start it.
[ ]:
# Submit pipline
pipeline.upsert(role_arn=role)

# Execute pipeline using the default parameters.
execution = pipeline.start()

execution.wait()

# List the execution steps to check out the status and artifacts:
execution.list_steps()
Visualize SageMaker Pipeline DAG
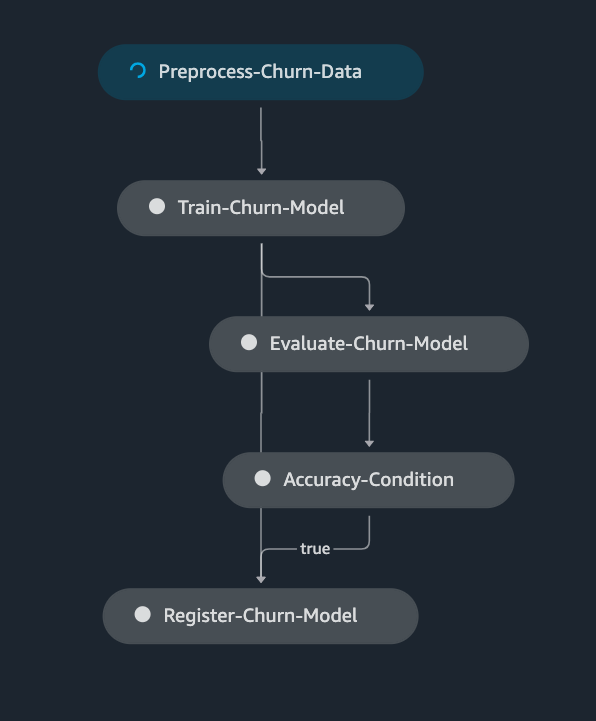
In SageMaker Studio, choose SageMaker Components and registries in the left pane and under Pipelines, click the pipeline that was created. Then all pipeline executions are shown and the one just created should have a status of Executing. Selecting that execution, the different pipeline steps can be tracked as they execute.
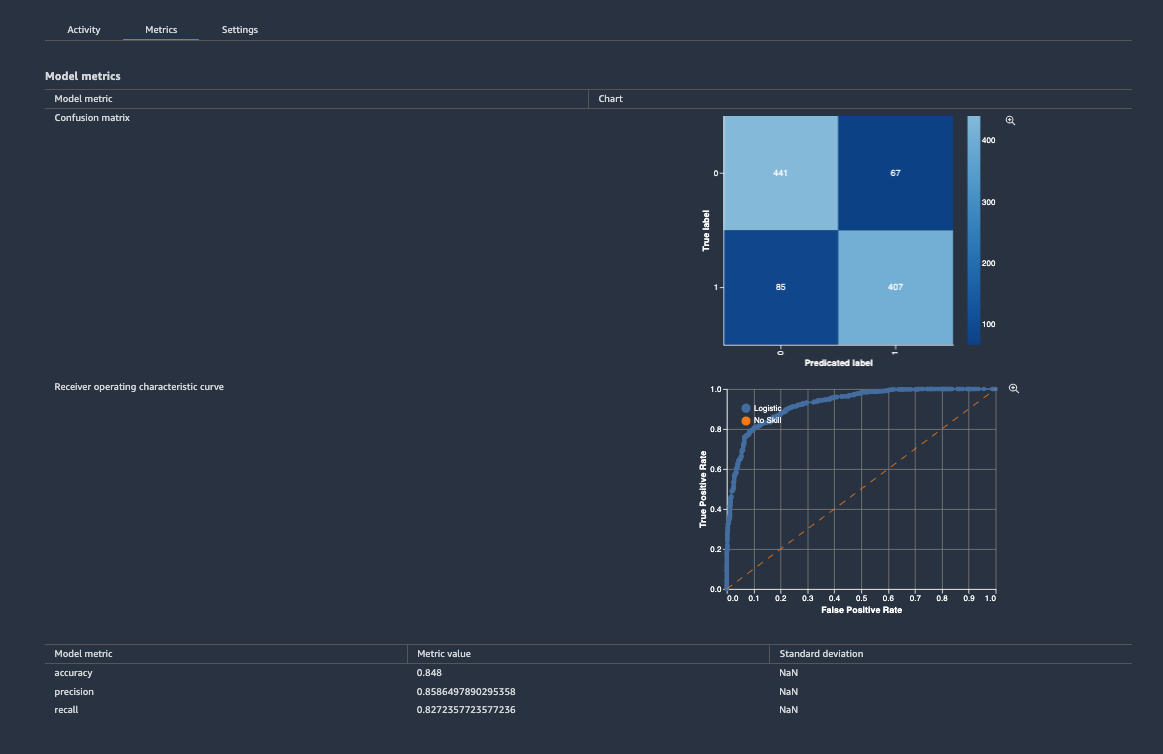
Visualize model performance metrics
Once the pipeline has completed successfully, metrics attached to the model version can be visualized. In SageMaker Studio, choose SageMaker Components and registries in the left pane and under Model registry, select the model package that was created. If a new model package group was created, only one model version should be visible. Click that version and visualize the model performance metrics.
Compare model performance metrics
When there are more than one model version, they can be visualized side by side.
Run the pipeline again, but with a larger dataset.
[ ]:
# Execute pipeline with explicit parameters
execution = pipeline.start(
    parameters=dict(
        InputData=large_input_data_uri,
    )
)

execution.wait()
Visualize
Select both versions and right-click. Choose Compare model versions.
Delete the model registry and the pipeline to keep the studio environment tidy.
[ ]:
def delete_model_package_group(sm_client, package_group_name):
    try:
        model_versions = sm_client.list_model_packages(ModelPackageGroupName=package_group_name)

    except Exception as e:
        print("{} \n".format(e))
        return

    for model_version in model_versions["ModelPackageSummaryList"]:
        try:
            sm_client.delete_model_package(ModelPackageName=model_version["ModelPackageArn"])
        except Exception as e:
            print("{} \n".format(e))
        time.sleep(0.5)  # Ensure requests aren't throttled

    try:
        sm_client.delete_model_package_group(ModelPackageGroupName=package_group_name)
        print("{} model package group deleted".format(package_group_name))
    except Exception as e:
        print("{} \n".format(e))
    return


def delete_sagemaker_pipeline(sm_client, pipeline_name):
    try:
        sm_client.delete_pipeline(
            PipelineName=pipeline_name,
        )
        print("{} pipeline deleted".format(pipeline_name))
    except Exception as e:
        print("{} \n".format(e))
        return
[ ]:
import boto3
import time

client = boto3.client("sagemaker")

delete_model_package_group(client, model_package_group_name)
delete_sagemaker_pipeline(client, pipeline_name)
This notebook was tested in multiple regions. The test results are as follows, except for us-west-2 which is shown at the top of the notebook.