Use Your Own Inference Code with Amazon SageMaker XGBoost Algorithm
This notebook’s CI test result for us-west-2 is as follows. CI test results in other regions can be found at the end of the notebook.

Customized inference for computing SHAP values with Amazon SageMaker XGBoost script mode
Contents
Introduction
This notebook shows how you can configure the SageMaker XGBoost model server by defining the following three functions in the Python source file you pass to the XGBoost constructor in the SageMaker Python SDK: - input_fn: Takes request data and deserializes the data into an object for prediction, - predict_fn: Takes the deserialized request object and performs inference against the loaded model, and - output_fn: Takes the result of prediction and serializes this according to the
response content type. We will write a customized inference script that is designed to illustrate how SHAP values enable the interpretion of XGBoost models.
We use the Abalone data, originally from the UCI data repository. More details about the original dataset can be found here. In this libsvm converted version, the nominal feature (Male/Female/Infant) has been converted into a real valued feature as required by XGBoost. Age of abalone is to be predicted from eight physical measurements.
This notebook uses the Abalone dataset to deploy a model server that returns SHAP values, which enable us to create model explanation such as the following plots that show each features contributing to push the model output from the base value.
|
|
Setup
This notebook was tested in Amazon SageMaker Studio on a ml.t3.medium instance with Python 3 (Data Science) kernel.
Let’s start by specifying: 1. The S3 bucket and prefix that you want to use for training and model data. This should be within the same region as the Notebook Instance, training, and hosting. 2. The IAM role arn used to give training and hosting access to your data. See the documentation for how to create these. Note, if more than one role is required for notebook instances, training, and/or hosting, please replace the boto regex with a the appropriate full IAM role arn string(s).
[ ]:
!pip install --upgrade sagemaker
[ ]:
%%time

import io
import os
import boto3
import sagemaker
import time

role = sagemaker.get_execution_role()
region = boto3.Session().region_name

# S3 bucket for saving code and model artifacts.
# Feel free to specify a different bucket here if you wish.
bucket = sagemaker.Session().default_bucket()
s3_bucket_prefix = "sagemaker/DEMO-xgboost-inference-script-mode"
default_bucket_prefix = sagemaker.Session().default_bucket_prefix

# If a default bucket prefix is specified, append it to the s3 path
if default_bucket_prefix:
    prefix = f"{default_bucket_prefix}/{s3_bucket_prefix}"
else:
    prefix = s3_bucket_prefix
Fetching the dataset
The following methods download the Abalone dataset and upload files to S3.
[ ]:
%%time
s3 = boto3.client("s3")
# Load the dataset
FILE_DATA = "abalone"
s3.download_file(
    f"sagemaker-example-files-prod-{region}",
    f"datasets/tabular/uci_abalone/abalone.libsvm",
    FILE_DATA,
)
sagemaker.Session().upload_data(FILE_DATA, bucket=bucket, key_prefix=prefix + "/train")
Train the XGBoost model
SageMaker can now run an XGboost script using the XGBoost estimator. A typical training script loads data from the input channels, configures training with hyperparameters, trains a model, and saves a model to model_dir so that it can be hosted later. In this notebook, we use the same training script abalone.py from Regression with Amazon SageMaker XGBoost
algorithm. Refer to Regression with Amazon SageMaker XGBoost algorithm for details on the training script.
After setting training parameters, we kick off training, and poll for status until training is completed, which in this example, takes between few minutes.
To run our training script on SageMaker, we construct a sagemaker.xgboost.estimator.XGBoost estimator, which accepts several constructor arguments:
entry_point: The path to the Python script SageMaker runs for training and prediction.
role: Role ARN
framework_version: SageMaker XGBoost version you want to use for executing your model training code, e.g.,
1.0-1,1.2-2,1.3-1,1.5-1, or1.7-1.train_instance_type (optional): The type of SageMaker instances for training. Note: Because Scikit-learn does not natively support GPU training, Sagemaker Scikit-learn does not currently support training on GPU instance types.
sagemaker_session (optional): The session used to train on Sagemaker.
hyperparameters (optional): A dictionary passed to the train function as hyperparameters.
[ ]:
from sagemaker.inputs import TrainingInput
from sagemaker.xgboost.estimator import XGBoost


job_name = "DEMO-xgboost-inference-script-mode-" + time.strftime("%Y-%m-%d-%H-%M-%S", time.gmtime())
print("Training job", job_name)

hyperparameters = {
    "max_depth": "5",
    "eta": "0.2",
    "gamma": "4",
    "min_child_weight": "6",
    "subsample": "0.7",
    "objective": "reg:squarederror",
    "num_round": "50",
    "verbosity": "2",
}

instance_type = "ml.c5.xlarge"

xgb_script_mode_estimator = XGBoost(
    entry_point="abalone.py",
    hyperparameters=hyperparameters,
    role=role,
    instance_count=1,
    instance_type=instance_type,
    framework_version="1.7-1",
    output_path="s3://{}/{}/{}/output".format(bucket, prefix, job_name),
)

content_type = "text/libsvm"
train_input = TrainingInput(
    "s3://{}/{}/{}/".format(bucket, prefix, "train"), content_type=content_type
)
Train with XGBoost Estimator on Abalone Data
Training is as simple as calling fit on the Estimator. This will start a SageMaker Training job that will download the data, invoke the entry point code (in the provided script file), and save any model artifacts that the script creates. In this case, the script requires a train and a validation channel. Since we only created a train channel, we re-use it for validation.
[ ]:
xgb_script_mode_estimator.fit({"train": train_input, "validation": train_input}, job_name=job_name)
Train with Automatic Model Tuning (HPO)
Instead of maunally configuring your hyper parameter values and training with SageMaker Training, you could also train with Amazon SageMaker Automatic Model Tuning. AMT, also known as hyperparameter tuning, finds the best version of a model by running many training jobs on your dataset using the algorithm and ranges of hyperparameters that you specify. It then chooses the hyperparameter values that result in a model that performs the best, as measured by a metric that you choose. We will use a HyperparameterTuner object to interact with Amazon SageMaker hyperparameter tuning APIs.
The code sample below shows you how to use the HyperParameterTuner. ***
[ ]:
from sagemaker.tuner import ContinuousParameter, IntegerParameter
from sagemaker.utils import name_from_base
from sagemaker.tuner import HyperparameterTuner


# You can select from the hyperparameters supported by the model, and configure ranges of values to be searched for training the optimal model.(https://docs.aws.amazon.com/sagemaker/latest/dg/automatic-model-tuning-define-ranges.html)
hyperparameter_ranges = {
    "max_depth": IntegerParameter(0, 10, scaling_type="Auto"),
    "num_round": IntegerParameter(1, 4000, scaling_type="Auto"),
    "alpha": ContinuousParameter(0, 2, scaling_type="Auto"),
    "subsample": ContinuousParameter(0.5, 1, scaling_type="Auto"),
    "min_child_weight": ContinuousParameter(0, 120, scaling_type="Auto"),
    "gamma": ContinuousParameter(0, 5, scaling_type="Auto"),
    "eta": ContinuousParameter(0.1, 0.5, scaling_type="Auto"),
}

# Increase the total number of training jobs run by AMT, for increased accuracy (and training time).
max_jobs = 6
# Change parallel training jobs run by AMT to reduce total training time, constrained by your account limits.
# if max_jobs=max_parallel_jobs then Bayesian search turns to Random.
max_parallel_jobs = 2

hp_tuner = HyperparameterTuner(
    xgb_script_mode_estimator,
    "validation:rmse",
    hyperparameter_ranges,
    max_jobs=max_jobs,
    max_parallel_jobs=max_parallel_jobs,
    objective_type="Minimize",
    base_tuning_job_name=job_name,
)

# Launch a SageMaker Tuning job to search for the best hyperparameters
hp_tuner.fit({"train": train_input, "validation": train_input})
Deploying the XGBoost endpoint
After training, we can host the newly created model in SageMaker, and create an Amazon SageMaker endpoint – a hosted and managed prediction service that we can use to perform inference. If you call deploy after you call fit on an XGBoost estimator, it will create a SageMaker endpoint using the training script (i.e., entry_point). You can also optionally specify other functions to customize the behavior of deserialization of the input request (input_fn()), serialization of the
predictions (output_fn()), and how predictions are made (predict_fn()). If any of these functions are not specified, the endpoint will use the default functions in the SageMaker XGBoost container. See the SageMaker Python SDK documentation for details.
In this notebook, we will run a separate inference script and customize the endpoint to return SHAP values in addition to predictions. The inference script that we will run in this notebook is provided as the accompanying file (inference.py) and also shown below:
import json
import os
import pickle as pkl

import numpy as np

import sagemaker_xgboost_container.encoder as xgb_encoders


def model_fn(model_dir):
    """
    Deserialize and return fitted model.
    """
    model_file = "xgboost-model"
    booster = pkl.load(open(os.path.join(model_dir, model_file), "rb"))
    return booster


def input_fn(request_body, request_content_type):
    """
    The SageMaker XGBoost model server receives the request data body and the content type,
    and invokes the `input_fn`.

    Return a DMatrix (an object that can be passed to predict_fn).
    """
    if request_content_type == "text/libsvm":
        return xgb_encoders.libsvm_to_dmatrix(request_body)
    else:
        raise ValueError(
            "Content type {} is not supported.".format(request_content_type)
        )


def predict_fn(input_data, model):
    """
    SageMaker XGBoost model server invokes `predict_fn` on the return value of `input_fn`.

    Return a two-dimensional NumPy array where the first columns are predictions
    and the remaining columns are the feature contributions (SHAP values) for that prediction.
    """
    prediction = model.predict(input_data)
    feature_contribs = model.predict(input_data, pred_contribs=True, validate_features=False)
    output = np.hstack((prediction[:, np.newaxis], feature_contribs))
    return output


def output_fn(predictions, content_type):
    """
    After invoking predict_fn, the model server invokes `output_fn`.
    """
    if content_type == "text/csv":
        return ','.join(str(x) for x in predictions[0])
    else:
        raise ValueError("Content type {} is not supported.".format(content_type))
transform_fn
If you would rather not structure your code around the three methods described above, you can instead define your own transform_fn to handle inference requests. An error is thrown if a transform_fn is present in conjunction with any input_fn, predict_fn, and/or output_fn. In our case, the transform_fn would look as follows:
def transform_fn(model, request_body, content_type, accept_type):
    dmatrix = xgb_encoders.libsvm_to_dmatrix(request_body)
    prediction = model.predict(dmatrix)
    feature_contribs = model.predict(dmatrix, pred_contribs=True, validate_features=False)
    output = np.hstack((prediction[:, np.newaxis], feature_contribs))
    return ','.join(str(x) for x in predictions[0])
where model is the model object loaded by model_fn, request_body is the data from the inference request, content_type is the content type of the request, and accept_type is the request content type for the response.
Deploy to an endpoint
Since the inference script is separate from the training script, here we use XGBoostModel to create a model from s3 artifacts and specify inference.py as the entry_point.
[ ]:
from sagemaker.xgboost.model import XGBoostModel

model_data = xgb_script_mode_estimator.model_data
print(model_data)

xgb_inference_model = XGBoostModel(
    model_data=model_data,
    role=role,
    entry_point="inference.py",
    framework_version="1.7-1",
)
[ ]:
predictor = xgb_inference_model.deploy(
    initial_instance_count=1,
    instance_type="ml.c5.xlarge",
)
Explain the model’s predictions on each data point
[ ]:
import numpy as np
import matplotlib.pyplot as plt
import pandas as pd
import seaborn as sns


def plot_feature_contributions(prediction):
    attribute_names = [
        "Sex",  # nominal / -- / M, F, and I (infant)
        "Length",  # continuous / mm / Longest shell measurement
        "Diameter",  # continuous / mm / perpendicular to length
        "Height",  # continuous / mm / with meat in shell
        "Whole weight",  # continuous / grams / whole abalone
        "Shucked weight",  # continuous / grams / weight of meat
        "Viscera weight",  # continuous / grams / gut weight (after bleeding)
        "Shell weight",  # continuous / grams / after being dried
    ]

    prediction, _, *shap_values, bias = prediction

    if len(shap_values) != len(attribute_names):
        raise ValueError("Length mismatch between shap values and attribute names.")

    df = pd.DataFrame(data=[shap_values], index=["SHAP"], columns=attribute_names).T
    df.sort_values(by="SHAP", inplace=True)

    df["bar_start"] = bias + df.SHAP.cumsum().shift().fillna(0.0)
    df["bar_end"] = df.bar_start + df.SHAP
    df[["bar_start", "bar_end"]] = np.sort(df[["bar_start", "bar_end"]].values)
    df["hue"] = df.SHAP.apply(lambda x: 0 if x > 0 else 1)

    sns.set(style="white")

    ax1 = sns.barplot(x=df.bar_end, y=df.index, data=df, orient="h", palette="vlag")
    for idx, patch in enumerate(ax1.patches):
        x_val = patch.get_x() + patch.get_width() + 0.8
        y_val = patch.get_y() + patch.get_height() / 2
        shap_value = df.SHAP.values[idx]
        value = "{0}{1:.2f}".format("+" if shap_value > 0 else "-", shap_value)
        ax1.annotate(value, (x_val, y_val), ha="right", va="center")

    ax2 = sns.barplot(x=df.bar_start, y=df.index, data=df, orient="h", color="#FFFFFF")
    ax2.set_xlim(
        df[["bar_start", "bar_end"]].values.min() - 1, df[["bar_start", "bar_end"]].values.max() + 1
    )
    ax2.axvline(x=bias, color="#000000", alpha=0.2, linestyle="--", linewidth=1)
    ax2.set_title("base value: {0:.1f}  →  model output: {1:.1f}".format(bias, prediction))
    ax2.set_xlabel("Abalone age")

    sns.despine(left=True, bottom=True)

    plt.tight_layout()
    plt.show()


def predict_and_plot(predictor, libsvm_str):
    label, *features = libsvm_str.strip().split()
    predictions = predictor.predict(" ".join(["-99"] + features))  # use dummy label -99
    np_array = np.array([float(x) for x in predictions[0]])
    plot_feature_contributions(np_array)
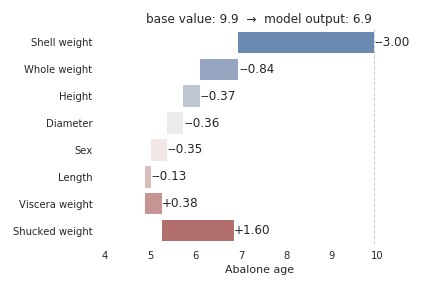
The below figure shows features each contributing to push the model output from the base value (9.9 rings) to the model output (6.9 rings). The primary indicator for a young abalone according to the model is low shell weight, which decreases the prediction by 3.0 rings from the base value of 9.9 rings. Whole weight and shucked weight are also powerful indicators. The whole weight pushes the prediction lower by 0.84 rings, while shucked weight pushes the prediction higher by 1.6 rings.
[ ]:
a_young_abalone = "6 1:3 2:0.37 3:0.29 4:0.095 5:0.249 6:0.1045 7:0.058 8:0.067"
predict_and_plot(predictor, a_young_abalone)
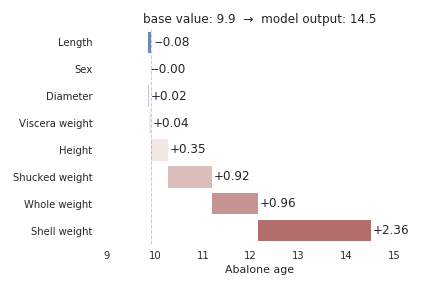
The second example shows feature contributions for another sample, an old abalone. We again see that the primary indicator for the age of abalone according to the model is shell weight, which increases the model prediction by 2.36 rings. Whole weight and shucked weight also contribute significantly, and they both push the model’s prediction higher.
[ ]:
an_old_abalone = "15 1:1 2:0.655 3:0.53 4:0.175 5:1.2635 6:0.486 7:0.2635 8:0.415"
predict_and_plot(predictor, an_old_abalone)
(Optional) Delete the Endpoint
If you’re done with this exercise, please run the delete_endpoint line in the cell below. This will remove the hosted endpoint and avoid any charges from a stray instance being left on.
[ ]:
predictor.delete_endpoint()
Notebook CI Test Results
This notebook was tested in multiple regions. The test results are as follows, except for us-west-2 which is shown at the top of the notebook.


