Fraud Detection for Automobile Claims: Data Preparation, Process, and Store Features
This notebook’s CI test result for us-west-2 is as follows. CI test results in other regions can be found at the end of the notebook.
Background
This notebook is the second part of a series of notebooks that will demonstrate how to prepare, train, and deploy a model that detects fradulent auto claims. In this notebook, we will be preparing, processing, and storing features using SageMaker Feature Store. You can choose to run this notebook by itself or in sequence with the other notebooks listed below. Please see the README.md for more information about this use case implemented by this series of notebooks.
Contents
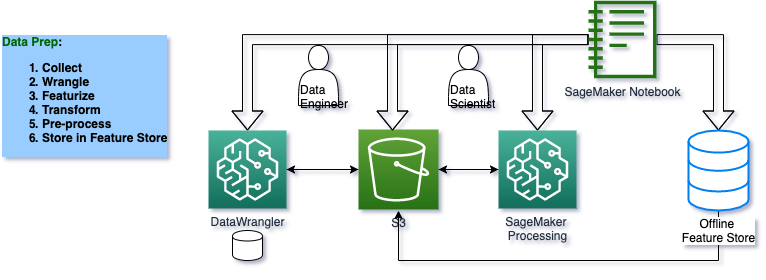
The purpose of this notebook is to perform the Data Prep phase of the ML life cycle. The main Data Wrangling, data ingestion, and multiple transformations will be done through the SageMaker Studio Data Wrangler GUI.
In this notebook, we will take the .flow files that define the transformations to the raw data. and apply them using a SageMaker Processing job that will apply those transformations to the raw data deposited in the S3 bucket as .csv files.
## Architecture for Data Prep, Process and Store Features
Install required and/or update third-party libraries
[ ]:
!python -m pip install -Uq pip
!python -m pip install -q awswrangler==2.20.1 imbalanced-learn==0.10.1 sagemaker==2.139.0 boto3==1.26.97
Import libraries
[ ]:
import json
import time
import boto3
import string
import sagemaker
import pandas as pd
import awswrangler as wr

from sagemaker.feature_store.feature_group import FeatureGroup
## Getting Started: Creating Resources
In order to successfully run this notebook you will need to create some AWS resources. First, an S3 bucket will be created to store all the data for this tutorial. Once created, you will then need to create an AWS Glue role using the IAM console then attach a policy to the S3 bucket to allow FeatureStore access to this notebook. If you’ve already run this notebook and are picking up where you left off, then running the cells below should pick up the resources you already created without creating any additional resources.
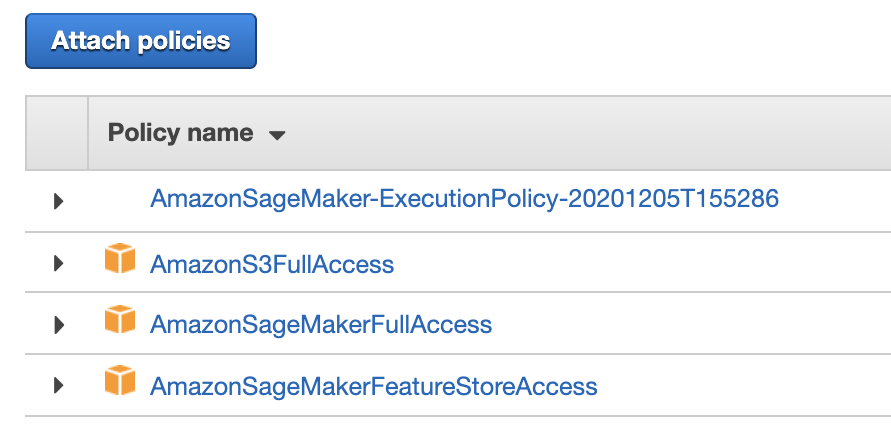
In a separate brower tab go to the IAM section of the AWS Console
Navigate to the Roles section and select the execution role you’re using for your SageMaker Studio user
If you’re not sure what role you’re using, run the cell below to print it out
Attach the AmazonSageMakerFeatureStoreAccess policy to this role. Once attached, the changes take effect immediately.
[ ]:
print("SageMaker Role:", sagemaker.get_execution_role().split("/")[-1])
Set region, boto3 and SageMaker SDK variables
[ ]:
# You can change this to a region of your choice
import sagemaker

region = sagemaker.Session().boto_region_name
print("Using AWS Region: {}".format(region))
[ ]:
boto3.setup_default_session(region_name=region)

boto_session = boto3.Session(region_name=region)

s3_client = boto3.client("s3", region_name=region)

sagemaker_boto_client = boto_session.client("sagemaker")

sagemaker_session = sagemaker.session.Session(
    boto_session=boto_session, sagemaker_client=sagemaker_boto_client
)
[ ]:
"""
Note: if you are not running this notebook from SageMaker Studio or SageMaker Classic Notebooks you will need to instanatiate
the sagemaker_execution_role_name with an AWS role that has SageMakerFullAccess and SageMakerFeatureStoreFullAccess
"""
sagemaker_execution_role_name = "AmazonSageMaker-ExecutionRole-20210107T234882"
try:
    sagemaker_role = sagemaker.get_execution_role()
except ValueError:
    iam = boto3.client("iam")
    sagemaker_role = iam.get_role(RoleName=sagemaker_execution_role_name)["Role"]["Arn"]
    print(f"\n instantiating sagemaker_role with supplied role name : {sagemaker_role}")

account_id = boto3.client("sts").get_caller_identity()["Account"]
Create a directory in the SageMaker default bucket for this tutorial
[ ]:
if "bucket" not in locals():
    bucket = sagemaker_session.default_bucket()
    prefix = "fraud-detect-demo"
    %store bucket
    %store prefix
    print(f"Creating bucket: {bucket}...")
If you want to use your own S3 bucket that’s already existing, uncomment and utilize the following example code.
[ ]:
"""
try:
    s3_client.create_bucket(Bucket=bucket, ACL='private', CreateBucketConfiguration={'LocationConstraint': region})
    print('Create S3 bucket: SUCCESS')

except Exception as e:
    if e.response['Error']['Code'] == 'BucketAlreadyOwnedByYou':
        print(f'Using existing bucket: {bucket}/{prefix}')
    else:
        raise(e)
"""
[ ]:
# ======> Tons of output_paths
traing_job_output_path = f"s3://{bucket}/{prefix}/training_jobs"
bias_report_1_output_path = f"s3://{bucket}/{prefix}/clarify-bias-1"
bias_report_2_output_path = f"s3://{bucket}/{prefix}/clarify-bias-2"
explainability_output_path = f"s3://{bucket}/{prefix}/clarify-explainability"

train_data_uri = f"s3://{bucket}/{prefix}/data/train/train.csv"
test_data_uri = f"s3://{bucket}/{prefix}/data/test/test.csv"

# =======> variables used for parameterizing the notebook run
train_instance_count = 1
train_instance_type = "ml.m4.xlarge"

claify_instance_count = 1
clairfy_instance_type = "ml.c5.xlarge"

predictor_instance_count = 1
predictor_instance_type = "ml.c5.xlarge"
Upload raw data to S3
Before you can preprocess the raw data with Data Wrangler, it must exist in S3.
[ ]:
s3_client.upload_file(
    Filename="data/claims.csv", Bucket=bucket, Key=f"{prefix}/data/raw/claims.csv"
)
s3_client.upload_file(
    Filename="data/customers.csv", Bucket=bucket, Key=f"{prefix}/data/raw/customers.csv"
)
Update attributes within the .flow file
DataWrangler will generate a .flow file. It contains a reference to an S3 bucket used during the Wrangling. This may be different from the one you have as a default in this notebook eg if the Wrangling was done by someone else, you will probably not have access to their bucket and you now need to point to your own S3 bucket so you can actually load the .flow file into Wrangler or access the data.
After running the cell below you can open the claims.flow and customers.flow files and export the data to S3 or you can continue the guide using the provided data/claims_preprocessed.csv and data/customers_preprocessed.csv files.
[ ]:
claims_flow_template_file = "claims_flow_template"

with open(claims_flow_template_file, "r") as f:
    variables = {"bucket": bucket, "prefix": prefix}
    template = string.Template(f.read())
    claims_flow = template.substitute(variables)
    claims_flow = json.loads(claims_flow)

with open("claims.flow", "w") as f:
    json.dump(claims_flow, f)

customers_flow_template_file = "customers_flow_template"

with open(customers_flow_template_file, "r") as f:
    variables = {"bucket": bucket, "prefix": prefix}
    template = string.Template(f.read())
    customers_flow = template.substitute(variables)
    customers_flow = json.loads(customers_flow)

with open("customers.flow", "w") as f:
    json.dump(customers_flow, f)
Load preprocessed data from Data Wrangler job
If you ran the Data Wrangler jobs from claims.flow and customers.flow, you can load your preprocessed data here. If you did not run the Data Wrangler job, you can still get started by loading the pre-made data sets from the /data directory of this example.
## Datasets and Feature Types
[ ]:
claims_dtypes = {
    "policy_id": int,
    "incident_severity": int,
    "num_vehicles_involved": int,
    "num_injuries": int,
    "num_witnesses": int,
    "police_report_available": int,
    "injury_claim": float,
    "vehicle_claim": float,
    "total_claim_amount": float,
    "incident_month": int,
    "incident_day": int,
    "incident_dow": int,
    "incident_hour": int,
    "fraud": int,
    "driver_relationship_self": int,
    "driver_relationship_na": int,
    "driver_relationship_spouse": int,
    "driver_relationship_child": int,
    "driver_relationship_other": int,
    "incident_type_collision": int,
    "incident_type_breakin": int,
    "incident_type_theft": int,
    "collision_type_front": int,
    "collision_type_rear": int,
    "collision_type_side": int,
    "collision_type_na": int,
    "authorities_contacted_police": int,
    "authorities_contacted_none": int,
    "authorities_contacted_fire": int,
    "authorities_contacted_ambulance": int,
    "event_time": float,
}

customers_dtypes = {
    "policy_id": int,
    "customer_age": int,
    "customer_education": int,
    "months_as_customer": int,
    "policy_deductable": int,
    "policy_annual_premium": int,
    "policy_liability": int,
    "auto_year": int,
    "num_claims_past_year": int,
    "num_insurers_past_5_years": int,
    "customer_gender_male": int,
    "customer_gender_female": int,
    "policy_state_ca": int,
    "policy_state_wa": int,
    "policy_state_az": int,
    "policy_state_or": int,
    "policy_state_nv": int,
    "policy_state_id": int,
    "event_time": float,
}
[ ]:
# ======> This is your DataFlow output path if you decide to redo the work in DataFlow on your own
# flow_output_path = <YOUR_PATH_HERE>
claims_flow_path = ""
customers_flow_path = ""

try:
    # this will try to load the exported dataframes from the claims and customers .flow files
    claims_s3_path = f"{flow_output_path}/claims_output"
    customers_s3_path = f"{flow_output_path}/customers_output"

    claims_preprocessed = wr.s3.read_csv(path=claims_s3_path, dataset=True, dtype=claims_dtypes)

    customers_preprocessed = wr.s3.read_csv(
        path=customers_s3_path, dataset=True, dtype=customers_dtypes
    )

except:
    # if the Data Wrangler job was not run, the claims and customers dataframes will be loaded from local copies
    timestamp = pd.to_datetime("now").timestamp()
    print("Unable to load Data Wrangler output. Loading pre-made dataframes...")

    claims_preprocessed = pd.read_csv(
        filepath_or_buffer="data/claims_preprocessed.csv", dtype=claims_dtypes
    )

    # a timestamp column is required by the feature store, so one is added with a current timestamp
    claims_preprocessed["event_time"] = timestamp

    customers_preprocessed = pd.read_csv(
        filepath_or_buffer="data/customers_preprocessed.csv", dtype=customers_dtypes
    )

    customers_preprocessed["event_time"] = timestamp

    print("Complete")
We now have a set of Pandas DataFrames that contain the customer and claim data, with the correct data types. When Dat Wrangler encodes a feature as one-hot-encoded feature, it will default to float data types for those resulting features (one feature –> many columns for the one hot encoding).
Note: the reason for explicitly converting the data types for categorical features generated by Data Wrangler, is to ensure they are of type integer so that Clarify will treat them as categorical variables.
## SageMaker Feature Store
Amazon SageMaker Feature Store is a purpose-built repository where you can store and access features so it’s much easier to name, organize, and reuse them across teams. SageMaker Feature Store provides a unified store for features during training and real-time inference without the need to write additional code or create manual processes to keep features consistent. SageMaker Feature Store keeps track of the metadata of stored features (e.g. feature name or version number) so that you can query the features for the right attributes in batches or in real time using Amazon Athena, an interactive query service. SageMaker Feature Store also keeps features updated, because as new data is generated during inference, the single repository is updated so new features are always available for models to use during training and inference.
A feature store consists of an offline componet stored in S3 and an online component stored in a low-latency database. The online database is optional, but very useful if you need supplemental features to be available at inference. In this section, we will create a feature groups for our Claims and Customers datasets. After inserting the claims and customer data into their respective feature groups, you need to query the offline store with Athena to build the training dataset.
You can reference the SageMaker Developer Guide for more information about the SageMaker Feature Store.
[ ]:
featurestore_runtime = boto_session.client(
    service_name="sagemaker-featurestore-runtime", region_name=region
)

feature_store_session = sagemaker.Session(
    boto_session=boto_session,
    sagemaker_client=sagemaker_boto_client,
    sagemaker_featurestore_runtime_client=featurestore_runtime,
)
Configure the feature groups
The datatype for each feature is set by passing a dataframe and inferring the proper datatype. Feature data types can also be set via a config variable, but it will have to match the correspongin Python data type in the Pandas dataframe when it’s ingested to the Feature Group.
[ ]:
claims_fg_name = f"{prefix}-claims"
customers_fg_name = f"{prefix}-customers"
%store claims_fg_name
%store customers_fg_name

claims_feature_group = FeatureGroup(name=claims_fg_name, sagemaker_session=feature_store_session)

customers_feature_group = FeatureGroup(
    name=customers_fg_name, sagemaker_session=feature_store_session
)

claims_feature_group.load_feature_definitions(data_frame=claims_preprocessed)
customers_feature_group.load_feature_definitions(data_frame=customers_preprocessed);
Create the feature groups
You must tell the Feature Group which columns in the dataframe correspond to the required record indentifier and event time features.
[ ]:
print(f"{customers_fg_name} -- {claims_fg_name} are the feature group names in use")
[ ]:
record_identifier_feature_name = "policy_id"
event_time_feature_name = "event_time"

try:
    print(f"\n Using s3://{bucket}/{prefix}")
    claims_feature_group.create(
        s3_uri=f"s3://{bucket}/{prefix}",
        record_identifier_name=record_identifier_feature_name,
        event_time_feature_name=event_time_feature_name,
        role_arn=sagemaker_role,
        enable_online_store=True,
    )
    print(f'Create "claims" feature group: SUCCESS')
except Exception as e:
    code = e.response.get("Error").get("Code")
    if code == "ResourceInUse":
        print(f"Using existing feature group: {claims_fg_name}")
    else:
        raise (e)

try:
    customers_feature_group.create(
        s3_uri=f"s3://{bucket}/{prefix}",
        record_identifier_name=record_identifier_feature_name,
        event_time_feature_name=event_time_feature_name,
        role_arn=sagemaker_role,
        enable_online_store=True,
    )
    print(f'Create "customers" feature group: SUCCESS')
except Exception as e:
    code = e.response.get("Error").get("Code")
    if code == "ResourceInUse":
        print(f"Using existing feature group: {customers_fg_name}")
    else:
        raise (e)
Wait until feature group creation has fully completed
[ ]:
def wait_for_feature_group_creation_complete(feature_group):
    status = feature_group.describe().get("FeatureGroupStatus")
    while status == "Creating":
        print("Waiting for Feature Group Creation")
        time.sleep(5)
        status = feature_group.describe().get("FeatureGroupStatus")
    if status != "Created":
        raise RuntimeError(f"Failed to create feature group {feature_group.name}")
    print(f"FeatureGroup {feature_group.name} successfully created.")


wait_for_feature_group_creation_complete(feature_group=claims_feature_group)
wait_for_feature_group_creation_complete(feature_group=customers_feature_group)
Ingest records into the Feature Groups
After the Feature Groups have been created, we can put data into each store by using the PutRecord API. This API can handle high TPS and is designed to be called by different streams. The data from all of these Put requests is buffered and written to s3 in chunks. The files will be written to the offline store within a few minutes of ingestion.
[ ]:
if "claims_table" in locals():
    print(
        "You may have already ingested the data into your Feature Groups. If you'd like to do this again, you can run the ingest methods outside of the 'if/else' statement."
    )

else:
    claims_feature_group.ingest(data_frame=claims_preprocessed, max_workers=3, wait=True)

    customers_feature_group.ingest(data_frame=customers_preprocessed, max_workers=3, wait=True);
Wait for offline store data to become available
This usually takes 5-8 minutes
[ ]:
if "claims_table" not in locals():
    claims_table = claims_feature_group.describe()["OfflineStoreConfig"]["DataCatalogConfig"][
        "TableName"
    ]
if "customers_table" not in locals():
    customers_table = customers_feature_group.describe()["OfflineStoreConfig"]["DataCatalogConfig"][
        "TableName"
    ]

claims_feature_group_s3_prefix = "/".join(
    claims_feature_group.describe()
    .get("OfflineStoreConfig")
    .get("S3StorageConfig")
    .get("ResolvedOutputS3Uri")
    .split("/")[3:]
)

customers_feature_group_s3_prefix = "/".join(
    customers_feature_group.describe()
    .get("OfflineStoreConfig")
    .get("S3StorageConfig")
    .get("ResolvedOutputS3Uri")
    .split("/")[3:]
)

print(claims_feature_group_s3_prefix)

offline_store_contents = None
while offline_store_contents is None:
    objects_in_bucket = s3_client.list_objects(
        Bucket=bucket, Prefix=customers_feature_group_s3_prefix
    )
    if "Contents" in objects_in_bucket and len(objects_in_bucket["Contents"]) > 1:
        offline_store_contents = objects_in_bucket["Contents"]
    else:
        print("Waiting for data in offline store...")
        time.sleep(60)

print("\nData available.")
[ ]:
claims_feature_group.describe()["OfflineStoreConfig"][
    "DataCatalogConfig"
], customers_feature_group.describe()["OfflineStoreConfig"]["DataCatalogConfig"]
## Create Train and Test Datasets
Once the data is available in the offline store, it will automatically be cataloged and loaded into an Athena table (this is done by default, but can be turned off). In order to build our training and test datasets, you will submit a SQL query to join the the Claims and Customers tables created in Athena.
[ ]:
claims_query = claims_feature_group.athena_query()
customers_query = customers_feature_group.athena_query()

claims_table = claims_query.table_name
customers_table = customers_query.table_name
database_name = customers_query.database
%store claims_table
%store customers_table
%store database_name

feature_columns = list(set(claims_preprocessed.columns) ^ set(customers_preprocessed.columns))
feature_columns_string = ", ".join(f'"{c}"' for c in feature_columns)
feature_columns_string = f'"{claims_table}".policy_id as policy_id, ' + feature_columns_string

query_string = f"""
SELECT DISTINCT {feature_columns_string}
FROM "{claims_table}" LEFT JOIN "{customers_table}"
ON "{claims_table}".policy_id = "{customers_table}".policy_id
"""
[ ]:
claims_query.run(query_string=query_string, output_location=f"s3://{bucket}/{prefix}/query_results")
claims_query.wait()
dataset = claims_query.as_dataframe()
[ ]:
dataset.to_csv("./data/claims_customer.csv")
[ ]:
col_order = ["fraud"] + list(dataset.drop(["fraud", "policy_id"], axis=1).columns)

train = dataset.sample(frac=0.80, random_state=0)[col_order]
test = dataset.drop(train.index)[col_order]
Write train, test data to S3
[ ]:
train.to_csv("data/train.csv", index=False)
test.to_csv("data/test.csv", index=False)
dataset.to_csv("data/dataset.csv", index=True)
[ ]:
train.head(5)
[ ]:
test.head(5)
Notebook CI Test Results
This notebook was tested in multiple regions. The test results are as follows, except for us-west-2 which is shown at the top of the notebook.