Bring Your Own Model with SageMaker Script Mode
This notebook’s CI test result for us-west-2 is as follows. CI test results in other regions can be found at the end of the notebook.
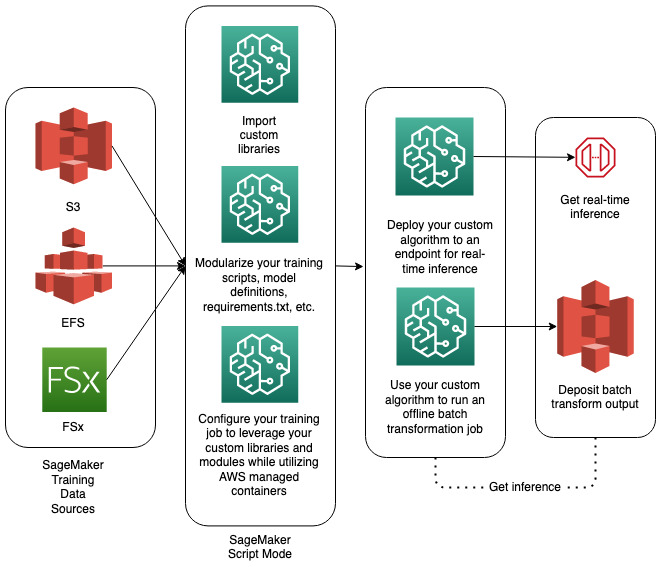
Overview
This notebook will demonstrate how you can bring your own model by using custom training and inference scripts, similar to those you would use outside of SageMaker, with SageMaker’s prebuilt containers for various frameworks like Scikit-learn, PyTorch, and XGBoost.
SageMaker Script Mode is flexible so you’ll also be seeing examples of how to include your own dependencies, such as a custom Python library, in your training and inference.
The following diagram provides a solution overview:
Prerequisites
To follow along, you need to create an IAM role, SageMaker Notebook instance, and S3 bucket. You may click on the CloudFormation button which will create the aforementioned resources and clone the amazon-sagemaker-examples GitHub repo into the notebook instance.  . Give the S3bucket a unique name; you can also give the CloudFormation stack and notebook unique names such as “script mode”. You can leave the other default settings in the CloudFormation template.
Once the SageMaker Notebook instance is created, choose conda_python3 as the kernel.
Imports
[ ]:
import sagemaker
import subprocess
import sys
import random
import math
import pandas as pd
import os
import boto3
import numpy as np
from sklearn.preprocessing import StandardScaler
from sagemaker.pytorch import PyTorch
from sagemaker.xgboost import XGBoost
from sagemaker.sklearn.estimator import SKLearn
from sagemaker.serializers import NumpySerializer, JSONSerializer, CSVSerializer
from sagemaker.deserializers import NumpyDeserializer, JSONDeserializer
from sagemaker.predictor import Predictor
from generate_synthetic_housing_data import *
Make sure your SageMaker version is updated.
[ ]:
# SageMaker Python SDK version 2.x is required
! pip install --upgrade sagemaker
Parameters
[ ]:
random.seed(42)

# Useful SageMaker variables
try:
    # You're using a SageMaker notebook
    sess = sagemaker.Session()
    bucket = sess.default_bucket()
    role = sagemaker.get_execution_role()
except ValueError:
    # You're using a notebook somewhere else
    print("Setting role and SageMaker session manually...")
    bucket = "bobby-demo"
    region = "us-west-2"

    iam = boto3.client("iam")
    sagemaker_client = boto3.client("sagemaker")

    sagemaker_execution_role_name = (
        "AmazonSageMaker-ExecutionRole-20200630T141851"  # Change this to your role name
    )
    role = iam.get_role(RoleName=sagemaker_execution_role_name)["Role"]["Arn"]
    boto3.setup_default_session(region_name=region, profile_name="default")
    sess = sagemaker.Session(sagemaker_client=sagemaker_client, default_bucket=bucket)

# Local data paths
train_dir = os.path.join(os.getcwd(), "data/train")
test_dir = os.path.join(os.getcwd(), "data/test")
os.makedirs(train_dir, exist_ok=True)
os.makedirs(test_dir, exist_ok=True)

# Data paths in S3
s3_prefix = "script-mode-workflow"
csv_s3_prefix = f"{s3_prefix}/csv"
csv_s3_uri = f"s3://{bucket}/{s3_prefix}/csv"
numpy_train_s3_prefix = f"{s3_prefix}/numpy/train"
numpy_train_s3_uri = f"s3://{bucket}/{numpy_train_s3_prefix}"
numpy_test_s3_prefix = f"{s3_prefix}/numpy/test"
numpy_test_s3_uri = f"s3://{bucket}/{numpy_test_s3_prefix}"
csv_train_s3_uri = f"{csv_s3_uri}/train"
csv_test_s3_uri = f"{csv_s3_uri}/test"

# Enable Local Mode training
enable_local_mode_training = False

# Endpoint names
sklearn_endpoint_name = "randomforestregressor-endpoint"
pytorch_endpoint_name = "pytorch-endpoint"
xgboost_endpoint_name = "xgboost-endpoint"
[ ]:
!wget -q https://raw.githubusercontent.com/aws-samples/amazon-sagemaker-script-mode/master/local_mode_setup.sh
!wget -q https://raw.githubusercontent.com/aws-samples/amazon-sagemaker-script-mode/master/daemon.json
!/bin/bash ./local_mode_setup.sh
Prepare Synthetic Housing Data
For all the examples below, we’ll be generating a synthetic housing dataset.
[ ]:
df = generate_houses(1506)

# Get training columns
train_cols = list(df.columns)
del train_cols[-1]
train_cols

# Split data
training_index = math.floor(0.8 * df.shape[0])
x_train, y_train = df[train_cols][:training_index], df.PRICE[:training_index]
x_test, y_test = df[train_cols][training_index:], df.PRICE[training_index:]

# Scale price
y_train = y_train / 100000
y_test = y_test / 100000

# Standardize data
x_train_np = StandardScaler().fit_transform(x_train)
x_test_np = StandardScaler().fit_transform(x_test)
[ ]:
x_train.head()
Rearrange dataframe for SageMaker training and scale price.
[ ]:
train_df = pd.DataFrame(data=x_train_np)
train_df.columns = x_train.columns
train_df["PRICE"] = y_train / 100000
first_col = train_df.pop("PRICE")
train_df.insert(0, "PRICE", first_col)

test_df = pd.DataFrame(data=x_test_np)
test_df.columns = x_test.columns
test_df["PRICE"] = y_test.reset_index(drop=True) / 100000
first_col = test_df.pop("PRICE")
test_df.insert(0, "PRICE", first_col)
Save as both CSV and Numpy data types to demonstrate data type flexibility in model training.
[ ]:
# Save as CSV
train_df.to_csv(f"{train_dir}/train.csv", header=False, index=False)
test_df.to_csv(f"{test_dir}/test.csv", header=False, index=False)

# Save as Numpy
np.save(os.path.join(train_dir, "x_train.npy"), x_train_np)
np.save(os.path.join(test_dir, "x_test.npy"), x_test_np)
np.save(os.path.join(train_dir, "y_train.npy"), y_train)
np.save(os.path.join(test_dir, "y_test.npy"), y_test)
Upload the data to S3
[ ]:
s3_resource_bucket = boto3.Session().resource("s3").Bucket(bucket)
s3_resource_bucket.Object(os.path.join(csv_s3_prefix, "train.csv")).upload_file(
    "data/train/train.csv"
)
s3_resource_bucket.Object(os.path.join(csv_s3_prefix, "test.csv")).upload_file("data/test/test.csv")
s3_resource_bucket.Object(os.path.join(numpy_train_s3_prefix, "x_train.npy")).upload_file(
    "data/train/x_train.npy"
)
s3_resource_bucket.Object(os.path.join(numpy_train_s3_prefix, "y_train.npy")).upload_file(
    "data/train/y_train.npy"
)
s3_resource_bucket.Object(os.path.join(numpy_test_s3_prefix, "x_test.npy")).upload_file(
    "data/test/x_test.npy"
)
s3_resource_bucket.Object(os.path.join(numpy_test_s3_prefix, "y_test.npy")).upload_file(
    "data/test/y_test.npy"
)
Scikit-learn
The first “level” of script mode is the ability to define your own training job, model, and inference process without any dependencies. This is done using a customized python script and pointing that script as the “entry point” when defining your SageMaker training estimator. There is no “out-of-the-box” random forest algorithm on SageMaker, but there is support for scikit-learn containers which does have random forest implementations, including regressors and classifiers. Here, we demonstrate the implementation of a custom random forest regressor to predict housing prices using our synthetic housing data set.
Script Mode in SageMaker allows you to take control of the training and inference process without having to go through the trouble of creating and maintaining your own docker containers. For example, if you want to use a scikit-learn algorithm, just use the AWS-provided scikit-learn container and pass it your own training and inference code. On your behalf, the SageMaker Python SDK will package this entry point script (which can be your training and/or inference code), upload it to S3, and set
two environment variables that are read at runtime and load the custom training and inference functions from the entry point script. These two environment variables are SAGEMAKER_SUBMIT_DIRECTORY which is set to the S3 path of the package and SAGEMAKER_PROGRAM which is set to the name of the script (which in our case is train_deploy_scikitlearn_without_dependencies.py).
The process is the same if you want to use an XGBoost model (use the XGBoost container) or a custom PyTorch model (use the PyTorch container). Since you’re passing in your own script (which is why we call it “script mode”), you get to define the model, the training process, and the inference process as well.
Below we include an entry point script called train_deploy_scikitlearn_without_dependencies.py which contains our custom training and inference code.
[ ]:
hyperparameters = {"max_depth": 20, "n_jobs": 4, "n_estimators": 120}

if enable_local_mode_training:
    train_instance_type = "local"
    inputs = {"train": f"file://{train_dir}", "test": f"file://{test_dir}"}
else:
    train_instance_type = "ml.c5.xlarge"
    inputs = {"train": csv_train_s3_uri, "test": csv_test_s3_uri}

estimator_parameters = {
    "entry_point": "train_deploy_scikitlearn_without_dependencies.py",
    "source_dir": "scikitlearn_script",
    "framework_version": "1.2-1",
    "py_version": "py3",
    "instance_type": train_instance_type,
    "instance_count": 1,
    "hyperparameters": hyperparameters,
    "role": role,
    "base_job_name": "randomforestregressor-model",
}

estimator = SKLearn(**estimator_parameters)
estimator.fit(inputs)
After the estimator finishes training, we can deploy it to a SageMaker endpoint.
[ ]:
existing_endpoints = sess.sagemaker_client.list_endpoints(
    NameContains=sklearn_endpoint_name, MaxResults=30
)["Endpoints"]
if not existing_endpoints:
    sklearn_predictor = estimator.deploy(
        initial_instance_count=1, instance_type="ml.m5.xlarge", endpoint_name=sklearn_endpoint_name
    )
else:
    sklearn_predictor = Predictor(
        endpoint_name="randomforestregressor-endpoint",
        sagemaker_session=sess,
        serializer=NumpySerializer(),
        deserializer=NumpyDeserializer(),
    )
Then we can use the SageMaker endpoint to make predictions.
[ ]:
sklearn_predictor.predict(x_test)
PyTorch
The second “level” of script mode is the ability to modularize and logically organize your custom training jobs, models, and inference processes.
Sometimes keeping all your code in one Python file can be unwieldy. Script Mode gives you the flexibility to parse out your code into multiple Python files. To illustrate this feature we build a custom PyTorch model and logically separate the model definition from the the training and inference logic. This is done by stipulating the source directory when defining your SageMaker training estimator (illustrated below). Once again, the model is not supported “out-of-the-box”, but the PyTorch framework is and can be leveraged in the same manner as scikit-learn was in the previous example.
In this PyTorch example, we want to separate the actual neural network definition from the rest of the code by putting it into its own file as demonstrated in the pytorch_script/ folder.
[ ]:
hyperparameters = {"epochs": 25, "batch_size": 128, "learning_rate": 0.01}

if enable_local_mode_training:
    train_instance_type = "local"
    inputs = {"train": f"file://{train_dir}", "test": f"file://{test_dir}"}
else:
    train_instance_type = "ml.c5.xlarge"
    inputs = {"train": numpy_train_s3_uri, "test": numpy_test_s3_uri}

estimator_parameters = {
    "entry_point": "train_deploy_pytorch_without_dependencies.py",
    "source_dir": "pytorch_script",
    "instance_type": train_instance_type,
    "instance_count": 1,
    "hyperparameters": hyperparameters,
    "role": role,
    "base_job_name": "pytorch-model",
    "framework_version": "1.5",
    "py_version": "py3",
}

estimator = PyTorch(**estimator_parameters)
estimator.fit(inputs)
Again, after the estimator finishes training, we can deploy it to a SageMaker endpoint.
[ ]:
existing_endpoints = sess.sagemaker_client.list_endpoints(
    NameContains=pytorch_endpoint_name, MaxResults=30
)["Endpoints"]
if not existing_endpoints:
    pytorch_predictor = estimator.deploy(
        initial_instance_count=1, instance_type="ml.m5.xlarge", endpoint_name=pytorch_endpoint_name
    )
else:
    pytorch_predictor = Predictor(
        endpoint_name="pytorch-endpoint",
        sagemaker_session=sess,
        serializer=JSONSerializer(),
        deserializer=JSONDeserializer(),
    )
Then we can use the endpoint to make predictions.
[ ]:
pytorch_predictor.serializer = JSONSerializer()
pytorch_predictor.deserializer = JSONDeserializer()

pytorch_predictor.predict(x_test.values[0])
XGBoost
The third “level” of script mode is the ability to bring your own libraries and dependencies to support custom functionality within your models, training jobs, and inference processes. This supercharges your customization options, and allows you to import libraries you have created yourself or Python packages hosted on PyPi.
Perhaps the number of Python files you have is becoming unwieldy now or you want more organization. In this scenario, you might be tempted to create your own Python library. Or maybe you wish to implement a function not currently supported by SageMaker in the training phase (such as k-fold cross validation).
Script Mode supports adding custom libraries and those libraries don’t have to be in the same directory as your entry point Python script. You simply need to stipulate the custom library or other dependencies when defining your SageMaker training estimator (illustrated below). SageMaker will copy the library folder to the same folder where the entry point script is located when the training job is kicked off.
In this example, we implement k-fold cross validation for an XGBoost model using a custom built library called my_custom_library. While XGBoost is supported “out-of-the-box” on SageMaker, that version does not support k-fold cross validation for training. Thus we use script mode to leverage the supported XGBoost container and the concomitant flexibility to include our custom libraries and dependencies.
[ ]:
hyperparameters = {"num_round": 6, "K": 5}

if enable_local_mode_training:
    train_instance_type = "local"
    inputs = {"train": f"file://{train_dir}"}
else:
    train_instance_type = "ml.c5.xlarge"
    inputs = {"train": csv_s3_uri}

estimator_parameters = {
    "entry_point": "train_deploy_xgboost_with_dependencies.py",
    "source_dir": "xgboost_script",
    "dependencies": ["my_custom_library"],
    "instance_type": train_instance_type,
    "instance_count": 1,
    "hyperparameters": hyperparameters,
    "role": role,
    "base_job_name": "xgboost-model",
    "framework_version": "1.0-1",
    "py_version": "py3",
}

estimator = XGBoost(**estimator_parameters)
estimator.fit(inputs)
After we train the model with k-fold cross validation, we can deploy it to a SageMaker endpoint.
[ ]:
existing_endpoints = sess.sagemaker_client.list_endpoints(
    NameContains=xgboost_endpoint_name, MaxResults=30
)["Endpoints"]
[ ]:
existing_endpoints = sess.sagemaker_client.list_endpoints(
    NameContains=xgboost_endpoint_name, MaxResults=30
)["Endpoints"]
if not existing_endpoints:
    xgboost_predictor = estimator.deploy(
        initial_instance_count=1, instance_type="ml.m5.xlarge", endpoint_name=xgboost_endpoint_name
    )
else:
    xgboost_predictor = Predictor(
        endpoint_name="xgboost-endpoint",
        sagemaker_session=sess,
        serializer=CSVSerializer(),
        deserializer=JSONDeserializer(),
    )
Then you can use the endpoint to make predictions.
[ ]:
xgboost_predictor.serializer = CSVSerializer()
xgboost_predictor.deserializer = JSONDeserializer()
xgboost_predictor.predict(x_test.values[0])[0]
Cleanup
[ ]:
resources = (
    [sklearn_endpoint_name, sklearn_predictor],
    [pytorch_endpoint_name, pytorch_predictor],
    [xgboost_endpoint_name, xgboost_predictor],
)

for resource in resources:
    existing_endpoints = sess.sagemaker_client.list_endpoints(
        NameContains=resource[0], MaxResults=30
    )["Endpoints"]
    if existing_endpoints:
        resource[1].delete_endpoint(delete_endpoint_config=True)
Notebook CI Test Results
This notebook was tested in multiple regions. The test results are as follows, except for us-west-2 which is shown at the top of the notebook.