Visualize Amazon SageMaker Training Jobs with TensorBoard
This notebook’s CI test result for us-west-2 is as follows. CI test results in other regions can be found at the end of the notebook.
This notebook shows how to use TensorBoard to visualize both local and remote training jobs as well as jobs run by Amazon SageMaker Automatic Model Tuning. The notebook uses an external S3 Bucket to store TensorFlow logs. This allows data scientists to use TensorBoard to visualize all past training jobs. TensorBoard can be hosted in SageMaker Notebook Instance, on a local computer or an instance running on AWS.
All TensorFlow logs used by TensorBoard are generated in training script source_dir/tensorboard_keras_cifar10.py. It includes code demonstrating how to log accuracy and loss for every epoch during training and validation, calculate and log confusion matrices and images, visualize model architecture, calculate weights distributions and histograms, and compare hyperparameter tuning jobs. The script follows the official TensorBoard guide,
so you can reference the documentation and easily adjust the code to your needs.
The model used for this notebook is a simple deep CNN that is based on the Keras examples. Code in this notebook is using the latest available version of SageMaker python SDK 1.60.2 and TensorFlow 2.2.0.
The dataset
The CIFAR-10 dataset is one of the most popular machine learning datasets. It consists of 60,000 32x32 images belonging to 10 different classes (6,000 images per class). Here are the classes in the dataset, as well as 10 random images from each:

In this tutorial, we will train a deep CNN to recognize these images.
Set up the environment
This notebook is using the default SageMaker’s S3 bucket. Tensorflow logs will be written to s3://sagemaker-<region>-<account_id>/tensorboard_keras_cifar10/logs.
[ ]:
import os
import sagemaker
from sagemaker import get_execution_role
import tensorflow as tf
from tensorflow import keras

sagemaker_session = sagemaker.Session()

role = get_execution_role()

bucket = sagemaker_session.default_bucket()
prefix = "tensorboard_keras_cifar10"
tensorflow_logs_path = "s3://{}/{}/logs".format(bucket, prefix)

print("Bucket: {}".format(bucket))
print("SageMaker ver: " + sagemaker.__version__)
print("Tensorflow ver: " + tf.__version__)
Download the CIFAR-10 dataset
Downloading the test and training data takes around 5 minutes.
[ ]:
from tensorflow.keras.datasets import cifar10

(x_train, y_train), (x_test, y_test) = cifar10.load_data()
print("x_train shape:", x_train.shape)
print(x_train.shape[0], "train samples")
print(x_test.shape[0], "test samples")
Converting dataset into TFRecord files to allow us to use SageMaker Pipe Mode.
[ ]:
import os

if not os.path.exists("./data/validation"):
    os.makedirs("./data/validation")

if not os.path.exists("./data/train"):
    os.makedirs("./data/train")


def write_tfrecords(x, y, filename):
    writer = tf.io.TFRecordWriter(filename)

    for image, label in zip(x, y):
        example = tf.train.Example(
            features=tf.train.Features(
                feature={
                    "image": tf.train.Feature(
                        bytes_list=tf.train.BytesList(value=[image.tobytes()])
                    ),
                    "label": tf.train.Feature(int64_list=tf.train.Int64List(value=label)),
                }
            )
        )
        writer.write(example.SerializeToString())


write_tfrecords(x_test, y_test, "./data/validation/validation.tfrecords")

write_tfrecords(x_train, y_train, "./data/train/train.tfrecords")
Run on SageMaker Training on the cloud
Uploading the data to s3
[ ]:
dataset_location = sagemaker_session.upload_data(path="data", key_prefix=prefix + "/data")
display(dataset_location)
Configuring metrics from the job logs
SageMaker can get training metrics directly from the logs and send them to CloudWatch metrics.
[ ]:
keras_metric_definition = [
    {"Name": "train:loss", "Regex": ".*loss: ([0-9\\.]+) - accuracy: [0-9\\.]+.*"},
    {"Name": "train:accuracy", "Regex": ".*loss: [0-9\\.]+ - accuracy: ([0-9\\.]+).*"},
    {
        "Name": "validation:accuracy",
        "Regex": ".*step - loss: [0-9\\.]+ - accuracy: [0-9\\.]+ - val_loss: [0-9\\.]+ - val_accuracy: ([0-9\\.]+).*",
    },
    {
        "Name": "validation:loss",
        "Regex": ".*step - loss: [0-9\\.]+ - accuracy: [0-9\\.]+ - val_loss: ([0-9\\.]+) - val_accuracy: [0-9\\.]+.*",
    },
    {
        "Name": "sec/steps",
        "Regex": ".* (\d+)[mu]s/step - loss: [0-9\\.]+ - accuracy: [0-9\\.]+ - val_loss: [0-9\\.]+ - val_accuracy: [0-9\\.]+",
    },
]
Train image classification based on the cifar10 dataset
We are going to train the model with Pipe Mode input. SageMaker Pipe Mode is a mechanism for providing S3 data to a training job via Linux fifos. Training programs can read from the fifo and get high-throughput data transfer from S3, without managing the S3 access in the program itself. Pipe Mode is covered in more detail in the SageMaker documentation.
[ ]:
from sagemaker.tensorflow import TensorFlow

hyperparameters = {"epochs": 2, "batch-size": 256, "tf-logs-path": tensorflow_logs_path}

inputs = {"train": dataset_location + "/train", "validation": dataset_location + "/validation"}

estimator = TensorFlow(
    base_job_name="tensorboard-example",
    entry_point="tensorboard_keras_cifar10.py",
    source_dir="source_dir",
    role=role,
    framework_version="2.2.0",
    py_version="py37",
    hyperparameters=hyperparameters,
    instance_count=1,
    instance_type="ml.c5.xlarge",
    metric_definitions=keras_metric_definition,
    input_mode="Pipe",
)

estimator.fit(inputs, wait=True)
The ``fit`` method will create a training job named ``tensorboard-example-{unique identifier}`` on ml.c5.xlarge instance.
These instances will write checkpoints and logs to the S3 bucket we’ve set up earlier. If you don’t have this bucket yet, ``sagemaker_session`` will create it for you. These checkpoints and logs can be used for restoring the training job, and to analyze training job metrics using TensorBoard.
Hyperparameter tuning
Next, the tuning job with the following configurations need to be specified: - hyperparameters that SageMaker Automatic Model Tuning will tune: learning-rate, batch-size and optimizer; - maximum number of training jobs it will run to optimize the objective metric: 10 - number of parallel training jobs that will run in the tuning job: 2 - objective metric that Automatic Model Tuning will use: validation:accuracy
[ ]:
shared_hyperparameters = {"epochs": 6, "tf-logs-path": tensorflow_logs_path}

estimator = TensorFlow(
    base_job_name="tensorboard-example-hpo",
    entry_point="tensorboard_keras_cifar10.py",
    source_dir="source_dir",
    role=role,
    framework_version="2.2.0",
    py_version="py37",
    hyperparameters=shared_hyperparameters,
    instance_count=1,
    instance_type="ml.p3.2xlarge",
    metric_definitions=keras_metric_definition,
    input_mode="Pipe",
)
[ ]:
from sagemaker.tuner import (
    IntegerParameter,
    CategoricalParameter,
    ContinuousParameter,
    HyperparameterTuner,
)

hyperparameter_ranges = {
    "learning-rate": ContinuousParameter(0.00001, 0.001),
    "batch-size": CategoricalParameter([64, 128]),
    "optimizer": CategoricalParameter(["sgd", "adam", "rmsprop"]),
}

objective_metric_name = "validation:accuracy"

inputs = {"train": dataset_location + "/train", "validation": dataset_location + "/validation"}

tuner = HyperparameterTuner(
    estimator,
    objective_metric_name,
    hyperparameter_ranges,
    metric_definitions=keras_metric_definition,
    objective_type="Maximize",
    max_jobs=4,
    max_parallel_jobs=2,
    early_stopping_type="Auto",
    base_tuning_job_name="remote-hpo",
)

tuner.fit(inputs)
TensorBoard
Run TensorBoard inside SageMaker Notebooks
Now we can use TensorBoard to compare all training jobs, including local, cloud, tuning training. The following cell will run TensorBoard inside of the SageMaker Notebook Instance.
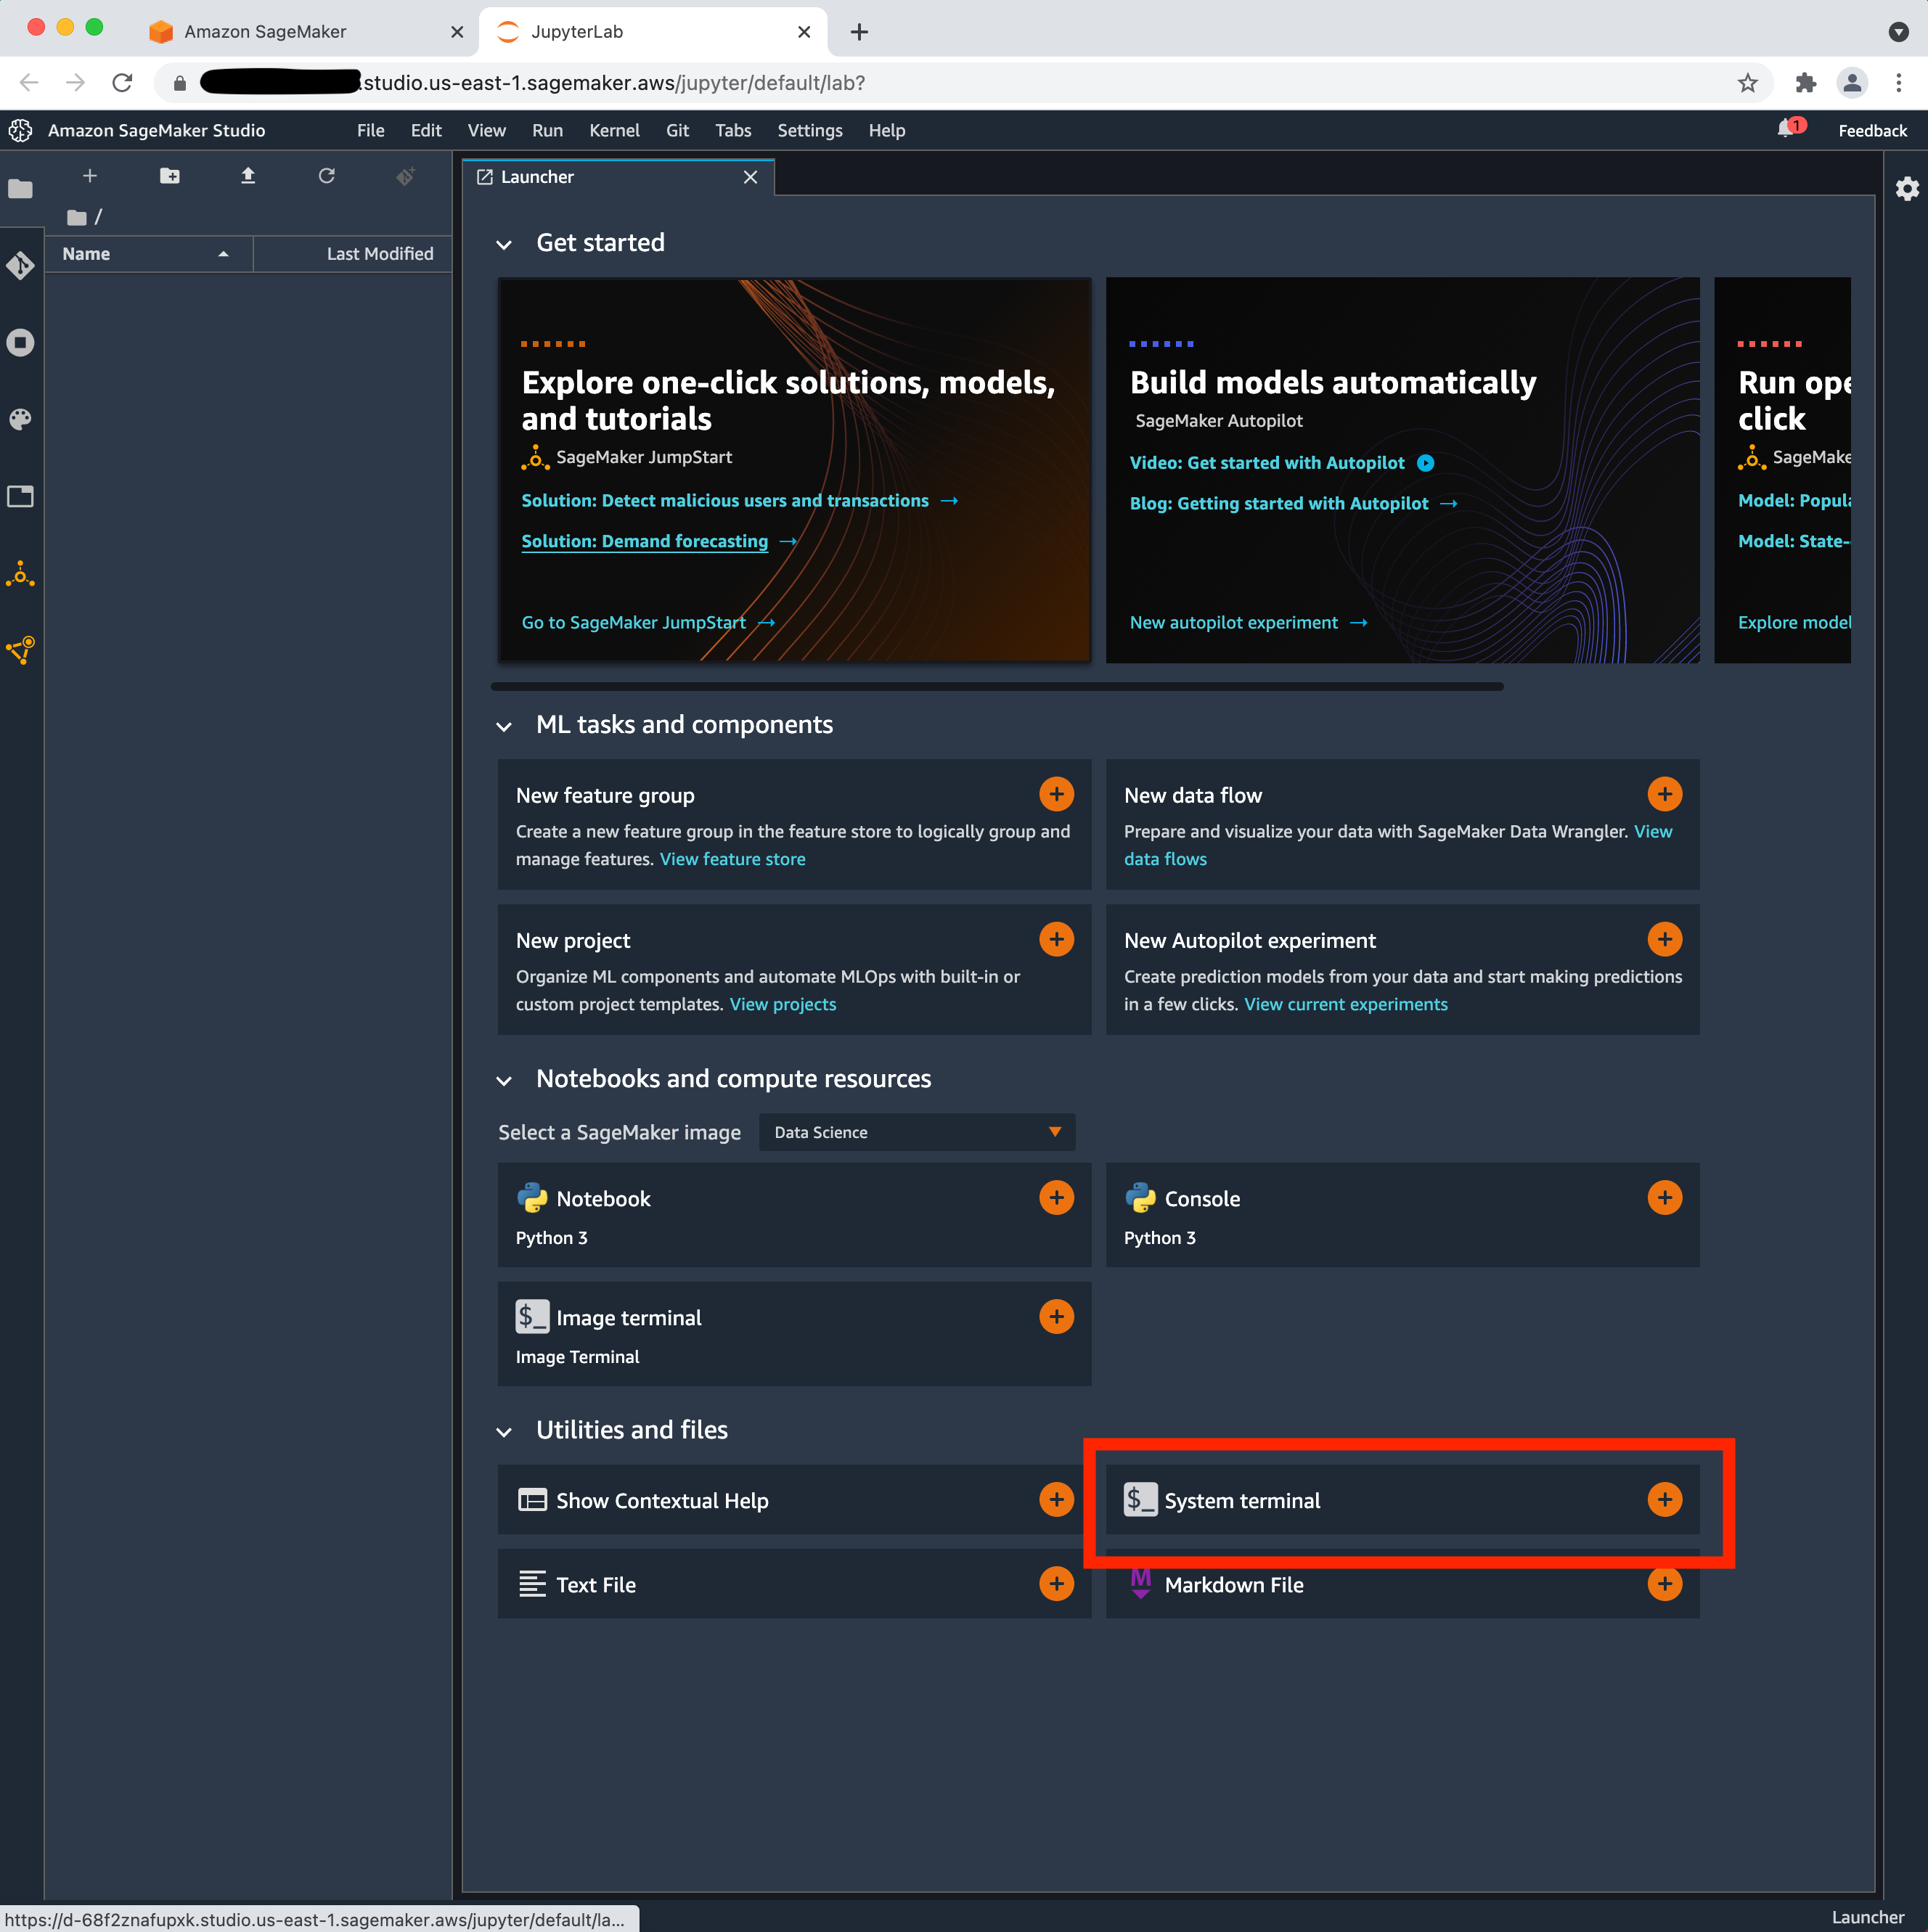
Start Tensorboard from the System terminal and view the Tensorboard UI. To do this, follow steps 1-3 below:
From SageMaker Studio’s Jupyter Server, launch the System terminal (under Utilities and files) (see image below)
Run the following command to install tensorboard onto the system terminal
pip install tensorboard
Paste the command that is the output of the next cell to start your tensorboard instance on Studio:
[ ]:
aws_region = sagemaker_session.boto_region_name
!AWS_REGION={aws_region}
!echo tensorboard --logdir {tensorflow_logs_path}
Finally click the link below!
Click here to access TensorBoard instance
Instance of TensorBoard will be available at https://<notebook instance hostname>/proxy/6006/. By default TensorBoard assigns port 6006, but if it’s already in use TensorBoard will increase the port by 1, so 6007, 6008 and so on until it finds an available port.
You should see something similar to this: 
Cleaning up
To avoid incurring charges to your AWS account for the resources used in this tutorial you need to remove all TensorFlow log files and model artifacts from the SageMaker S3 bucket.
Notebook CI Test Results
This notebook was tested in multiple regions. The test results are as follows, except for us-west-2 which is shown at the top of the notebook.