Glue ETL as part of a SageMaker pipeline
This notebook’s CI test result for us-west-2 is as follows. CI test results in other regions can be found at the end of the notebook.
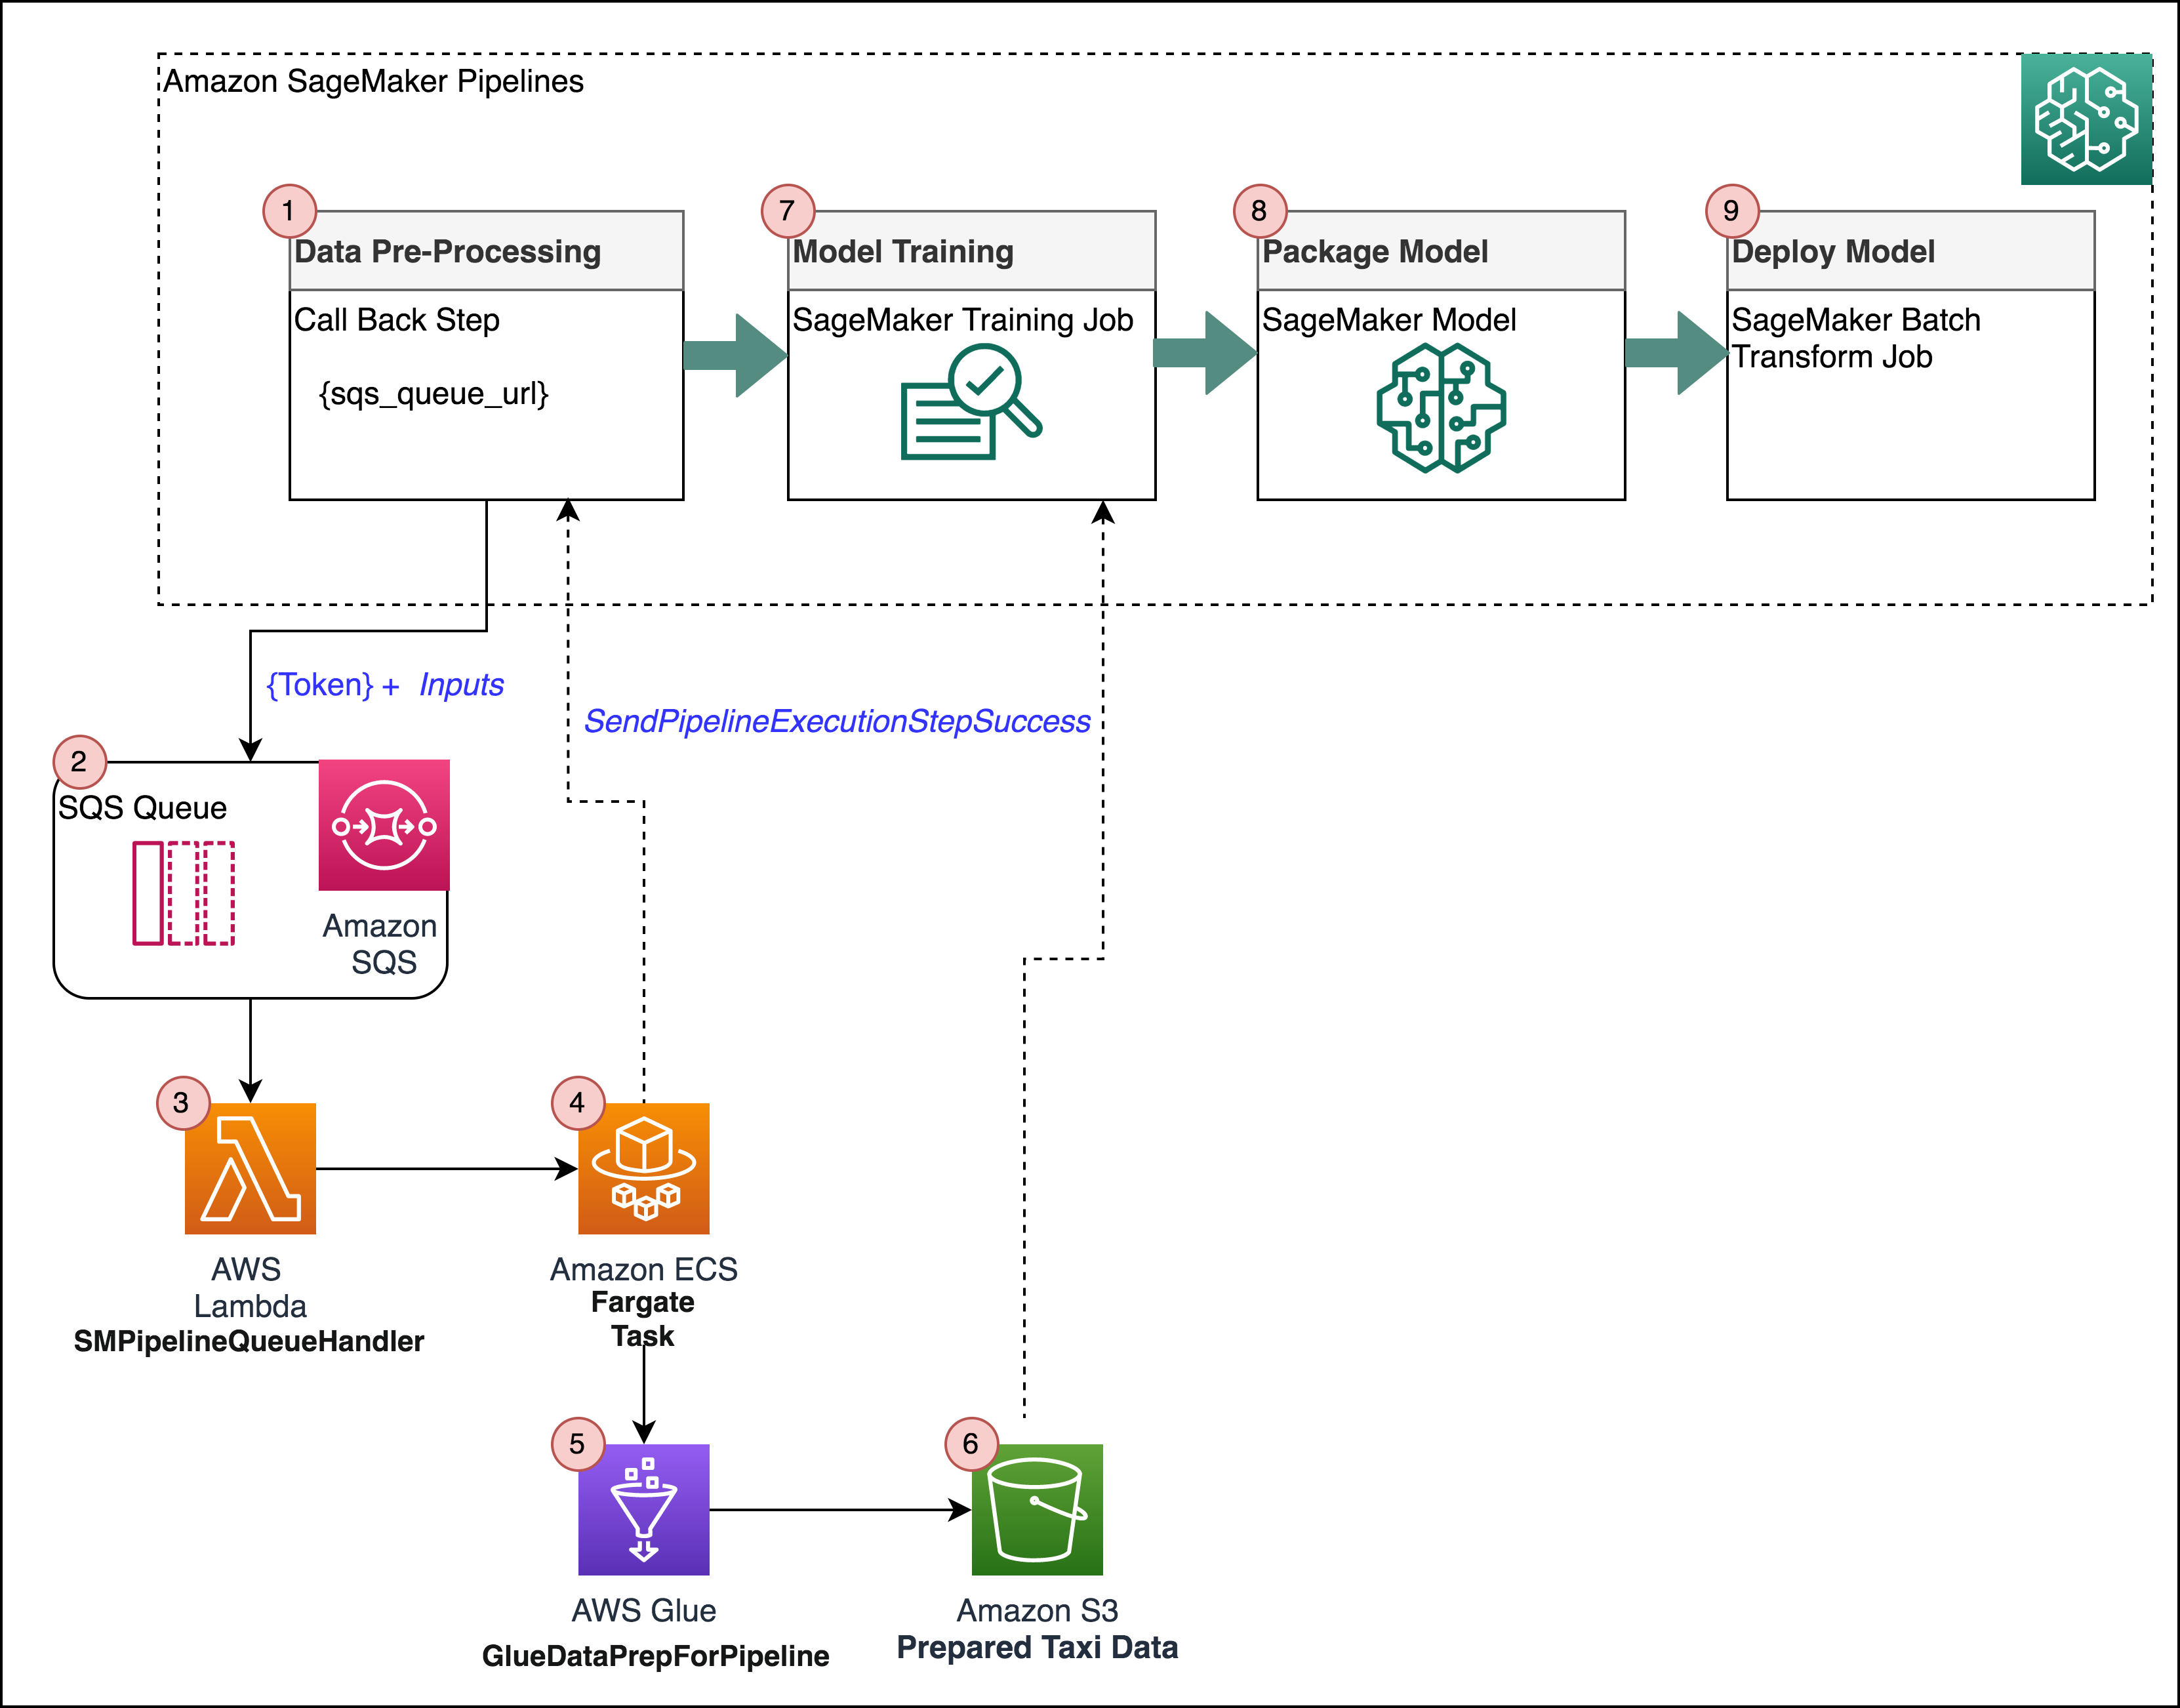
This notebook will show how to use the Callback Step to extend your SageMaker Pipeline steps to include tasks performed by other AWS services or custom integrations. For this notebook, you’ll learn how to include a Glue ETL job as part of a SageMaker ML pipeline. The overall flow will be:
Define Glue ETL job
Run Spark data preparation job in Glue
Run ML training job on SageMaker
Evaluate ML model performance
The pipeline sends a message to an SQS queue. A Lambda function responds to SQS and invokes an ECS Fargate task. The task will handle running the Spark job and monitoring for progress. It’ll then send the callback token back to the pipeline.
Data set
We’ll use the Yellow Taxi records from NYC in 2020. In this blog, we used a prepared version of the data that had passenger counts per half hour. In this notebook we’ll take the raw NYC data and prepare the half-hour totals.
One-time setup
This notebook needs permissions to:
Create Lambda functions
Create an ECS cluster
Upload images to ECR
Create IAM roles
Invoke SageMaker API for pipelines
Create security groups
Write data into S3
Create security groups
Describe VPC information
In a production setting, we would deploy a lot of these resources using an infrastructure-as-code tool like CloudFormation or the CDK. But for simplicity in this demo we’ll create everything in this notebook.
Setup prerequisite IAM roles
First we need to create the following IAM roles:
A role for the ECS Fargate task and task runner. Besides the usual policies that allow pulling images and creating logs, the task needs permission to start and monitor a Glue job, and send the callback token to SageMaker. Because the specific SageMaker action isn’t visible in IAM yet, for now we give the task full SageMaker permissions.
A role for Glue with permissions to read and write from our S3 bucket.
A role for Lambda with permissions to run an ECS task, send the failure callback if something goes wrong, and poll SQS.
For your convenience, we have prepared the setup_iam_roles.py script to help create the IAM roles and respective policies. In most cases, this script will be run by administrator teams, on behalf of data scientists.
[ ]:
import sagemaker
from setup_iam_roles import create_glue_pipeline_role
from setup_iam_roles import create_lambda_sm_pipeline_role
from setup_iam_roles import create_ecs_task_role, create_task_runner_role

sagemaker_session = sagemaker.session.Session()
default_bucket = sagemaker_session.default_bucket()

ecs_role_arn = create_ecs_task_role(role_name="fg_task_pipeline_role")
task_role_arn = create_task_runner_role(role_name="fg_task_runner_pipeline_role")
glue_role_arn = create_glue_pipeline_role(role_name="glue_pipeline_role", bucket=default_bucket)

lambda_role_arn = create_lambda_sm_pipeline_role(
    role_name="lambda_sm_pipeline_role", ecs_role_arn=ecs_role_arn, task_role_arn=task_role_arn
)
Processing
Setup the configurations & tasks that will be used to process data in the pipeline.
Set up ECS Fargate cluster
The ECS Fargate cluster will be used to execute a Fargate task that will handle running the Spark data pre-processing in Glue and monitoring for progress. This task is invoked by a Lambda function that gets called whenever the CallbackStep puts a message to SQS.
Pipeline Step Tasks: CallbackStep -> SQS -> Lambda -> Fargate Task -> Glue Job
[ ]:
import boto3

ecs = boto3.client("ecs")

response = ecs.create_cluster(clusterName="FargateTaskRunner")
[ ]:
print(f"Cluster Name: {response['cluster']['clusterName']}")
print(f"Cluster ARN: {response['cluster']['clusterArn']}")
print(f"Cluster Status: {response['cluster']['status']}")
cluster_arn = response["cluster"]["clusterArn"]
Build container image for Fargate task
First, install the Amazon SageMaker Studio Build CLI convenience package that allows you to build docker images from your Studio environment. Please ensure you have the pre-requisites in place as outlined in this blog.
[ ]:
import sys

!{sys.executable} -m pip install sagemaker_studio_image_build
Next, write the code to your local environment that will be used to build the docker image.
task.py: This code will be used by the task runner to start and monitor the Glue job then report status back to SageMaker Pipelines via send_pipeline_execution_step_success or send_pipeline_execution_step_failure
[ ]:
!mkdir container
[ ]:
%%writefile container/task.py

import boto3
import os
import sys
import traceback
import time

if "inputLocation" in os.environ:
    input_uri = os.environ["inputLocation"]
else:
    print("inputLocation not found in environment")
    sys.exit(1)
if "outputLocation" in os.environ:
    output_uri = os.environ["outputLocation"]
else:
    print("outputLocation not found in environment")
    sys.exit(1)
if "token" in os.environ:
    token = os.environ["token"]
else:
    print("token not found in environment")
    sys.exit(1)
if "glue_job_name" in os.environ:
    glue_job_name = os.environ["glue_job_name"]
else:
    print("glue_job_name not found in environment")
    sys.exit(1)

print(f"Processing from {input_uri} to {output_uri} using callback token {token}")
sagemaker = boto3.client("sagemaker")
glue = boto3.client("glue")

poll_interval = 60

try:
    t1 = time.time()
    response = glue.start_job_run(
        JobName=glue_job_name, Arguments={"--output_uri": output_uri, "--input_uri": input_uri}
    )
    job_run_id = response["JobRunId"]
    print(f"Starting job {job_run_id}")

    job_status = "STARTING"
    job_error = ""
    while job_status in ["STARTING", "RUNNING", "STOPPING"]:
        time.sleep(poll_interval)
        response = glue.get_job_run(
            JobName=glue_job_name, RunId=job_run_id, PredecessorsIncluded=False
        )
        job_status = response["JobRun"]["JobRunState"]
        if "ErrorMessage" in response["JobRun"]:
            job_error = response["JobRun"]["ErrorMessage"]
        print(f"Job is in state {job_status}")

    t2 = time.time()
    total_time = (t2 - t1) / 60.0
    if job_status == "SUCCEEDED":
        print("Job succeeded")
        sagemaker.send_pipeline_execution_step_success(
            CallbackToken=token,
            OutputParameters=[
                {"Name": "minutes", "Value": str(total_time)},
                {
                    "Name": "s3_data_out",
                    "Value": str(output_uri),
                },
            ],
        )
    else:
        print(f"Job failed: {job_error}")
        sagemaker.send_pipeline_execution_step_failure(CallbackToken=token, FailureReason=job_error)
except Exception as e:
    trc = traceback.format_exc()
    print(f"Error running ETL job: {str(e)}:\m {trc}")
    sagemaker.send_pipeline_execution_step_failure(CallbackToken=token, FailureReason=str(e))
Next, write the code for your Dockerfile…
[ ]:
%%writefile container/Dockerfile

#FROM ubuntu:18.04
FROM public.ecr.aws/ubuntu/ubuntu:latest

RUN apt-get -y update && apt-get install -y --no-install-recommends \
         python3-pip \
         python3-setuptools \
         curl \
         unzip

RUN /usr/bin/pip3 install boto3

RUN curl "https://awscli.amazonaws.com/awscli-exe-linux-x86_64.zip" -o "awscliv2.zip"
RUN unzip awscliv2.zip
RUN ./aws/install

COPY task.py /opt
CMD /usr/bin/python3 /opt/task.py
Finally, use the studio image build CLI to build and push your image to ECR
[ ]:
%%sh

cd container

sm-docker build . --repository ecs-fargate-task:latest
After building the image, you have to grab the ECR URI and define a local notebook variable that holds it in the last cell in this section.
[ ]:
import sagemaker as sage

sess = sage.Session()

account = sess.boto_session.client("sts").get_caller_identity()["Account"]
region = boto3.session.Session().region_name

task_uri = "{}.dkr.ecr.{}.amazonaws.com/ecs-fargate-task".format(account, region)
print("URI:", task_uri)
Set up ECS Fargate task
Now we will create and register the task using the roles we create above…
[ ]:
region = boto3.Session().region_name
response = ecs.register_task_definition(
    family="FargateTaskRunner",
    taskRoleArn=task_role_arn,
    executionRoleArn=ecs_role_arn,
    networkMode="awsvpc",
    containerDefinitions=[
        {
            "name": "FargateTask",
            "image": task_uri,
            "cpu": 512,
            "memory": 1024,
            "essential": True,
            "environment": [
                {"name": "inputLocation", "value": "temp"},
                {"name": "outputLocation", "value": "temp"},
            ],
            "logConfiguration": {
                "logDriver": "awslogs",
                "options": {
                    "awslogs-create-group": "true",
                    "awslogs-group": "glue_sg_pipeline",
                    "awslogs-region": region,
                    "awslogs-stream-prefix": "task",
                },
            },
        },
    ],
    requiresCompatibilities=[
        "FARGATE",
    ],
    cpu="512",
    memory="1024",
)
[ ]:
print(f"Task definition ARN: {response['taskDefinition']['taskDefinitionArn']}")
task_arn = response["taskDefinition"]["taskDefinitionArn"]
Copy data to our bucket
Next, we’ll copy the 2020 taxi data to the sagemaker session default bucket breaking up the data per month.
[ ]:
s3 = boto3.client("s3")
taxi_bucket = "nyc-tlc"
taxi_prefix = "taxi"

for month in ["01", "02", "03", "04", "05", "06", "07", "08", "09", "10", "11", "12"]:
    copy_source = {"Bucket": taxi_bucket, "Key": f"csv_backup/yellow_tripdata_2020-{month}.csv"}
    s3.copy(copy_source, default_bucket, f"{taxi_prefix}/yellow_tripdata_2020-{month}.csv")
[ ]:
default_bucket
Create SQS queue for pipeline
In this step, we’ll create the SQS queue that will be used by the CallbackStep inside SageMaker Pipeline steps. SageMaker Pipelines will put a token to this queue that will serve as a trigger for your Lambda function which will initiate the Fargate task to process your data.
[ ]:
sqs_client = boto3.client("sqs")
queue_url = ""
queue_name = "pipeline_callbacks_glue_prep"
try:
    response = sqs_client.create_queue(QueueName=queue_name)
except Exception as e:
    print(f"Failed to create queue:", e)
Format the queue URL to the same format we will need later on.
[ ]:
queue_url = f"https://sqs.{region}.amazonaws.com/{account}/{queue_name}"
[ ]:
queue_url
VPC and security settings
For this setup, we’ll use the default VPC and all of its subnets for the fargate task. However, we’ll create a new security group for the tasks that allows egress but no ingress.
[ ]:
ec2 = boto3.client("ec2")
response = ec2.describe_vpcs(Filters=[{"Name": "isDefault", "Values": ["true"]}])
[ ]:
default_vpc_id = response["Vpcs"][0]["VpcId"]
[ ]:
response = ec2.describe_subnets(Filters=[{"Name": "vpc-id", "Values": [default_vpc_id]}])
[ ]:
task_subnets = []
for r in response["Subnets"]:
    task_subnets.append(r["SubnetId"])
[ ]:
response = ec2.create_security_group(
    Description="Security group for Fargate tasks", GroupName="fg_task_sg", VpcId=default_vpc_id
)
sg_id = response["GroupId"]
[ ]:
response = ec2.authorize_security_group_ingress(
    GroupId=sg_id,
    IpPermissions=[
        {
            "FromPort": 0,
            "IpProtocol": "-1",
            "UserIdGroupPairs": [
                {"GroupId": sg_id, "Description": "local SG ingress"},
            ],
            "ToPort": 65535,
        },
    ],
)
Create ETL script
The ETL job will take two arguments, the location of the input data in S3 and the output path in S3.
[ ]:
%%writefile etl.py
import sys
from awsglue.transforms import *
from awsglue.utils import getResolvedOptions
from pyspark.context import SparkContext
from awsglue.context import GlueContext
from awsglue.job import Job
from pyspark.sql.types import IntegerType
from pyspark.sql import functions as F

## @params: [JOB_NAME]
args = getResolvedOptions(sys.argv, ["JOB_NAME", "input_uri", "output_uri"])

sc = SparkContext()
glueContext = GlueContext(sc)
spark = glueContext.spark_session
job = Job(glueContext)
job.init(args["JOB_NAME"], args)

df = spark.read.format("csv").option("header", "true").load("{0}*.csv".format(args["input_uri"]))
df = df.withColumn("Passengers", df["passenger_count"].cast(IntegerType()))
df = df.withColumn(
    "pickup_time",
    F.to_timestamp(
        F.unix_timestamp("tpep_pickup_datetime", "yyyy-MM-dd HH:mm:ss").cast("timestamp")
    ),
)

dfW = df.groupBy(F.window("pickup_time", "30 minutes")).agg(F.sum("Passengers").alias("passenger"))
dfOut = dfW.drop("window")
dfOut.repartition(1).write.option("timestampFormat", "yyyy-MM-dd HH:mm:ss").csv(args["output_uri"])

job.commit()
[ ]:
s3.upload_file("etl.py", default_bucket, "pipeline/etl.py")
[ ]:
glue_script_location = f"s3://{default_bucket}/pipeline/etl.py"
glue_script_location
Create ETL job
Next, we’ll create the glue job using the script and roles creates in the prevous steps…
[ ]:
glue = boto3.client("glue")
response = glue.create_job(
    Name="GlueDataPrepForPipeline",
    Description="Prepare data for SageMaker training",
    Role=glue_role_arn,
    ExecutionProperty={"MaxConcurrentRuns": 1},
    Command={
        "Name": "glueetl",
        "ScriptLocation": glue_script_location,
    },
    MaxRetries=0,
    Timeout=60,
    MaxCapacity=10.0,
    GlueVersion="2.0",
)
glue_job_name = response["Name"]
[ ]:
glue_job_name
Create Lambda function
The Lambda function will be triggered on new messages to the SQS queue create by the CallbackStep in SageMaker Pipelines. The Lambda function is responsible for initiating the run of your Fargate task. Now, write the code that will be used in the Lambda function..
[ ]:
%%writefile queue_handler.py
import json
import boto3
import os
import traceback

ecs = boto3.client("ecs")
sagemaker = boto3.client("sagemaker")


def handler(event, context):
    print(f"Got event: {json.dumps(event)}")

    cluster_arn = os.environ["cluster_arn"]
    task_arn = os.environ["task_arn"]
    task_subnets = os.environ["task_subnets"]
    task_sgs = os.environ["task_sgs"]
    glue_job_name = os.environ["glue_job_name"]
    print(f"Cluster ARN: {cluster_arn}")
    print(f"Task ARN: {task_arn}")
    print(f"Task Subnets: {task_subnets}")
    print(f"Task SG: {task_sgs}")
    print(f"Glue job name: {glue_job_name}")

    for record in event["Records"]:
        payload = json.loads(record["body"])
        print(f"Processing record {payload}")

        token = payload["token"]
        print(f"Got token {token}")

        try:
            input_data_s3_uri = payload["arguments"]["input_location"]
            output_data_s3_uri = payload["arguments"]["output_location"]
            print(f"Got input_data_s3_uri {input_data_s3_uri}")
            print(f"Got output_data_s3_uri {output_data_s3_uri}")

            response = ecs.run_task(
                cluster=cluster_arn,
                count=1,
                launchType="FARGATE",
                taskDefinition=task_arn,
                networkConfiguration={
                    "awsvpcConfiguration": {
                        "subnets": task_subnets.split(","),
                        "securityGroups": task_sgs.split(","),
                        "assignPublicIp": "ENABLED",
                    }
                },
                overrides={
                    "containerOverrides": [
                        {
                            "name": "FargateTask",
                            "environment": [
                                {"name": "inputLocation", "value": input_data_s3_uri},
                                {"name": "outputLocation", "value": output_data_s3_uri},
                                {"name": "token", "value": token},
                                {"name": "glue_job_name", "value": glue_job_name},
                            ],
                        }
                    ]
                },
            )
            if "failures" in response and len(response["failures"]) > 0:
                f = response["failures"][0]
                print(f"Failed to launch task for token {token}: {f['reason']}")
                sagemaker.send_step_failure(CallbackToken=token, FailureReason=f["reason"])
            else:
                print(f"Launched task {response['tasks'][0]['taskArn']}")
        except Exception as e:
            trc = traceback.format_exc()
            print(f"Error handling record: {str(e)}:\m {trc}")
            sagemaker.send_step_failure(CallbackToken=token, FailureReason=e)
Finally, bundle the code and upload it to S3 then create the Lambda function…
[ ]:
import zipfile

archive = zipfile.ZipFile("queue_handler.zip", "w")
archive.write("queue_handler.py")

s3 = boto3.client("s3")
s3.upload_file("queue_handler.zip", default_bucket, "pipeline/queue_handler.zip")
[ ]:
lambda_client = boto3.client("lambda")
lambda_client.create_function(
    Code={
        "S3Bucket": default_bucket,
        "S3Key": "pipeline/queue_handler.zip",
    },
    FunctionName="SMPipelineQueueHandler",
    Description="Process Glue callback messages from SageMaker Pipelines",
    Handler="queue_handler.handler",
    Publish=True,
    Role=lambda_role_arn,
    Runtime="python3.7",
    Timeout=20,
    MemorySize=128,
    PackageType="Zip",
    Environment={
        "Variables": {
            "cluster_arn": cluster_arn,
            "task_arn": task_arn,
            "task_subnets": ",".join(task_subnets),
            "task_sgs": sg_id,
            "glue_job_name": glue_job_name,
        }
    },
)
Set up Lambda as SQS target
Next, we’ll attach the lambda function created above to the SQS queue we previously created. This ensures that your Lambda will be triggered when new messages are put to your SQS queue.
[ ]:
lambda_client.create_event_source_mapping(
    EventSourceArn=f"arn:aws:sqs:{region}:{account}:{queue_name}",
    FunctionName="SMPipelineQueueHandler",
    Enabled=True,
    BatchSize=10,
)
Build & Execute SageMaker Pipeline
Now that all of the components are created and configured that support the tasks within your pipeline steps, we’re now ready to bring it all together and setup the pipeline.
First, install the SageMaker Python SDK.
[ ]:
!pip install "sagemaker>=2.99.0"
Pipeline Initialization
[ ]:
import time

timestamp = int(time.time())
[ ]:
from sagemaker.workflow.parameters import (
    ParameterInteger,
    ParameterString,
)

input_data = ParameterString(
    name="InputData", default_value=f"s3://{default_bucket}/{taxi_prefix}/"
)
id_out = ParameterString(name="IdOut", default_value="taxiout" + str(timestamp))
output_data = ParameterString(
    name="OutputData", default_value=f"s3://{default_bucket}/{taxi_prefix}_output/"
)
training_instance_count = ParameterInteger(name="TrainingInstanceCount", default_value=1)
Pipeline Steps
1 - Call Back Step
First, we’ll configure the callback step.
The callback step will accept the following inputs: * S3 location of our raw taxi data * SQS queue
The callback step will return the following outputs: * S3 location of processed data to be used for model training
[ ]:
from sagemaker.workflow.callback_step import CallbackStep, CallbackOutput, CallbackOutputTypeEnum
from sagemaker.workflow.functions import Join

callback1_output = CallbackOutput(
    output_name="s3_data_out", output_type=CallbackOutputTypeEnum.String
)

step_callback_data = CallbackStep(
    name="GluePrepCallbackStep",
    sqs_queue_url=queue_url,
    inputs={
        "input_location": f"s3://{default_bucket}/{taxi_prefix}/",
        "output_location": Join(
            on="/", values=["s3:/", default_bucket, f"{taxi_prefix}_output", id_out]
        ),
    },
    outputs=[callback1_output],
)
2 - Training Step
Next, we’ll configure the training step by first configuring the estimator for random cut forest. Then, we use the output of the estimator’s .fit() method as arguments to the TrainingStep. By passing the pipeline_session to the sagemaker_session, calling .fit() does not launch the training job. Instead, it returns the arguments needed to run the job as a step in the pipeline.
To generate the step arguments for the training step, it will accept the following inputs: * S3 location of processed data to be used for model training * ECR containing the training image for rcf * Estimator configuration
The training step will return the following outputs: * S3 location of the trained model artifact
[ ]:
from sagemaker.workflow.pipeline_context import PipelineSession

containers = {
    "us-west-2": "174872318107.dkr.ecr.us-west-2.amazonaws.com/randomcutforest:latest",
    "us-east-1": "382416733822.dkr.ecr.us-east-1.amazonaws.com/randomcutforest:latest",
    "us-east-2": "404615174143.dkr.ecr.us-east-2.amazonaws.com/randomcutforest:latest",
    "eu-west-1": "438346466558.dkr.ecr.eu-west-1.amazonaws.com/randomcutforest:latest",
}
region_name = boto3.Session().region_name
container = containers[region_name]
model_prefix = "model"

pipeline_session = PipelineSession()

rcf = sagemaker.estimator.Estimator(
    container,
    sagemaker.get_execution_role(),
    output_path="s3://{}/{}/output".format(default_bucket, model_prefix),
    instance_count=training_instance_count,
    instance_type="ml.c5.xlarge",
    sagemaker_session=pipeline_session,
)

rcf.set_hyperparameters(num_samples_per_tree=200, num_trees=50, feature_dim=1)
[ ]:
from sagemaker.inputs import TrainingInput
from sagemaker.workflow.steps import TrainingStep

train_step_args = rcf.fit(
    inputs={
        "train": TrainingInput(
            # s3_data = Output of the previous call back step
            s3_data=step_callback_data.properties.Outputs["s3_data_out"],
            content_type="text/csv;label_size=0",
            distribution="ShardedByS3Key",
        ),
    },
)
step_train = TrainingStep(
    name="TrainModel",
    step_args=train_step_args,
)
3 - Create Model
Next, we’ll package the trained model for deployment. To achieve this, we define the ModelStep by providing the return values from model.create() as the step arguments. Similarly, the pipeline_session is required when defining the model, which puts off the model creation to the pipeline execution time.
To generate the step arguments for the model step, it will accept the following inputs: * S3 location of the trained model artifact * ECR containing the inference image for rcf
The create model step will return the following outputs: * SageMaker packaged model
[ ]:
from sagemaker.model import Model
from sagemaker import get_execution_role

role = get_execution_role()

image_uri = sagemaker.image_uris.retrieve("randomcutforest", region)

model = Model(
    image_uri=image_uri,
    model_data=step_train.properties.ModelArtifacts.S3ModelArtifacts,
    sagemaker_session=pipeline_session,
    role=role,
)
[ ]:
from sagemaker.workflow.model_step import ModelStep


model_step_args = model.create(
    instance_type="ml.m5.large",
)

create_model = ModelStep(name="TaxiModel", step_args=model_step_args)
4 - Batch Transform
Next, we’ll deploy the model using batch transform then do a quick evaluation with our data to compute anomaly scores for each of our data points on input.
To generate the step arguments for the batch transform step, it will accept the following inputs: * SageMaker packaged model * S3 location of the input data * ECR containing the inference image for rcf
The batch transform step will return the following outputs: * S3 location of the output data (anomaly scores)
[ ]:
base_uri = step_callback_data.properties.Outputs["s3_data_out"]
output_prefix = "batch-out"

from sagemaker.transformer import Transformer

transformer = Transformer(
    model_name=create_model.properties.ModelName,
    instance_type="ml.m5.xlarge",
    assemble_with="Line",
    accept="text/csv",
    instance_count=1,
    output_path=f"s3://{default_bucket}/{output_prefix}/",
    sagemaker_session=pipeline_session,
)
[ ]:
from sagemaker.inputs import TransformInput
from sagemaker.workflow.steps import TransformStep

batch_data = step_callback_data.properties.Outputs["s3_data_out"]

transform_step_args = transformer.transform(
    data=batch_data,
    content_type="text/csv",
    split_type="Line",
    input_filter="$[0]",
    join_source="Input",
    output_filter="$[0,-1]",
)

step_transform = TransformStep(
    name="TaxiTransform",
    step_args=transform_step_args,
)
Configure Pipeline Using Created Steps
[ ]:
from sagemaker.workflow.pipeline import Pipeline
from sagemaker.utils import unique_name_from_base

pipeline_name = unique_name_from_base("GluePipeline")
pipeline = Pipeline(
    name=pipeline_name,
    parameters=[
        input_data,
        training_instance_count,
        id_out,
    ],
    steps=[step_callback_data, step_train, create_model, step_transform],
)
[ ]:
from sagemaker import get_execution_role

pipeline.upsert(role_arn=get_execution_role())
[ ]:
import json

definition = json.loads(pipeline.definition())
definition
Execute Pipeline
[ ]:
execution = pipeline.start()
[ ]:
execution.describe()
[ ]:
execution.list_steps()
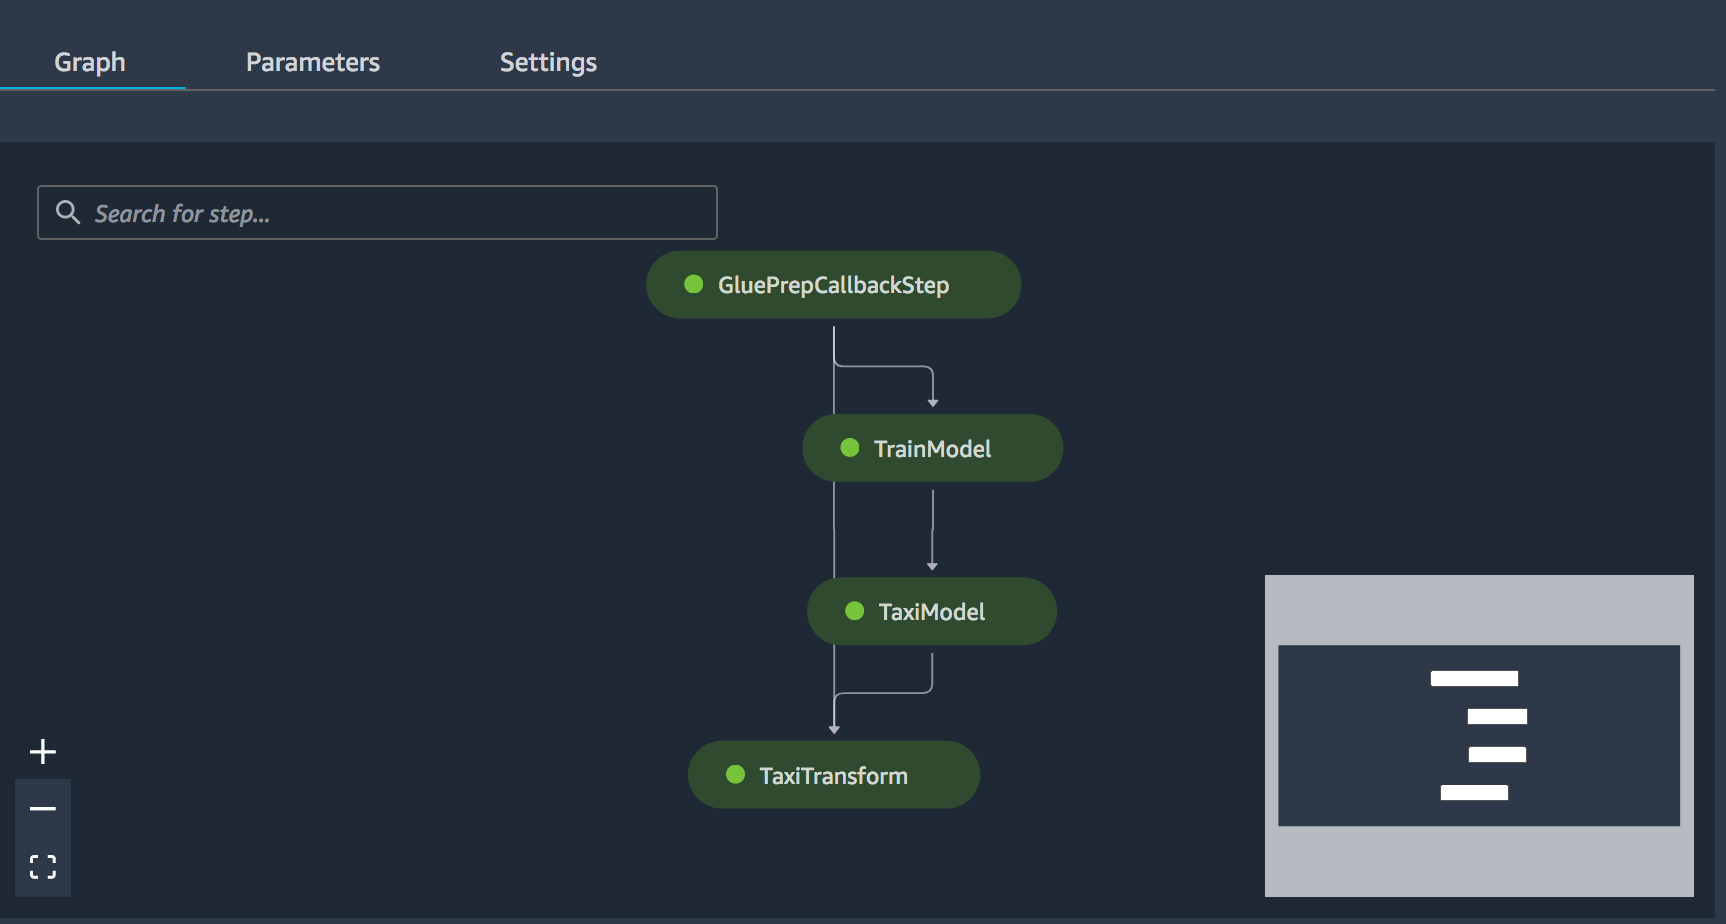
You can continue to check the status of your pipeline to sure it completes successfuly. When your pipeline completes, you will see all steps in a completed status. You can also check the status of your pipeline and each pipeline step directy in the Studio console under Components and registries –> Pipelines as shown below:
Notebook CI Test Results
This notebook was tested in multiple regions. The test results are as follows, except for us-west-2 which is shown at the top of the notebook.