Computer vision model building pipeline using the step decorator
This notebook’s CI test result for us-west-2 is as follows. CI test results in other regions can be found at the end of the notebook.
We have introduced a low-code experience for data scientists to convert the Machine Learning (ML) development code into repeatable and reusable workflow steps of Amazon SageMaker Pipelines using a [@step decorator](https://docs.aws.amazon.com/sagemaker/latest/dg/pipelines-step-decorator.html). This sample notebook demonstrates how to build a computer vision pipeline using a combination of the @step decorator and other pipeline steps.
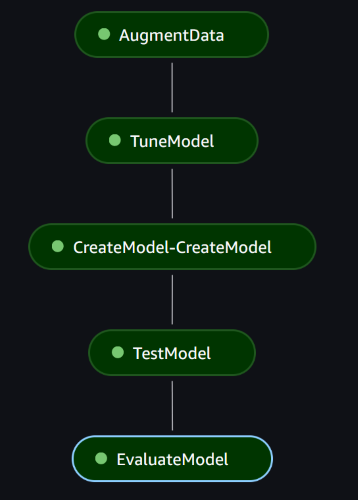
Specifically, this notebook builds a pipeline which: 1. Uses the @step decorator to augment a retail image dataset; 2. Uses the Tuning step to train and tune a model using SageMaker’s Object Detection algorithm; 3. Uses the Model step to create a model object for the best-performing model; 4. Uses the Transform step to run the test set through the best-performing model; 5. Uses the @step decorator to evaluate the results.
The screenshot below shows an example of a successful execution of this pipeline.
Setup
If you run the notebook from a local IDE, please follow the “AWS CLI Prerequisites” section of the Set-up Amazon SageMaker Prerequisites to set up AWS credentials.
The code in this notebook requires certain libraries to run successfully. Run the cell below to install these.
[ ]:
%pip install -r ./requirements.txt -U
First, let’s import the libraries we will need and set up some variables related to our data.
Notice that a config.yaml file is included with this code sample. This enables us to set default values for the SageMaker SDK.
We also use Pipeline Session which allows us to manage SageMaker APIs and AWS services needed under Pipeline Context.
Finally, we use S3FS to more easily interact with our files in Amazon S3.
[ ]:
import json
import os
from datetime import datetime
from pathlib import Path

import imageio.v2 as imageio
import matplotlib.pyplot as plt
import numpy as np
import pandas as pd

import boto3
import sagemaker
import s3fs
from sagemaker.utils import unique_name_from_base
from sagemaker.workflow.function_step import step
from sagemaker.workflow.pipeline import Pipeline
from sagemaker.workflow.model_step import ModelStep


pipeline_session = sagemaker.workflow.pipeline_context.PipelineSession()
bucket_name = pipeline_session.default_bucket()
s3_prefix_project_folder = "computer-vision-retail-pipeline-demo"  # main project folder in S3
default_bucket_prefix = pipeline_session.default_bucket_prefix

# If a default bucket prefix is specified, append it to the s3 path
if default_bucket_prefix:
    prefix_project = f"{default_bucket_prefix}/{s3_prefix_project_folder}"
else:
    prefix_project = s3_prefix_project_folder

prefix_dataset = "dataset"  # where our dataset will be located
prefix_models = "models"  # where our trained model weights will be saved
prefix_output = "output"  # where the predictions will be saved
prefix_results = "results"  # where the evaluation results will be stored

local_dataset_folder = "dataset-full"
local_train_manifest = f"{local_dataset_folder}/train.manifest"
local_valid_manifest = f"{local_dataset_folder}/validation.manifest"
local_test_manifest = f"{local_dataset_folder}/test.manifest"

class_names = [  # names of the 10 products that we will be trying to detect
    "flakes",
    "mm",
    "coke",
    "spam",
    "nutella",
    "doritos",
    "ritz",
    "skittles",
    "mountaindew",
    "evian",
]
manifest_attributes = ["source-ref", "retail-object-labeling"]

os.environ["SAGEMAKER_USER_CONFIG_OVERRIDE"] = os.getcwd()  # set path to config file
sagemaker_role = sagemaker.get_execution_role()
region = pipeline_session.boto_region_name
s3_fs = s3fs.S3FileSystem()
Download and preprocess the dataset
This sample notebook uses a dataset and some code from the Computer vision for retail inventory workshop. The dataset contains 95 images of a shelf with different combinations of 10 supermarket products. The images have already been labeled using SageMaker Ground Truth and the dataset has been split into three parts:
Training (66 images)
Validation (19 images)
Testing (10 images)
The cell below downloads the dataset and unzips it.
[ ]:
! wget https://github.com/aws-samples/computer-vision-retail-workshop/raw/main/dataset/dataset-full.zip --no-check-certificate
! unzip dataset-full.zip
Using S3Fs, a Pythonic file interface for S3, upload the dataset to the S3 bucket.
[ ]:
s3_fs.put(
    f"./{local_dataset_folder}/",
    f"{bucket_name}/{prefix_project}/{prefix_dataset}/",
    recursive=True,
);
To demonstrate the types of images contained in the dataset, the code below loads and displays one image and prints the associated annotations. The annotations are bounding boxes for each product displayed on the shelf.
[ ]:
with open(local_train_manifest) as file_handle:
    lines = file_handle.readlines()

line_dict = json.loads(lines[0])  # load the 1st line of the manifest file
filename = str(Path(line_dict["source-ref"]).name)

image = imageio.imread(f"{local_dataset_folder}/{filename}")
plt.imshow(image)
plt.grid(False)
plt.axis(True)
plt.title(f"{local_dataset_folder}/{filename}")
plt.show()

print(json.dumps(line_dict, indent=4))
Currently, the source-ref attribute in the annotations file contains only the file name for each image. However, source-ref needs to be the S3 location of the image, because the algorithm will load the data from S3. For more information about the format used for manifest files, see the documentation.
The cell below defines a method which loads a manifest file and updates each source-ref attribute.
[ ]:
def update_manifest_sourceref(original_file: str, updated_file: str, bucket_name: str, prefix: str):
    new_manifest = []

    with open(original_file) as read_file:
        lines = read_file.readlines()

    for line in lines:
        annotation = json.loads(line)
        source_ref = str(Path(annotation["source-ref"]).name)
        updated_source_ref = f"s3://{bucket_name}/{prefix}/{source_ref}"
        annotation["source-ref"] = updated_source_ref
        new_manifest.append(json.dumps(annotation))

    with open(updated_file, "w") as write_file:
        for annotation in new_manifest:
            write_file.write(f"{annotation}\n")
Later on, the test set will be used to test the model through a batch transform. For this, we need to remove the existing annotations and format it as documented in S3DataSource. The method below performs these operations.
[ ]:
def create_unlabeled_test_manifest(labeled_manifest: str, unlabeled_manifest: str):
    new_manifest = [{"prefix": f"s3://{bucket_name}/{prefix_project}/{prefix_dataset}/"}]

    with open(labeled_manifest) as read_file:
        lines = read_file.readlines()

    for line in lines:
        annotation = json.loads(line)
        source_ref = str(Path(annotation["source-ref"]).name)
        new_manifest.append(source_ref)

    with open(unlabeled_manifest, "w") as write_file:
        json.dump(new_manifest, write_file)
Let’s set up the correct locations and file names for the manifest files with updated values for source-ref, their corresponding S3 URI, and the unlabeled test manifest.
[ ]:
updated_train_manifest = f"{local_dataset_folder}/train-updated.manifest"
updated_valid_manifest = f"{local_dataset_folder}/validation-updated.manifest"
updated_test_manifest = f"{local_dataset_folder}/test-updated.manifest"
unlabeled_test_manifest = f"{local_dataset_folder}/test-unlabeled.manifest"

s3_train_manifest = f"s3://{bucket_name}/{prefix_project}/{prefix_dataset}/train-updated.manifest"
s3_valid_manifest = (
    f"s3://{bucket_name}/{prefix_project}/{prefix_dataset}/validation-updated.manifest"
)
s3_test_manifest = f"s3://{bucket_name}/{prefix_project}/{prefix_dataset}/test-updated.manifest"
s3_unlabeled_test = f"s3://{bucket_name}/{prefix_project}/{prefix_dataset}/test-unlabeled.manifest"
Now run the previously defined method for each of the datasets (training, validation, testing) and upload the updated manifest files to S3.
[ ]:
update_manifest_sourceref(
    local_train_manifest,
    updated_train_manifest,
    bucket_name,
    f"{prefix_project}/{prefix_dataset}",
)
s3_fs.put_file(updated_train_manifest, s3_train_manifest)

update_manifest_sourceref(
    local_valid_manifest,
    updated_valid_manifest,
    bucket_name,
    f"{prefix_project}/{prefix_dataset}",
)
s3_fs.put_file(updated_valid_manifest, s3_valid_manifest)

update_manifest_sourceref(
    local_test_manifest,
    updated_test_manifest,
    bucket_name,
    f"{prefix_project}/{prefix_dataset}",
)
s3_fs.put_file(updated_test_manifest, s3_test_manifest)
create_unlabeled_test_manifest(updated_test_manifest, unlabeled_test_manifest)
s3_fs.put_file(unlabeled_test_manifest, s3_unlabeled_test)
Augment dataset
Currently, the dataset only contains 95 images split into three datasets. This leaves us with relatively few training images. Augmenting the dataset means we generate synthetic variations of the existing images to increase the size of the dataset. There are many types of augmentations which can be applied to images, including flipping, rotating, scaling, translation, adding noise, adjusting brightness, and more. For simplicity, the code below only flips each image horizontally, thereby doubling our training dataset.
We define two methods: augment_image flips a single image and calculates the new bounding boxes for the annotations, and augment_dataset then applies this flipping logic to every image in the dataset. Notice how we use the @step decorator to turn augment_dataset into a step for the model building pipeline. It will automatically take the code and run it as a SageMaker training job when we execute the pipeline. The @step decorator has many parameter
options, but it also uses the defaults we specified in our SageMaker configuration file.
[ ]:
def augment_image(image_filename: str, bboxes: dict) -> tuple:
    with s3_fs.open(image_filename) as image_handle:
        # load image
        image = imageio.imread(image_handle)
        image_width = image.shape[1]

        # flip image
        image_flipped = image.copy()
        image_flipped = np.fliplr(image_flipped)

        # flip bounding boxes
        bboxes_flipped = []
        for bbox in bboxes:
            bboxes_flipped.append(
                {
                    "left": image_width - (bbox["left"] + bbox["width"]),
                    "top": bbox["top"],
                    "width": bbox["width"],
                    "height": bbox["height"],
                    "class_id": bbox["class_id"],
                }
            )

        return image_flipped, bboxes_flipped


@step(name="AugmentData", keep_alive_period_in_seconds=300)
def augment_dataset(manifest_s3_path: str, output_path: str, output_manifest: str) -> tuple:
    new_manifest = []

    with s3_fs.open(manifest_s3_path) as input_handle:
        lines = input_handle.readlines()

        for line in lines:
            line_dict = json.loads(line)  # load one json line (corresponding to one image)
            filename_object = Path(line_dict["source-ref"])
            filename = str(filename_object.name)  # filename without the path

            # add json line of the original image
            new_manifest.append(json.dumps(line_dict))

            # generate augmented images
            print("Augmenting image:", filename)
            image_augm, bboxes_augm = augment_image(
                image_filename=line_dict["source-ref"],
                bboxes=line_dict["retail-object-labeling"]["annotations"],
            )

            # new image size of augmented image
            image_height = image_augm.shape[0]
            image_width = image_augm.shape[1]
            if len(image_augm.shape) == 3:
                image_depth = image_augm.shape[2]
            else:
                image_depth = 1
            line_dict["retail-object-labeling"]["image_size"] = [
                {"width": image_width, "height": image_height, "depth": image_depth}
            ]

            # augmented image filename
            filename_no_extension = str(filename_object.stem)  # filename without extension
            filename_augmented = f"{filename_no_extension}_augm.jpg"
            # image_augm_filename = f'augmented/{filename_augmented}'
            imageio.imsave(filename_augmented, image_augm, quality=95)  # save locally
            new_filename_s3 = f"{output_path}/{filename_augmented}"
            line_dict["source-ref"] = new_filename_s3  # add new filename to the manifest file
            s3_fs.put_file(filename_augmented, new_filename_s3)

            # new image bounding boxes
            line_dict["retail-object-labeling"]["annotations"] = bboxes_augm

            # add a new json line for this augmentation image
            new_manifest.append(json.dumps(line_dict))

    augm_manifest_location = f"{output_path}/{output_manifest}"
    with s3_fs.open(augm_manifest_location, "w") as output_handle:
        for label in new_manifest:
            output_handle.write(label + "\n")

    return augm_manifest_location, len(new_manifest)
The final trick to using the @step decorator is the delayed return. By calling our decorated augment_dataset method, SageMaker returns a DelayedReturn instance instead of running the function. A DelayedReturn instance is a proxy for the actual return of that function. The DelayedReturn instance can be passed to another function as an argument or directly to a pipeline instance as a step.
[ ]:
delayed_augment = augment_dataset(
    s3_train_manifest,
    f"s3://{bucket_name}/{prefix_project}/{prefix_dataset}",
    "train-augmented.manifest",
)
Tune a model
Next, let’s set up an automatic hyperparameter tuning step in our pipeline which uses the built-in SageMaker Object Detection algorithm to train models. Since we are using a built-in algorithm, we don’t have to write the algorithm code ourselves, and it makes sense to use the Tuning step without a decorator.
First, the code below sets up an Estimator object for the Object Detection algorithm. It fetches the correct training image, sets up the input channels for the training and validation datasets, and specifies static hyperparameters.
[ ]:
train_channel = sagemaker.inputs.TrainingInput(
    delayed_augment[0],
    distribution="FullyReplicated",
    content_type="application/x-recordio",
    s3_data_type="AugmentedManifestFile",
    attribute_names=manifest_attributes,
    record_wrapping="RecordIO",
    shuffle_config=sagemaker.inputs.ShuffleConfig(seed=1),
)

validation_channel = sagemaker.inputs.TrainingInput(
    s3_valid_manifest,
    distribution="FullyReplicated",
    content_type="application/x-recordio",
    record_wrapping="RecordIO",
    s3_data_type="AugmentedManifestFile",
    attribute_names=manifest_attributes,
)

training_image = sagemaker.image_uris.retrieve(
    region=region, framework="object-detection", version="1", image_scope="training"
)

estimator = sagemaker.estimator.Estimator(
    training_image,
    sagemaker_role,
    input_mode="Pipe",
    instance_count=1,
    instance_type="ml.p3.2xlarge",
    volume_size=50,
    max_run=10 * 60 * 60,
    output_path=f"s3://{bucket_name}/{prefix_project}/{prefix_models}",
    sagemaker_session=pipeline_session,
)

estimator.set_hyperparameters(
    base_network="resnet-50",
    use_pretrained_model=1,
    early_stopping=True,
    num_classes=len(class_names),
    optimizer="adam",
    image_shape=512,
    num_training_samples=delayed_augment[1],
)
The code below sets up the Hyperparameter Tuner to find the optimal values for learning_rate and mini_batch_size.
Note that we are using a ml.p3.2xlarge instance for training. The Object Detection algorithm requires GPU instances for training. If you encounter any quota errors, please request a quota increase and then try again. If you have access to multiple instances of this type on your account, you can
increase the max_parallel_jobs parameter below to speed up the tuning job.
[ ]:
tuner = sagemaker.tuner.HyperparameterTuner(
    estimator,
    "validation:mAP",
    objective_type="Maximize",
    base_tuning_job_name="retail-ODD-lightsaber",
    hyperparameter_ranges={
        "learning_rate": sagemaker.tuner.ContinuousParameter(0.00001, 0.001),
        "mini_batch_size": sagemaker.tuner.IntegerParameter(8, 16),
    },
    max_parallel_jobs=1,
    max_jobs=5,
)

step_tuning_args = tuner.fit(
    inputs={"train": train_channel, "validation": validation_channel},
)

step_tuning = sagemaker.workflow.steps.TuningStep(
    name="TuneModel",
    step_args=step_tuning_args,
)
Run best model on test set
Once the tuning step has found the best performing model, we want to create this model (using ModelStep) and use it with a TransformStep to run it on the test set. The predictions will be uploaded onto Amazon S3.
The code below creates the model object based on the best model from the tuning job.
[ ]:
inference_image = sagemaker.image_uris.retrieve(
    region=region, framework="object-detection", version="1", image_scope="inference"
)

best_model = sagemaker.model.Model(
    image_uri=inference_image,
    model_data=step_tuning.get_top_model_s3_uri(
        top_k=0, s3_bucket=bucket_name, prefix=f"{prefix_project}/{prefix_models}"
    ),
    sagemaker_session=pipeline_session,
    role=sagemaker_role,
)

step_create_model = ModelStep(
    name="CreateModel",
    step_args=best_model.create(),
)
The code below uses a batch transform job to run the model over the test data set.
[ ]:
transformer = sagemaker.transformer.Transformer(
    model_name=step_create_model.properties.ModelName,
    instance_count=1,
    instance_type="ml.p3.2xlarge",
    output_path=f"s3://{bucket_name}/{prefix_project}/{prefix_output}",
    sagemaker_session=pipeline_session,
)

step_transform_args = transformer.transform(
    data=s3_unlabeled_test,
    content_type="application/x-image",
    data_type="ManifestFile",
)

step_transform = sagemaker.workflow.steps.TransformStep(
    name="TestModel",
    step_args=step_transform_args,
    depends_on=[step_create_model],
)
Evaluate test results
Finally, the @step decorator can be used to evaluate the performance of the model using the predictions generated on the test set. The code below calculates Intersection Over Union (IOU), a metric that describes the degree of overlap between two bounding boxes, to find the similarity between the predicted bounding boxes and the ground truth bounding boxes.
Based on this, it calculates true positives (TP), true negatives (TN), false positives (FP), and false negatives (FN) for every class. Precision, recall, and F1 score are also calculated per class and as a macro average. The results are saved in Amazon S3.
[ ]:
def get_iou(BBoxW1, BBoxH1, BBoxL1, BBoxT1, BBoxW2, BBoxH2, BBoxL2, BBoxT2):
    # intersection over union in order to match bboxes
    BBoxR1 = BBoxL1 + BBoxW1
    BBoxB1 = BBoxT1 + BBoxH1
    BBoxR2 = BBoxL2 + BBoxW2
    BBoxB2 = BBoxT2 + BBoxH2

    int_L = max(BBoxL1, BBoxL2)
    int_R = min(BBoxR1, BBoxR2)
    int_T = max(BBoxT1, BBoxT2)
    int_B = min(BBoxB1, BBoxB2)
    intersection_area = max(0, int_R - int_L) * max(0, int_B - int_T)

    bbox1_area = (BBoxR1 - BBoxL1) * (BBoxB1 - BBoxT1)
    bbox2_area = (BBoxR2 - BBoxL2) * (BBoxB2 - BBoxT2)

    iou = intersection_area / (bbox1_area + bbox2_area - intersection_area)

    return iou


@step(name="EvaluateModel")
def evaluate(
    class_names: list,
    testset_folder: str,
    test_manifest_file: str,
    threshold_iou: float,
    threshold_confidence: float,
    output_folder: str,
):
    # initialize performance df
    data = np.zeros([len(class_names), 6], dtype=float)
    df_class_performance = pd.DataFrame(data=data, columns=["TP", "FP", "FN", "PR", "RE", "F1"])
    df_classes = pd.DataFrame(data=class_names, columns=["CLASS"])
    df_class_performance = pd.concat([df_classes, df_class_performance], axis=1)

    # open manifest file
    with s3_fs.open(test_manifest_file) as read_file:
        print(f"Evaluating {test_manifest_file}...")
        lines = read_file.readlines()

    # go through each JSON line
    for line in lines:
        ls_annotations = []
        image_info = json.loads(line)

        # get image
        filename = Path(image_info["source-ref"])
        print(f"Analyzing image {str(filename.name)}...")
        filename_with_path = Path(*filename.parts[2:])

        # get predictions from batch transform
        predictions_file = f"{testset_folder}/{str(filename.name)}.out"
        with s3_fs.open(predictions_file) as read_file:
            file_content = read_file.readlines()
        predictions = json.loads(file_content[0])["prediction"]
        df_predictions = pd.DataFrame(
            predictions, columns=["class", "confidence", "xmin", "ymin", "xmax", "ymax"]
        )

        # filter low confidence predictions
        df_predictions = df_predictions.loc[df_predictions["confidence"] >= threshold_confidence]

        image_width = image_info["retail-object-labeling"]["image_size"][0]["width"]
        image_height = image_info["retail-object-labeling"]["image_size"][0]["height"]
        df_predictions.loc[:, "xmin"] *= image_width
        df_predictions.loc[:, "xmax"] *= image_width
        df_predictions.loc[:, "ymin"] *= image_height
        df_predictions.loc[:, "ymax"] *= image_height
        df_predictions.loc[:, ["xmin", "xmax", "ymin", "ymax"]] = df_predictions.loc[
            :, ["xmin", "xmax", "ymin", "ymax"]
        ].round(decimals=0)

        # get annotations from manifest GT file
        for index, annotation in enumerate(image_info["retail-object-labeling"]["annotations"]):
            ls_ground_truth = []
            ls_ground_truth.append(
                image_info["retail-object-labeling"]["annotations"][index]["class_id"]
            )
            ls_ground_truth.append(
                image_info["retail-object-labeling"]["annotations"][index]["top"]
            )
            ls_ground_truth.append(
                image_info["retail-object-labeling"]["annotations"][index]["left"]
            )
            ls_ground_truth.append(
                image_info["retail-object-labeling"]["annotations"][index]["height"]
            )
            ls_ground_truth.append(
                image_info["retail-object-labeling"]["annotations"][index]["width"]
            )
            ls_annotations.append(ls_ground_truth)
        df_annotations = pd.DataFrame(
            data=ls_annotations, columns=["class_id", "top", "left", "height", "width"]
        )

        # create IOU array
        mat_iou = np.zeros((len(df_annotations), len(df_predictions)), dtype=float)
        for prediction_index in range(len(df_predictions)):
            for annotation_index in range(len(df_annotations)):
                iou = get_iou(
                    BBoxW1=df_predictions.loc[prediction_index, "xmax"]
                    - df_predictions.loc[prediction_index, "xmin"],
                    BBoxH1=df_predictions.loc[prediction_index, "ymax"]
                    - df_predictions.loc[prediction_index, "ymin"],
                    BBoxL1=df_predictions.loc[prediction_index, "xmin"],
                    BBoxT1=df_predictions.loc[prediction_index, "ymin"],
                    BBoxW2=df_annotations.loc[annotation_index, "width"],
                    BBoxH2=df_annotations.loc[annotation_index, "height"],
                    BBoxL2=df_annotations.loc[annotation_index, "left"],
                    BBoxT2=df_annotations.loc[annotation_index, "top"],
                )
                mat_iou[annotation_index, prediction_index] = iou
        mat_iou[mat_iou < threshold_iou] = 0  # binarize IOU array
        mat_iou[mat_iou > 0] = 1

        # analyzing IOU array
        for annotation_index in range(len(df_annotations)):
            class_id_annotation = int(df_annotations.loc[annotation_index, "class_id"])

            if mat_iou[annotation_index, :].sum() == 0:  # if no matches for this annotation
                df_class_performance.loc[class_id_annotation, "FN"] += 1

            elif (
                mat_iou[annotation_index, :].sum() == 1
            ):  # if only one matching for this annotation
                indx_nonzero = np.nonzero(mat_iou[annotation_index, :])[0][0]
                class_id_detection = int(df_predictions.loc[indx_nonzero, "class"])

                if class_id_annotation == class_id_detection:
                    df_class_performance.loc[class_id_detection, "TP"] += 1
                else:
                    df_class_performance.loc[class_id_detection, "FP"] += 1

            elif (
                mat_iou[annotation_index, :].sum() > 1
            ):  # if more than one matching for this annotation
                indx_nonzero = np.squeeze(
                    np.nonzero(mat_iou[annotation_index, :])[0]
                )  # many indices of nonzero ious
                conf_detection = df_predictions.loc[
                    indx_nonzero, "confidence"
                ]  # many confidences of nonzero ious
                indx_maxconf = indx_nonzero[
                    np.argmax(conf_detection)
                ]  # find the indx of max confidence
                class_id_maxconf = df_predictions.loc[
                    indx_maxconf, "class"
                ]  # find the class of max confidence

                indx_lowconf = np.delete(
                    indx_nonzero, np.argmax(conf_detection)
                )  # keep all the indexes without the one of max confidence
                class_id_lowconf = df_predictions.loc[
                    indx_lowconf, "class"
                ]  # find the classes of the rest

                if class_id_annotation == class_id_maxconf:
                    df_class_performance.loc[
                        class_id_maxconf, "TP"
                    ] += 1  # the max confidence is TP
                    df_class_performance.loc[class_id_lowconf, "FP"] += 1  # the rest are FP
                else:
                    df_class_performance.loc[class_id_maxconf, "FP"] += 1  # all are FP
                    df_class_performance.loc[class_id_lowconf, "FP"] += 1

            else:
                print("Problem with negative IOU values!")

        for prediction_index in range(len(df_predictions)):
            class_id_detection = int(df_predictions.loc[prediction_index, "class"])
            if mat_iou[:, prediction_index].sum() == 0:  # if no matches for this detection
                df_class_performance.loc[class_id_detection, "FP"] += 1

    # estimate metrics per class
    df_class_performance.loc[:, "PR"] = df_class_performance.loc[:, "TP"] / (
        df_class_performance.loc[:, "TP"] + df_class_performance.loc[:, "FP"]
    )
    df_class_performance.loc[:, "RE"] = df_class_performance.loc[:, "TP"] / (
        df_class_performance.loc[:, "TP"] + df_class_performance.loc[:, "FN"]
    )
    df_class_performance.loc[:, "F1"] = (
        2 * df_class_performance.loc[:, "PR"] * df_class_performance.loc[:, "RE"]
    ) / (df_class_performance.loc[:, "PR"] + df_class_performance.loc[:, "RE"])

    mean_macro = [
        "macro Average",
        "",
        "",
        "",
        df_class_performance.loc[:, "PR"].mean(),
        df_class_performance.loc[:, "RE"].mean(),
        df_class_performance.loc[:, "F1"].mean(),
    ]
    df_mean = pd.DataFrame(data=[mean_macro], columns=["CLASS", "TP", "FP", "FN", "PR", "RE", "F1"])
    df_class_performance = pd.concat([df_class_performance, df_mean], ignore_index=True)

    output_file = f"{output_folder}/results.csv"
    with s3_fs.open(output_file, "w") as output_handle:
        df_class_performance.to_csv(output_handle)

    return output_file
Once again, use a delayed return to create the step for the pipeline.
[ ]:
delayed_evaluate = evaluate(
    class_names,
    step_transform.properties.TransformOutput.S3OutputPath,
    s3_test_manifest,
    0.5,
    0.2,
    f"s3://{bucket_name}/{prefix_project}/{prefix_results}",
)
Build pipeline
Finally, define the pipeline. You only have to provide the last step.
[ ]:
pipeline = Pipeline(
    name=unique_name_from_base("retail-computer-vision"),
    steps=[delayed_evaluate],
)
Create or update the pipeline.
[ ]:
pipeline.upsert(role_arn=sagemaker_role)
Now run a pipeline execution.
[ ]:
execution = pipeline.start()
execution.wait(delay=300, max_attempts=18)
You can view the execution’s progress in SageMaker Studio, or you can run the cells below to retrieve information on it.
[ ]:
execution.describe()
[ ]:
execution.list_steps()
[ ]:
output_file_s3_uri = execution.result(step_name="EvaluateModel")
print(output_file_s3_uri)
When the pipeline execution has successfully finished, you will find a results.csv file in your S3 bucket. The full path to the results file is printed by the cell above. Below is an example of the output it will contain, but remember that your output will differ.
CLASS |
TP |
FP |
FN |
PR |
RE |
F1 |
|
|---|---|---|---|---|---|---|---|
0 |
flakes |
6.0 |
0.0 |
1.0 |
1.0 |
0.8571428571428571 |
0.923076923076923 |
1 |
mm |
10.0 |
3.0 |
1.0 |
0.7692307692307693 |
0.9090909090909091 |
0.8333333333333333 |
2 |
coke |
9.0 |
0.0 |
3.0 |
1.0 |
0.75 |
0.8571428571428571 |
3 |
spam |
8.0 |
1.0 |
3.0 |
0.8888888888888888 |
0.7272727272727273 |
0.7999999999999999 |
4 |
nutella |
13.0 |
0.0 |
1.0 |
1.0 |
0.9285714285714286 |
0.962962962962963 |
5 |
doritos |
10.0 |
0.0 |
2.0 |
1.0 |
0.8333333333333334 |
0.9090909090909091 |
6 |
ritz |
11.0 |
1.0 |
1.0 |
0.9166666666666666 |
0.9166666666666666 |
0.9166666666666666 |
7 |
skittles |
10.0 |
0.0 |
0.0 |
1.0 |
1.0 |
1.0 |
8 |
mountaindew |
13.0 |
0.0 |
1.0 |
1.0 |
0.9285714285714286 |
0.962962962962963 |
9 |
evian |
5.0 |
0.0 |
2.0 |
1.0 |
0.7142857142857143 |
0.8333333333333333 |
10 |
macro Average |
0.9574786324786324 |
0.8564935064935064 |
0.899856994856995 |
Clean Up
This section helps clean up the resources created by running this notebook.
Warning: This section does not clean up the data and results uploaded to Amazon S3. Please delete these resources manually.
The code below deletes the SageMaker pipeline.
[ ]:
pipeline.delete()
Notebook CI Test Results
This notebook was tested in multiple regions. The test results are as follows, except for us-west-2 which is shown at the top of the notebook.