Scale interactive experimentation to scheduled jobs on SageMaker Studio Notebooks without changing code.
This notebook’s CI test result for us-west-2 is as follows. CI test results in other regions can be found at the end of the notebook.
In addition to the the interactive ML experience that Amazon SageMaker Studio provides, data workers also seek solutions to execute notebooks as batch jobs without the need to refactor code as python modules and without having to learn DevOps tools and best practices to automate and manage their deployment infrastructure. Some common usecases for doing this include:
Executing model inference regularly to generate reports
Scaling up a feature engineering step after having tested in Studio against a small subset of data on a small instance
Re-training and deploying models on events of new data arrivals
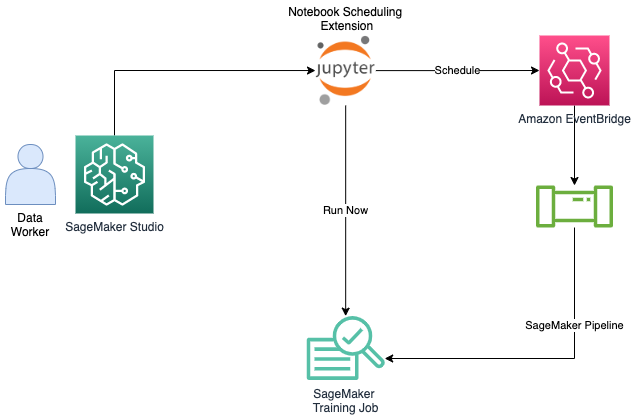
SageMaker Studio provides an built-in extension for you to run your notebooks as-is or in a parameterized fashion. You can run these notebooks on a schedule or immedietely with the run-now capability. There’s no need for the end user to modify their existing notebook code.
Prerequisites
In order to utilize the SageMaker Job Scheduling extension you’ll need to have JupyterLab3 enabled for your Studio IDE. More information on this process can be found in the documentation
Example Background
Customer Churn Use Case
Losing customers is costly for any business. For our scheduled notebook workflow, we’re going to use a familiar example of customer churn: leaving a mobile phone operator. If a provider knows that a customer is thinking of leaving, it can offer timely incentives and the customer may stick around. Incentives are often much more cost-effective than losing and reacquiring a customer.
Solution Overview
We’re going to build an end to end workflow which will train a refreshed machine learning model on recent data and then generate a daily report. The process will be as follows:
Gather “the last two weeks” of carrier data. In production, this may be from a data lake or feature store.
Process that data in order to train a refreshed machine learning model.
Train a scikit-learn RandomForest model on the previous data
Plot the Confusion matrix and F1 score of our refreshed model so that we can understand it’s effectiveness on known data
Run inference using our refreshed model on “todays” recent data to determine which accounts are at risk of leaving the carrier
Schedule this notebook to execute every day.
Install or Upgrade Packages
[ ]:
# Install Reinvent Wheels
! pip install --upgrade sagemaker
Parameterize Notebook
Using notebook cell metadata, we can mark a cell with the tag “parameters” if we want to modify any variables during automated execution. For this example, we’ll specify default hyperparamter values which can be modified for our notebook job. To mark a cell as parameter inputs, simply select the wheel icon on the right panel and add a “parameters” tag:
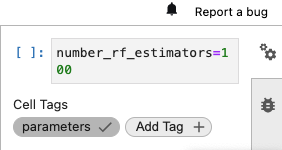
[ ]:
# These parameters can be modified when executing this notebook as a job
number_rf_estimators = 100
Prepare Data
In this example we’ll use a synthetic dataset from a Telecommunications company that we’ll use to predict whether or not a particular customer will leave or churn. For a more in-depth exploratory data analysis, view this example
[ ]:
# You can download additional assets for your use in your notebook jobs
import boto3

s3 = boto3.client("s3")
s3.download_file(
    f"sagemaker-example-files-prod-{boto3.session.Session().region_name}",
    "datasets/scripts/sagemaker-studio-scheduling/synthetic_data.py",
    "synthetic_data.py",
)
[ ]:
import pandas as pd
from synthetic_data import generate_data


previous_two_weeks_data = generate_data(5000, label_known=True)
todays_data = generate_data(300, label_known=False)

previous_two_weeks_data.head()
[ ]:
def process_data(df, label_known):
    """
    This function represents typical data munging that needs to be performed for machine learning workflows.
    We'll cast data types, drop columns that are irrelevant as features to the model, and convert categorical
    features into indicator variables. If the data is not from the ground truth dataset, we'll drop it's churn label.
    """
    df = df.drop("Phone", axis=1)
    df["Area Code"] = df["Area Code"].astype(object)
    df = df.drop(["Day Charge", "Eve Charge", "Night Charge", "Intl Charge"], axis=1)
    model_data = pd.get_dummies(df)

    if label_known:
        model_data = pd.concat(
            [
                model_data["Churn?_True."],
                model_data.drop(["Churn?_False.", "Churn?_True."], axis=1),
            ],
            axis=1,
        )
        model_data = model_data.rename(columns={"Churn?_True.": "Churn"})

    return model_data
[ ]:
processed_prior_data = process_data(previous_two_weeks_data, label_known=True)
processed_todays_data = process_data(todays_data, label_known=False)
Train a refreshed model
In our example, we’re going to train a refreshed model on the previous 2 weeks of data. In production, you may wish to train a refreshed model or even fine-tune an existing one
[ ]:
import numpy as np
import matplotlib.pyplot as plt
from sklearn.model_selection import train_test_split
from sklearn.ensemble import RandomForestClassifier
from sklearn.metrics import f1_score, confusion_matrix, ConfusionMatrixDisplay

y = np.ravel(processed_prior_data[["Churn"]])
x = processed_prior_data.drop(["Churn"], axis=1)

x_train, x_test, y_train, y_test = train_test_split(x, y, test_size=0.25)

clf = RandomForestClassifier(n_estimators=int(number_rf_estimators), criterion="gini")
clf.fit(x_train, y_train)
Generate predictions from the refreshed model on our validation dataset
[ ]:
# Run Inference on test set
from IPython.display import Markdown as md

y_pred = clf.predict(x_test)
f1 = f1_score(y_test, y_pred)
md("## Refreshed Model's F1 Score on validation data: {:.2f}".format(f1))
[ ]:
# Plot test set results
cm = confusion_matrix(y_test, y_pred)
disp = ConfusionMatrixDisplay(confusion_matrix=cm, display_labels=["Churn", "Didn't Churn"])
disp.plot()
plt.show()
Run inference on today’s data
[ ]:
todays_predictions = clf.predict(processed_todays_data)
accounts_likely_to_churn = pd.concat(
    [pd.DataFrame(todays_predictions, columns=["Predicted Churn"]), processed_todays_data], axis=1
)
accounts_likely_to_churn = accounts_likely_to_churn[
    accounts_likely_to_churn["Predicted Churn"] == 1
]

accounts_likely_to_churn.head()
Store predictions
In a production setting, you may want to store these predictions into a database such as DynamoDB or trigger a corresponding action based on the account-ids. Alternatively, you may want to register this particular model into SageMaker Model Registry.
Run the Notebook as a job to visualize how the daily report will look
Right click your notebook and select “Create Notebook Job”
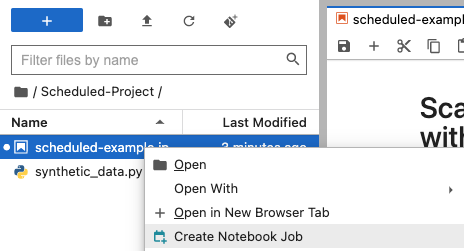
Alternatively you can select the “Notebook job” icon on your notebook bar
![]()
Choose the right instance type for your scheduled job based on your workload - Standard Instances, Compute Optimized Instances or Accelerated computing instances that contain GPUs. You can choose any of the instances available for SageMaker training jobs. See here for the complete list of instances available: https://aws.amazon.com/sagemaker/pricing/
You can expand the “Additional Options” to modify any other settings. SageMaker Studio will automatically detect the Image/Kernel you are using in your notebook and will pre-select it for you. Ensure that you have validated this selection.
You can enter a new value for the
number_rf_estimatorsif you’d like
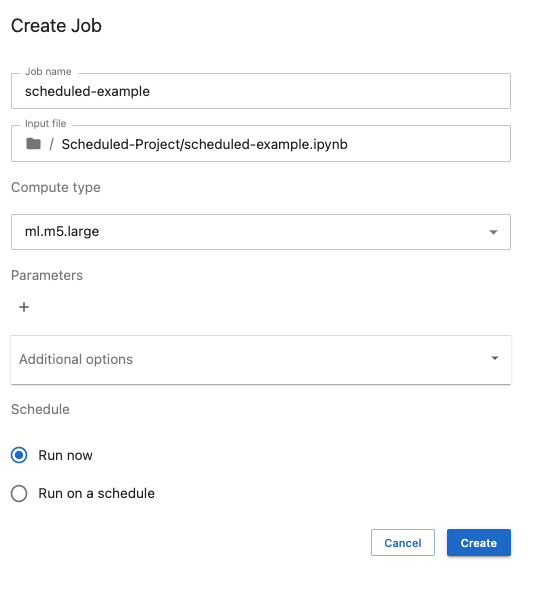
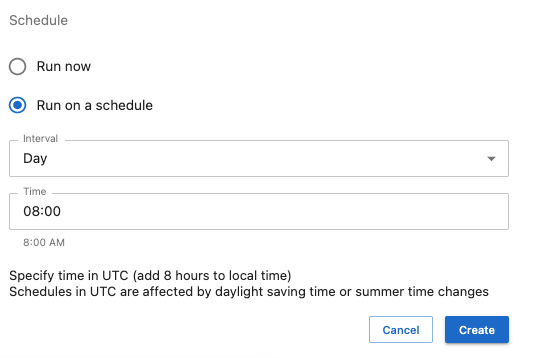
Schedule Notebook as a Job for Daily Reports
To run this self contained notebook as a daily scheduled job, we can simply use the built-in functionality available in SageMaker Studio. You may need to add permissions to your SageMaker execution role. More information can be found in the documentation.
Simply click the “Run on a schedule” button and set your desired schedule
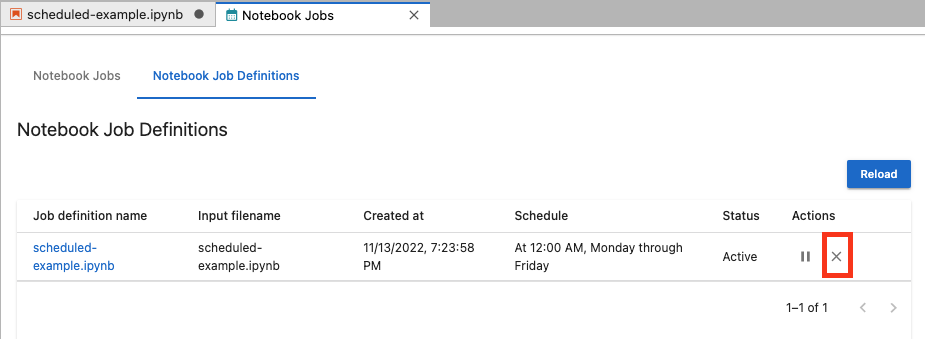
Clean Up
If you scheduled this notebook, be sure to delete your schedule job definition once your experimentation is complete.
Notebook CI Test Results
This notebook was tested in multiple regions. The test results are as follows, except for us-west-2 which is shown at the top of the notebook.