Ingest data with Redshift
This notebook’s CI test result for us-west-2 is as follows. CI test results in other regions can be found at the end of the notebook.
This notebook demonstrates how to set up a database with Redshift and query data with it.
Amazon Redshift is a fully managed data warehouse that allows you to run complex analytic queries against petabytes of structured data. Your queries are distributed and parallelized across multiple physical resources, and you can easily scale your Amazon Redshift environment up and down depending on your business needs.
You can also check the existing notebook for more information on how to load data from and save data to Redshift.
When should you use Redshift?
While Athena is mostly used to run ad-hoc queries on Amazon S3 data lake, Redshift is usually recommended for large structured data sets, or traditional relational database; it does well with performing aggregations, complex joins, and inner queries. You would need to set up and load the cluster before using it; and you need to load data into created tables.
Set up Redshift
First we are going to make sure we have policy attached to our role (The role we will create specifically for the Redshift task) to access Redshift. You can do this through IAM client as below, or through the AWS console.
Note: You would need IAMFullAccess to attach policies to the role.
Attach IAMFullAccess Policy from Console
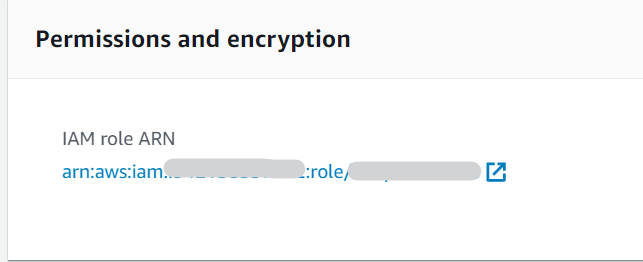
1. Go to Sagemaker Console, choose notebook instances in the navigation panel, then select your notebook instance to view the details. Then under Permissions and Encryption, click on the IAM role ARN link and it will take you to your role summery in the IAM Console.
2. Click on Create Policy under Permissions.

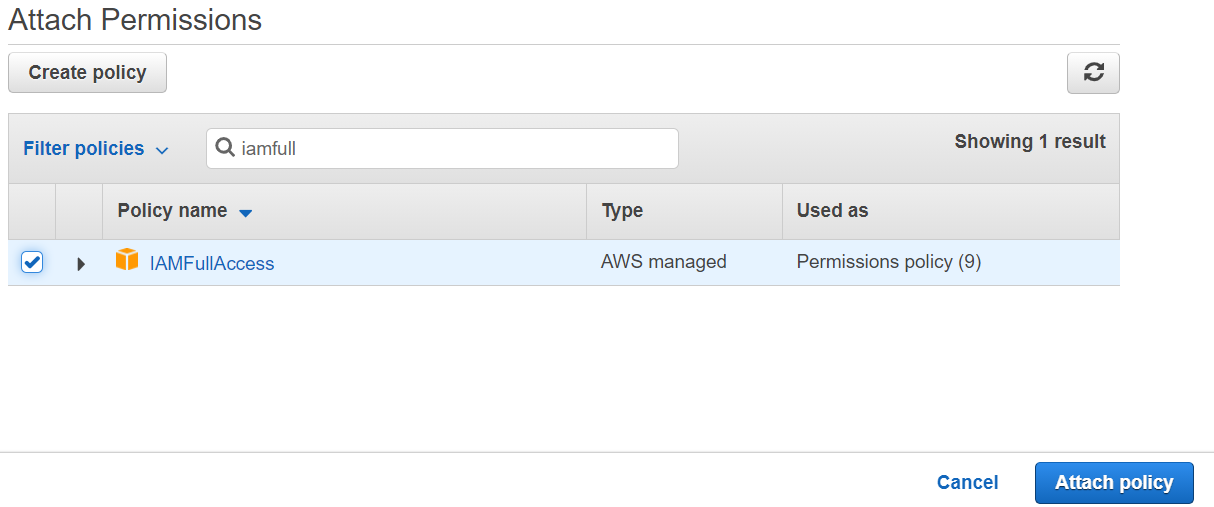
3. In the Attach Permissions page, search for IAMFullAccess. It will show up in the policies search results if it has not been attached to your role yet. Select the checkbox for the IAMFullAccess Policy, then click Attach Policy. You now have the policy successfully attached to your role.
Dataset
This example uses the California Housing dataset, which was originally published in:
Pace, R. Kelley, and Ronald Barry. “Sparse spatial autoregressions.” Statistics & Probability Letters 33.3 (1997): 291-297.
[ ]:
%pip install -qU 'sagemaker>=2.15.0' 'PyAthena==1.10.7' 'awswrangler==1.2.0' 'SQLAlchemy==1.3.13'
[ ]:
import io
import boto3
import sagemaker
import json
from sagemaker import get_execution_role
import os
from sklearn.datasets import *
import pandas as pd
from botocore.exceptions import ClientError
import awswrangler as wr
from datetime import date

# Get region
session = boto3.session.Session()
region_name = session.region_name

# Get SageMaker session & default S3 bucket
sagemaker_session = sagemaker.Session()
bucket = sagemaker_session.default_bucket()  # replace with your own bucket name if you have one
role = sagemaker.get_execution_role()
prefix = "data/tabular/california_housing"
filename = "california_housing.csv"
[ ]:
iam = boto3.client("iam")
sts = boto3.client("sts")
redshift = boto3.client("redshift")
sm = boto3.client("sagemaker")
s3 = sagemaker_session.boto_session.resource("s3")
[ ]:
role_name = role.split("/")[-1]
print("Your Role name used to create this notebook is: {}".format(role_name))
[ ]:
# helper functions to upload data to s3
def write_to_s3(filename, bucket, prefix):
    # put one file in a separate folder. This is helpful if you read and prepare data with Athena
    filename_key = filename.split(".")[0]
    key = "{}/{}/{}".format(prefix, filename_key, filename)
    return s3.Bucket(bucket).upload_file(filename, key)


def upload_to_s3(bucket, prefix, filename):
    url = "s3://{}/{}/{}".format(bucket, prefix, filename)
    print("Writing to {}".format(url))
    write_to_s3(filename, bucket, prefix)
[ ]:
tabular_data = fetch_california_housing()
tabular_data_full = pd.DataFrame(tabular_data.data, columns=tabular_data.feature_names)
tabular_data_full["target"] = pd.DataFrame(tabular_data.target)
tabular_data_full.to_csv("california_housing.csv", index=False)

upload_to_s3(bucket, "data/tabular", filename)
The policy enables Redshift to assume the role. The services can then perform any tasks granted by the permissions policy assigned to the role (which we will attach to it later).
[ ]:
assume_role_policy_doc = {
    "Version": "2012-10-17",
    "Statement": [
        {
            "Effect": "Allow",
            "Principal": {"Service": "redshift.amazonaws.com"},
            "Action": "sts:AssumeRole",
        }
    ],
}
[ ]:
# Create Role
iam_redshift_role_name = "Tabular_Redshift"
try:
    iam_role_redshift = iam.create_role(
        RoleName=iam_redshift_role_name,
        AssumeRolePolicyDocument=json.dumps(assume_role_policy_doc),
        Description="Tabular data Redshift Role",
    )
except ClientError as e:
    if e.response["Error"]["Code"] == "EntityAlreadyExists":
        print("Role already exists")
    else:
        print("Unexpected error: %s" % e)
[ ]:
# get role arn
role_rs = iam.get_role(RoleName="Tabular_Redshift")
iam_role_redshift_arn = role_rs["Role"]["Arn"]
print("Your Role arn used to create a Redshift Cluster is: {}".format(iam_role_redshift_arn))
We will create policies we used to access S3 and Athena. The two policies we will create here are: * S3FullAccess: arn:aws:iam::aws:policy/AmazonS3FullAccess * AthenaFullAccess: arn:aws:iam::aws:policy/AmazonAthenaFullAccess
You can check the policy document in the IAM console and copy the policy file here.
[ ]:
# s3FullAccess
my_redshift_to_s3 = {
    "Version": "2012-10-17",
    "Statement": [{"Effect": "Allow", "Action": "s3:*", "Resource": "*"}],
}
[ ]:
# Athena Full Access
my_redshift_to_athena = {
    "Version": "2012-10-17",
    "Statement": [
        {"Effect": "Allow", "Action": ["athena:*"], "Resource": ["*"]},
        {
            "Effect": "Allow",
            "Action": [
                "glue:CreateDatabase",
                "glue:DeleteDatabase",
                "glue:GetDatabase",
                "glue:GetDatabases",
                "glue:UpdateDatabase",
                "glue:CreateTable",
                "glue:DeleteTable",
                "glue:BatchDeleteTable",
                "glue:UpdateTable",
                "glue:GetTable",
                "glue:GetTables",
                "glue:BatchCreatePartition",
                "glue:CreatePartition",
                "glue:DeletePartition",
                "glue:BatchDeletePartition",
                "glue:UpdatePartition",
                "glue:GetPartition",
                "glue:GetPartitions",
                "glue:BatchGetPartition",
            ],
            "Resource": ["*"],
        },
        {
            "Effect": "Allow",
            "Action": [
                "s3:GetBucketLocation",
                "s3:GetObject",
                "s3:ListBucket",
                "s3:ListBucketMultipartUploads",
                "s3:ListMultipartUploadParts",
                "s3:AbortMultipartUpload",
                "s3:CreateBucket",
                "s3:PutObject",
            ],
            "Resource": ["arn:aws:s3:::aws-athena-query-results-*"],
        },
        {
            "Effect": "Allow",
            "Action": ["s3:GetObject", "s3:ListBucket"],
            "Resource": ["arn:aws:s3:::athena-examples*"],
        },
        {
            "Effect": "Allow",
            "Action": ["s3:ListBucket", "s3:GetBucketLocation", "s3:ListAllMyBuckets"],
            "Resource": ["*"],
        },
        {
            "Effect": "Allow",
            "Action": ["sns:ListTopics", "sns:GetTopicAttributes"],
            "Resource": ["*"],
        },
        {
            "Effect": "Allow",
            "Action": [
                "cloudwatch:PutMetricAlarm",
                "cloudwatch:DescribeAlarms",
                "cloudwatch:DeleteAlarms",
            ],
            "Resource": ["*"],
        },
        {"Effect": "Allow", "Action": ["lakeformation:GetDataAccess"], "Resource": ["*"]},
    ],
}
[ ]:
try:
    policy_redshift_s3 = iam.create_policy(
        PolicyName="Tabular_RedshiftPolicyToS3", PolicyDocument=json.dumps(my_redshift_to_s3)
    )
    print("Policy created.")
except ClientError as e:
    if e.response["Error"]["Code"] == "EntityAlreadyExists":
        print("Policy already exists")
    else:
        print("Unexpected error: %s" % e)

account_id = sts.get_caller_identity()["Account"]
policy_redshift_s3_arn = f"arn:aws:iam::{account_id}:policy/Tabular_RedshiftPolicyToS3"
[ ]:
try:
    policy_redshift_athena = iam.create_policy(
        PolicyName="Tabular_RedshiftPolicyToAthena",
        PolicyDocument=json.dumps(my_redshift_to_athena),
    )
    print("Policy created.")
except ClientError as e:
    if e.response["Error"]["Code"] == "EntityAlreadyExists":
        print("Policy already exists")
    else:
        print("Unexpected error: %s" % e)

account_id = sts.get_caller_identity()["Account"]
policy_redshift_athena_arn = f"arn:aws:iam::{account_id}:policy/Tabular_RedshiftPolicyToAthena"
[ ]:
# Attach RedshiftPolicyToAthena policy
try:
    response = iam.attach_role_policy(
        PolicyArn=policy_redshift_athena_arn, RoleName=iam_redshift_role_name
    )
except ClientError as e:
    if e.response["Error"]["Code"] == "EntityAlreadyExists":
        print("Policy is already attached. This is ok.")
    else:
        print("Unexpected error: %s" % e)
[ ]:
# Attach RedshiftPolicyToS3 policy
try:
    response = iam.attach_role_policy(
        PolicyArn=policy_redshift_s3_arn, RoleName=iam_redshift_role_name
    )
except ClientError as e:
    if e.response["Error"]["Code"] == "EntityAlreadyExists":
        print("Policy is already attached. This is ok.")
    else:
        print("Unexpected error: %s" % e)
SecretsManagerReadWrite: we will use this service to store and retrive our Redshift Credentials.AmazonRedshiftFullAccess: we will use this role to create a Redshift cluster from the notebook.
[ ]:
# making sure you have secret manager policy attached to role
try:
    policy = "SecretsManagerReadWrite"
    response = iam.attach_role_policy(
        PolicyArn="arn:aws:iam::aws:policy/{}".format(policy), RoleName=role_name
    )
    print("Policy %s has been succesfully attached to role: %s" % (policy, role_name))
except ClientError as e:
    if e.response["Error"]["Code"] == "EntityAlreadyExists":
        print("Policy is already attached.")
    else:
        print("Unexpected error: %s " % e)
[ ]:
# making sure you have RedshiftFullAccess policy attached to role
from botocore.exceptions import ClientError

try:
    policy = "AmazonRedshiftFullAccess"
    response = iam.attach_role_policy(
        PolicyArn="arn:aws:iam::aws:policy/{}".format(policy), RoleName=role_name
    )
    print("Policy %s has been succesfully attached to role: %s" % (policy, role_name))
except ClientError as e:
    if e.response["Error"]["Code"] == "EntityAlreadyExists":
        print("Policy is already attached. ")
    else:
        print("Unexpected error: %s " % e)
Optional: Create Redshift Cluster
Most of the times we have a Redshift cluster already up and running and we want to connect to the cluster in-use, but if you want to create a new cluster, you can follow the steps below to create one. Note that only some Instance Types support Redshift Query Editor, so be careful when you specify the Redshift Cluster Nodes.(https://docs.aws.amazon.com/redshift/latest/mgmt/query-editor.html).
[ ]:
notebook_instance_name = sm.list_notebook_instances()["NotebookInstances"][0][
    "NotebookInstanceName"
]
Your IAM role will need permission to create a secret and get its value. This can be accomplished with the SecretsManagerReadWrite managed policy.
AWS Secrets Manager is a service that enables you to easily rotate, manage, and retrieve database credentials, API keys, and other secrets throughout their lifecycle. Using Secrets Manager, you can secure and manage secrets used to access resources in the AWS Cloud, on third-party services, and on-premises.
*note that MasterUserPassword must contain at least 1 upper case letter and at least 1 decimal digit.
Ensure that you change the secret password to be unique and secure.
[ ]:
secretsmanager = boto3.client("secretsmanager")

try:
    response = secretsmanager.create_secret(
        Name="tabular_redshift_login",
        Description="California Housing data New Cluster Redshift Login",
        SecretString='[{"username":"awsuser"},{"password":"Californiahousing1"}]',
        Tags=[
            {"Key": "name", "Value": "tabular_redshift_login"},
        ],
    )
except ClientError as e:
    if e.response["Error"]["Code"] == "ResourceExistsException":
        print("Secret already exists. This is ok.")
    else:
        print("Unexpected error: %s" % e)
[ ]:
# And retrieving the secret again
secretsmanager = boto3.client("secretsmanager")
import json

secret = secretsmanager.get_secret_value(SecretId="tabular_redshift_login")
cred = json.loads(secret["SecretString"])

master_user_name = cred[0]["username"]
master_user_pw = cred[1]["password"]
[ ]:
# Set up parameters
# Redshift configuration parameters
redshift_cluster_identifier = "redshiftdemo"
database_name = "california_housing"
cluster_type = "multi-node"

node_type = "dc2.large"
number_nodes = "2"
When creating a new cluster, you want to make sure that the Redshift VPC is the same one you used to create your notebook in. Your VPC should have the following two VPC attributes set to yes: DNS resolution and DNS hostnames. You can either specify a security group or specify a created cluster subnet group name (which you will create from the Redshift console).
If you are not using default VPC and using security group returns VPC error, you can try create a subnet group in Redshift Console, by choose Configurations -> subnet groups -> create cluster subnet group, then specify the VPC and subnet you want to choose and you created this notebook in. Specify the ClusterSubnetGroupName in the following command with the subnet group you created.
[ ]:
notebook_instance = sm.describe_notebook_instance(NotebookInstanceName=notebook_instance_name)
security_group_id = notebook_instance["SecurityGroups"][0]
print(security_group_id)
[ ]:
response = redshift.create_cluster(
    DBName=database_name,
    ClusterIdentifier=redshift_cluster_identifier,
    ClusterType=cluster_type,
    NodeType=node_type,
    NumberOfNodes=int(number_nodes),
    MasterUsername=master_user_name,
    MasterUserPassword=master_user_pw,
    # ClusterSubnetGroupName="<cluster-subnet-group-1>",  # you can either specify an existing subnet group (change this to your Subnet Group name), or use the security group ID that was retrieved above
    IamRoles=[iam_role_redshift_arn],
    VpcSecurityGroupIds=[security_group_id],
    Port=5439,
    PubliclyAccessible=False,
)

print(response)
Wait until the status of your redshift cluster become available.
[ ]:
# check cluster status
response = redshift.describe_clusters(ClusterIdentifier=redshift_cluster_identifier)
cluster_status = response["Clusters"][0]["ClusterStatus"]
print("Your Redshift Cluster Status is: " + cluster_status)
Existing Redshift Cluster
Your existing Redshift cluster have to be in the same VPC as your notebook instance.
Also, note that this Notebook instance needs to resolve to a private IP when connecting to the Redshift instance. There are two ways to resolve the Redshift DNS name to a private IP:
The Redshift cluster is not publicly accessible so by default it will resolve to private IP. The Redshift cluster is publicly accessible and has an EIP associated with it but when accessed from within a VPC, it should resolve to private IP of the Redshift cluster. This is possible by setting following two VPC attributes to yes: DNS resolution and DNS hostnames. For instructions on setting that up, see Redshift public docs on Managing Clusters in an Amazon Virtual Private Cloud (VPC).
We will use sqlalchemy to connect to the redshift database engine.
[ ]:
from sqlalchemy import create_engine
from sqlalchemy.orm import sessionmaker
Retrive Redshift credentials from Secret Manager
[ ]:
secretsmanager = boto3.client("secretsmanager")
secret = secretsmanager.get_secret_value(SecretId="tabular_redshift_login")
cred = json.loads(secret["SecretString"])

master_user_name = cred[0]["username"]
master_user_pw = cred[1]["password"]
Set up parameters for connection: replace with your own parameters
We are going to use the data and schema created in the sequel notebook Ingest_data_with_Athena.ipynb. If you see an error below, please make sure you run through the 02_Ingest_data_with_Athena.ipynb notebook before the next steps.
[ ]:
redshift_cluster_identifier = "redshiftdemo"

database_name_redshift = "california_housing"
database_name_athena = "tabular_california_housing"

redshift_port = "5439"

schema_redshift = "redshift"
schema_spectrum = "spectrum"

table_name_csv = "california_housing_athena"
Check cluster status to see if it is available
[ ]:
# check cluster status
response = redshift.describe_clusters(ClusterIdentifier=redshift_cluster_identifier)
cluster_status = response["Clusters"][0]["ClusterStatus"]
print("Cluster status is:", cluster_status)
[ ]:
# Get Redshift Endpoint Address & IAM Role
redshift_endpoint_address = response["Clusters"][0]["Endpoint"]["Address"]
iam_role = response["Clusters"][0]["IamRoles"][0]["IamRoleArn"]

print("Redshift endpoint: {}".format(redshift_endpoint_address))
print("IAM Role: {}".format(iam_role))
Create Engine
https://docs.sqlalchemy.org/en/13/core/engines.html
[ ]:
# Connect to Redshift Database Engine
engine = create_engine(
    "postgresql://{}:{}@{}:{}/{}".format(
        master_user_name,
        master_user_pw,
        redshift_endpoint_address,
        redshift_port,
        database_name_redshift,
    )
)
Create Session: we will use this session to run SQL commands
[ ]:
# config session
session = sessionmaker()
session.configure(bind=engine)
s = session()
Method 1: Access Data without Moving it to Redshift: Amazon Redshift Spectrum
Redshift Spectrum is used to query data directly from files on Amazon S3.You will need to create external tables in an external schema. The external schema references a database in the external data catalog and provides the IAM role ARN that authorizes your cluster to access Amazon S3 on your behalf. #### Get table and schema information from the Glue Catalog: getting meta data from data catalog and connecting to the Athena database
[ ]:
statement = """
rollback;
create external schema if not exists {} from data catalog
    database '{}'
    iam_role '{}'
    create external database if not exists
""".format(
    schema_spectrum, database_name_athena, iam_role
)

s.execute(statement)
s.commit()
Run a sample query through Redshift Spectrum
[ ]:
statement = """
select *
    from {}.{} limit 10
""".format(
    schema_spectrum, table_name_csv
)

df = pd.read_sql_query(statement, engine)
df.head(5)
Method 2: Loading Data into Redshift from Athena
To load data into Redshift, you need to either use COPY command or INSERT INTO command to move data into a table from data files. Copied files may reside in an S3 bucket, an EMR cluster, or on a remote host accessed.
Create and Upload Data into Athena Database
[ ]:
database_name = "tabular_california_housing"
table_name_csv = "california_housing_athena"

# SQL statement to execute
statement = """CREATE EXTERNAL TABLE IF NOT EXISTS {}.{}(
        MedInc double,
        HouseAge double,
        AveRooms double,
        AveBedrms double,
        Population double,
        AveOccup double,
        Latitude double,
        Longitude double,
        MedValue double

) ROW FORMAT DELIMITED FIELDS TERMINATED BY ',' LINES TERMINATED BY '\\n' LOCATION '{}'
TBLPROPERTIES ('skip.header.line.count'='1')""".format(
    database_name, table_name_csv, data_s3_path
)

# Execute statement using connection cursor
cursor = connect(region_name=region_name, s3_staging_dir=s3_staging_dir).cursor()
cursor.execute(statement)
[ ]:
# verify the table has been created
statement = "SHOW TABLES in {}".format(database_name)
cursor.execute(statement)

df_show = as_pandas(cursor)
df_show.head(5)
Create Schema in Redshift
[ ]:
# create schema
statement = """create schema if not exists {}""".format(schema_redshift)

s = session()
s.execute(statement)
s.commit()
Create Redshift Table
[ ]:
table_name_redshift = table_name_csv + "_" + "redshift_insert"
statement = """
rollback;
create table if not exists redshift.{}(
        MedInc float,
        HouseAge float,
        AveRooms float,
        AveBedrms float,
        Population float,
        AveOccup float,
        Latitude float,
        Longitude float,
        MedValue float)""".format(
    table_name_redshift
)

s.execute(statement)
s.commit()
Insert into data into the table we created
https://docs.aws.amazon.com/redshift/latest/dg/c_Examples_of_INSERT_30.html
[ ]:
table_name_redshift = table_name_csv + "_" + "redshift_insert"

statement = """
    insert into redshift.{}
        select * from {}.{}
    """.format(
    table_name_redshift, schema_spectrum, table_name_csv
)
s.execute(statement)
s.commit()
Query data in Redshift
[ ]:
statement = """
     select * from redshift.{} limit 10
""".format(
    table_name_redshift
)
df = pd.read_sql_query(statement, engine)
df.head(5)
Method 3: Copy data directly from S3
You can also Copy Data into a new table. https://docs.aws.amazon.com/redshift/latest/dg/tutorial-loading-run-copy.html
Create a new Schema in Redshift
[ ]:
# create a new sample table
table_name_redshift = table_name_csv + "_" + "redshift_copy"
statement = """
rollback;
create table if not exists redshift.{}(
        MedInc float,
        HouseAge float,
        AveRooms float,
        AveBedrms float,
        Population float,
        AveOccup float,
        Latitude float,
        Longitude float,
        MedValue float)""".format(
    table_name_redshift
)

s.execute(statement)
s.commit()
Copy data into Redshift table
Redshift assumes your data comes in pipe delimited, so if you are reading in csv or txt, be sure to specify the delimiter. To load data that is in CSV format, add csv to your COPY command. Also since we are reading directly from S3, if your data has header, remember to add ignoreheader to your command.
[ ]:
table_name_redshift = table_name_csv + "_" + "redshift_copy"
data_s3_path = "s3://{}/data/tabular/california_housing/california_housing.csv".format(bucket)
statement = """
rollback;
copy redshift.{}
  from '{}'
  iam_role '{}'
  csv
  ignoreheader 1
    """.format(
    table_name_redshift, data_s3_path, iam_role
)
s.execute(statement)
s.commit()
[ ]:
statement = """
     select * from redshift.{} limit 10
""".format(
    table_name_redshift
)
df_copy = pd.read_sql_query(statement, engine)
df_copy.head(5)
Error Handling
Sometimes you might see an error stating” Load into table ‘part’ failed. Check ‘stl_load_errors’ system table for details.”, and below is a helpful function to check where the copying process went wrong. You can find more information in the Redshift Load Error documentation.
[ ]:
statement = """
select query, substring(filename,22,25) as filename,line_number as line,
substring(colname,0,12) as column, type, position as pos, substring(raw_line,0,30) as line_text,
substring(raw_field_value,0,15) as field_text,
substring(err_reason,0,45) as reason
from stl_load_errors
order by query desc
limit 10"""
error = pd.read_sql_query(statement, engine)
error.head(5)
Method 4: AWS Data Wrangler
You can find more information on how AWS Data Wrangler works at this tutorial.
Run this command within a private subnet. You can find your host address by going to the Redshift Console, then choose Clusters -> Property -> Connection details -> View all connection details -> Node IP address -> Private IP address. https://aws-data-wrangler.readthedocs.io/en/latest/stubs/awswrangler.db.get_engine.html#awswrangler.db.get_engine
[ ]:
private_ip = redshift.describe_clusters(ClusterIdentifier=redshift_cluster_identifier)["Clusters"][
    0
]["ClusterNodes"][0]["PrivateIPAddress"]
print("Private IP address is: ", private_ip)
[ ]:
engine = wr.db.get_engine(
    db_type="postgresql",
    host=private_ip,  # Private IP address of your Redshift Cluster
    port=redshift_port,
    database=database_name_redshift,
    user=master_user_name,
    password=master_user_pw,
)
[ ]:
df = wr.db.read_sql_query("SELECT * FROM redshift.{}".format(table_name_redshift), con=engine)
[ ]:
df.head()
Data Science On AWS workshops, Chris Fregly, Antje Barth, https://www.datascienceonaws.com/
Notebook CI Test Results
This notebook was tested in multiple regions. The test results are as follows, except for us-west-2 which is shown at the top of the notebook.