Audit and Improve Video Annotation Quality Using Amazon SageMaker Ground Truth
This notebook’s CI test result for us-west-2 is as follows. CI test results in other regions can be found at the end of the notebook.
This notebook walks through how to evaluate the quality of video annotations received from SageMaker Ground Truth annotators using several metrics.
The standard functionality of this notebook works with the standard Conda Python3/Data Science kernel; however, there is an optional section that uses a PyTorch model to generate image embeddings.
Start by importing the required libraries and initializing the session and other variables used in this notebook. By default, the notebook uses the default Amazon S3 bucket in the same AWS Region you use to run this notebook. If you want to use a different S3 bucket, make sure it is in the same AWS Region you use to complete this tutorial, and specify the bucket name for bucket.
[ ]:
!pip install tqdm
[ ]:
%pylab inline
import json
import os
import sys
import boto3
import sagemaker as sm
import subprocess
from glob import glob
from tqdm import tqdm
from PIL import Image
import datetime
import numpy as np
from matplotlib import patches
from plotting_funcs import *
from scipy.spatial import distance
Prerequisites
Create some of the resources you need to launch a Ground Truth audit labeling job in this notebook. To execute this notebook, you must create the following resources:
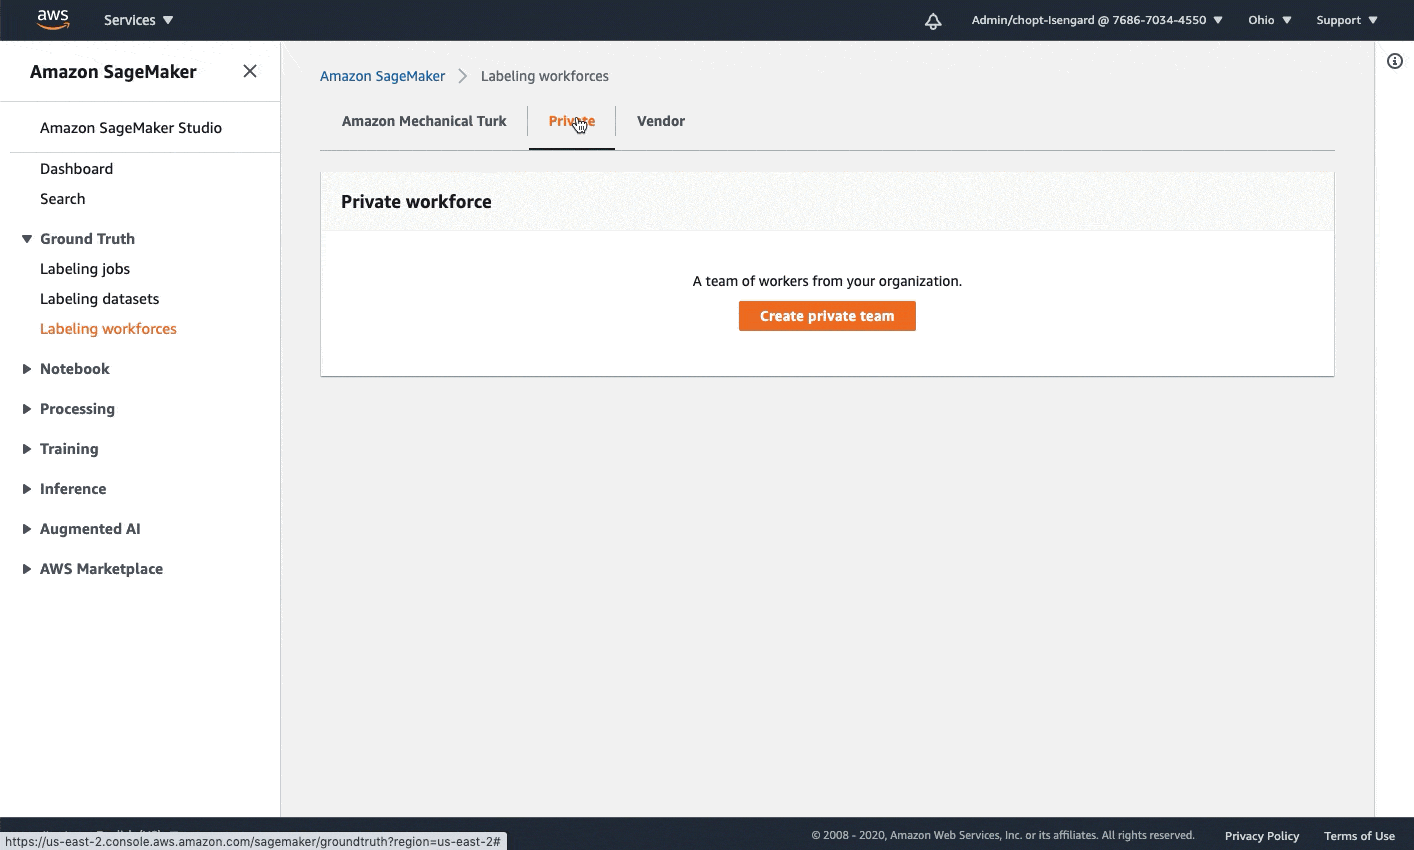
A work team: A work team is a group of workers that complete labeling tasks. If you want to preview the worker UI and execute the labeling task, you must create a private work team, add yourself as a worker to this team, and provide the following work team ARN. This GIF demonstrates how to quickly create a private work team on the Amazon SageMaker console. To learn more about private, vendor, and Amazon Mechanical Turk workforces, see Create and Manage Workforces.
[ ]:
WORKTEAM_ARN = "<<ADD WORK TEAM ARN HERE>>"

print(f"This notebook will use the work team ARN: {WORKTEAM_ARN}")

# Make sure workteam arn is populated
assert WORKTEAM_ARN != "<<ADD WORK TEAM ARN HERE>>"
The IAM execution role you used to create this notebook instance must have the following permissions:
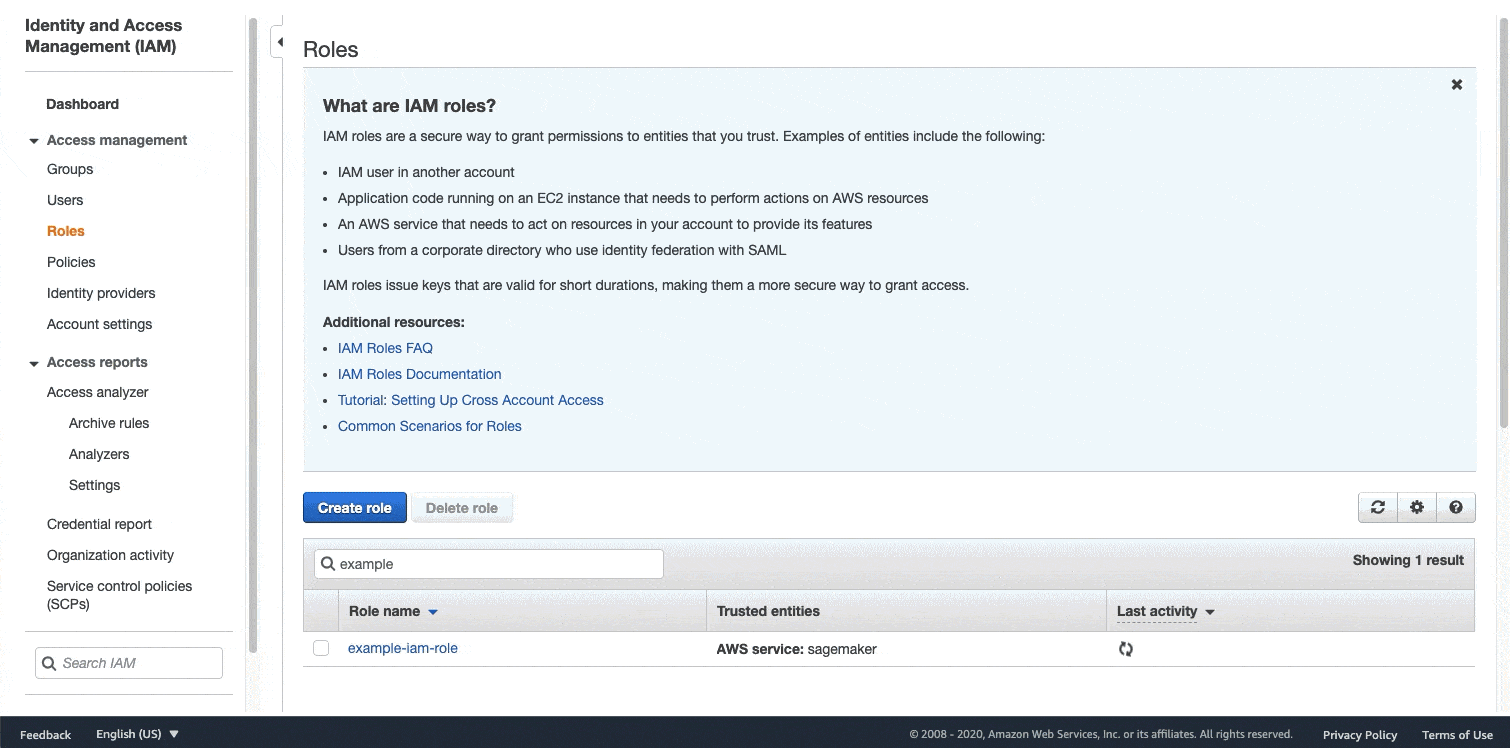
AmazonSageMakerFullAccess: If you do not require granular permissions for your use case, you can attach the AmazonSageMakerFullAccess policy to your IAM user or role. If you are running this example in a SageMaker notebook instance, this is the IAM execution role used to create your notebook instance. If you need granular permissions, see Assign IAM Permissions to Use Ground Truth for granular policy to use Ground Truth.The AWS managed policy AmazonSageMakerGroundTruthExecution. Run the following code snippet to see your IAM execution role name. This GIF demonstrates how to attach this policy to an IAM role in the IAM console. For further instructions see the: Adding and removing IAM identity permissions section in the AWS Identity and Access Management User Guide.
Amazon S3 permissions: When you create your role, you specify Amazon S3 permissions. Make sure that your IAM role has access to the S3 bucket that you plan to use in this example. If you do not specify a S3 bucket in this notebook, the default bucket in the AWS region in which you are running this notebook instance is used. If you do not require granular permissions, you can attach AmazonS3FullAccess to your role.
The S3 bucket that you use for this demo must have a CORS policy attached. To learn more about this requirement, and how to attach a CORS policy to an S3 bucket, see Video Frame Job Permission Requirements.
[ ]:
role = sm.get_execution_role()
role_name = role.split("/")[-1]
print(
    "IMPORTANT: Make sure this execution role has the AWS Managed policy AmazonGroundTruthExecution attached."
)
print("********************************************************************************")
print("The IAM execution role name:", role_name)
print("The IAM execution role ARN:", role)
print("********************************************************************************")
[ ]:
sagemaker_cl = boto3.client("sagemaker")
# Make sure the bucket is in the same region as this notebook.
bucket = "<< YOUR S3 BUCKET NAME >>"

sm_session = sm.Session()
s3 = boto3.client("s3")

if bucket == "<< YOUR S3 BUCKET NAME >>":
    bucket = sm_session.default_bucket()
region = boto3.session.Session().region_name
bucket_region = s3.head_bucket(Bucket=bucket)["ResponseMetadata"]["HTTPHeaders"][
    "x-amz-bucket-region"
]
assert (
    bucket_region == region
), f"Your S3 bucket {bucket} and this notebook need to be in the same region."
print(f"IMPORTANT: make sure the role {role_name} has the access to read and write to this bucket.")
print(
    "********************************************************************************************************"
)
print(f"This notebook will use the following S3 bucket: {bucket}")
print(
    "********************************************************************************************************"
)
Download data
Download a dataset from the Multi-Object Tracking Challenge, a commonly used benchmark for multi-object tracking. Depending on your connection speed, this can take 5–10 minutes. Unzip it and upload it to a bucket in Amazon S3.
Disclosure regarding the Multiple Object Tracking Benchmark:
Multiple Object Tracking Benchmark is created by Anton Milan, Ian Reid, Stefan Roth, Konrad Schindler, and Laura Leal-Taixe. We have not modified the images or the accompanying annotations. You can obtain the images and the annotations here. The images and annotations are licensed by the authors under Creative Commons Attribution-NonCommercial-ShareAlike 3.0 License. The following paper describes Multiple Object Tracking Benchmark in depth: from the data collection and annotation to detailed statistics about the data and evaluation of models trained on it.
MOT17: A Benchmark for Multi-Object Tracking. Anton Milan, Ian Reid, Stefan Roth, Konrad Schindler, Laura Leal-Taixe arXiv:1603.00831
[ ]:
# Grab our data this will take ~5 minutes
!wget https://motchallenge.net/data/MOT17.zip -O /tmp/MOT17.zip
[ ]:
# unzip our data
!unzip -q /tmp/MOT17.zip -d MOT17
!rm /tmp/MOT17.zip
[ ]:
# send our data to s3 this will take a couple minutes
!aws s3 cp --recursive MOT17/MOT17/train s3://{bucket}/MOT17/train --quiet
View images and labels
The scene is a street setting with a large number of cars and pedestrians. Grab image paths and plot the first image.
[ ]:
img_paths = glob("MOT17/MOT17/train/MOT17-13-SDP/img1/*.jpg")
img_paths.sort()

imgs = []
for imgp in img_paths:
    img = Image.open(imgp)
    imgs.append(img)

img
Load labels
The MOT17 dataset has labels for each scene in a single text file. Load the labels and organize them into a frame-level dictionary so you can easily plot them.
[30]:
# grab our labels
labels = []
with open("MOT17/MOT17/train/MOT17-13-SDP/gt/gt.txt", "r") as f:
    for line in f:
        labels.append(line.replace("\n", "").split(","))

lab_dict = {}
for i in range(1, len(img_paths) + 1):
    lab_dict[i] = []

for lab in labels:
    lab_dict[int(lab[0])].append(lab)
View MOT17 annotations
In the existing MOT-17 annotations, the labels include both bounding box coordinates and unique IDs for each object being tracked. By plotting the following two frames, you can see how the objects of interest persist across frames. Since our video has a high number of frames per second, look at frame 1 and then frame 31 to see the same scene with approximately one second between frames. You can adjust the start index, end index, and step values to view different labeled frames in the scene.
[ ]:
start_index = 1
end_index = 32
step = 30

for j in range(start_index, end_index, step):

    # Create figure and axes
    fig, ax = plt.subplots(1, figsize=(24, 12))
    ax.set_title(f"Frame {j}", fontdict={"fontsize": 20})

    # Display the image
    ax.imshow(imgs[j])

    for i, annot in enumerate(lab_dict[j]):
        annot = np.array(annot, dtype=np.float32)

        # if class is non-pedestrian display box
        if annot[6] == 0:
            rect = patches.Rectangle(
                (annot[2], annot[3]),
                annot[4],
                annot[5],
                linewidth=1,
                edgecolor="r",
                facecolor="none",
            )
            ax.add_patch(rect)
            plt.text(
                annot[2],
                annot[3] - 10,
                f"Object {int(annot[1])}",
                bbox=dict(facecolor="white", alpha=0.5),
            )
Evaluate labels
For demonstration purposes, we’ve labeled three vehicles in one of the videos and inserted a few labeling anomalies into the annotations. Identifying mistakes and then sending directed recommendations for frames and objects to fix makes the label auditing process more efficient. If a labeler only has to focus on a few frames instead of a deep review of the entire scene, it can drastically improve speed and reduce cost.”
We have provided a JSON file containing intentionally flawed labels. For a typical Ground Truth Video job, this file is in the Amazon S3 output location you specified when creating your labeling job. This label file is organized as a sequential list of labels. Each entry in the list consists of the labels for one frame.
For more information about Ground Truth’s output data format, see the Output Data section of the Amazon SageMaker Developer Guide.
[ ]:
# load  labels
lab_path = "SeqLabel.json"
with open(lab_path, "r") as f:
    flawed_labels = json.load(f)

img_paths = glob("MOT17/MOT17/train/MOT17-13-SDP/img1/*.jpg")
img_paths.sort()

# Let's grab our images
imgs = []
for imgp in img_paths:
    img = Image.open(imgp)
    imgs.append(img)

flawed_labels["tracking-annotations"][0]
View annotations
We annotated 3 vehicles, one of which enters the scene at frame 9. View the scene starting at frame 9 to see all of our labeled vehicles.
[ ]:
# let's view our tracking labels
start_index = 9
end_index = 16
step = 3

for j in range(start_index, end_index, step):

    # Create figure and axes
    fig, ax = plt.subplots(1, figsize=(24, 12))
    ax.set_title(f"Frame {j}")

    # Display the image
    ax.imshow(np.array(imgs[j]))

    for i, annot in enumerate(flawed_labels["tracking-annotations"][j]["annotations"]):
        rect = patches.Rectangle(
            (annot["left"], annot["top"]),
            annot["width"],
            annot["height"],
            linewidth=1,
            edgecolor="r",
            facecolor="none",
        )
        ax.add_patch(rect)
        plt.text(
            annot["left"] - 5,
            annot["top"] - 10,
            f"{annot['object-name']}",
            bbox=dict(facecolor="white", alpha=0.5),
        )
Analyze tracking data
Put the tracking data into a form that’s easier to analyze.
The following function turns our tracking output into a dataframe. You can use this dataframe to plot values and compute metrics to help you understand how the object labels move through the frames.
[ ]:
# generate dataframes
label_frame = create_annot_frame(flawed_labels["tracking-annotations"])
label_frame.head()
View label progression plots
The following plots illustrate how the coordinates of a given object progress through the frames of a video. Each bounding box has a left and top coordinate, representing the top-left point of the bounding box. It also has height and width values that represent the other 3 points of the box.
In the following plots, the blue lines represent the progression of our 4 values (top coordinate, left coordinate, width, and height) through the video frames and the orange lines represent a rolling average of these values. If a video has 5 frames per second or more, the objects within the video (and therefore the bounding boxes drawn around them) should have some amount of overlap between frames. Our video has vehicles driving at a normal pace, so our plots should show a relatively smooth progression.
You can also plot the deviation between the rolling average and the actual values of bounding box coordinates. You may want to look at frames in which the actual value deviates substantially from the rolling average.
[ ]:
# plot out progression of different metrics

plot_timeseries(label_frame, obj="Vehicle:1", roll_len=5)
plot_deviations(label_frame, obj="Vehicle:1", roll_len=5)
Plot box sizes
Combine the width and height values to examine how the size of the bounding box for a given object progresses through the scene. For Vehicle 1, we intentionally reduced the size of the bounding box on frame 139 and restored it on frame 141. We also removed a bounding box on frame 217. We can see both of these flaws reflected in our size progression plots.
[ ]:
def plot_size_prog(annot_frame, obj="Vehicle:1", roll_len=5, figsize=(17, 10)):
    """
    Plot size progression of a bounding box for a given object.
    """
    fig, ax = plt.subplots(nrows=1, ncols=1, figsize=figsize)
    lframe_len = max(annot_frame["frameid"])
    ann_subframe = annot_frame[annot_frame.obj == obj]
    ann_subframe.index = list(np.arange(len(ann_subframe)))
    size_vec = np.zeros(lframe_len + 1)
    size_vec[ann_subframe["frameid"].values] = ann_subframe["height"] * ann_subframe["width"]
    ax.plot(size_vec)
    ax.plot(pd.Series(size_vec).rolling(roll_len).mean())
    ax.title.set_text(f"{obj} Size progression")
    ax.set_xlabel("Frame Number")
    ax.set_ylabel("Box size")


plot_size_prog(label_frame, obj="Vehicle:1")
plot_size_prog(label_frame, obj="Vehicle:2")
View box size differential
Now, look at how the size of the box changes from frame to frame by plotting the actual size differential to get a better idea of the magnitude of these changes.
You can also normalize the magnitude of the size changes by dividing the size differentials by the sizes of the boxes to express the differential as a percentage change from the original size of the box. This makes it easier to set thresholds beyond which you can classify this frame as potentially problematic for this object bounding box.
The following plots visualize both the absolute size differential and the size differential as a percentage. You can also add lines representing where the bounding box changed by more than 20% in size from one frame to the next.
[ ]:
# look at rolling size differential, try changing the object


def plot_size_diff(lab_frame, obj="Vehicle:1", hline=0.5, figsize=(24, 16)):
    """
    Plot the sequential size differential between the bounding box for a given object between frames
    """
    ann_subframe = lab_frame[lab_frame.obj == obj]
    lframe_len = max(lab_frame["frameid"])
    ann_subframe.index = list(np.arange(len(ann_subframe)))
    size_vec = np.zeros(lframe_len + 1)
    size_vec[ann_subframe["frameid"].values] = ann_subframe["height"] * ann_subframe["width"]
    size_diff = np.array(size_vec[:-1]) - np.array(size_vec[1:])
    norm_size_diff = size_diff / np.array(size_vec[:-1])
    fig, ax = plt.subplots(ncols=1, nrows=2, figsize=figsize)
    ax[0].plot(size_diff)
    ax[0].set_title("Absolute size differential")
    ax[1].plot(norm_size_diff)
    ax[1].set_title("Normalized size differential")
    ax[1].hlines(-hline, 0, len(size_diff), colors="red")
    ax[1].hlines(hline, 0, len(size_diff), colors="red")


plot_size_diff(label_frame, obj="Vehicle:1", hline=0.2)
If you normalize the size differential, you can use a threshold to identify which frames to flag for review. The preceding plot sets a threshold of 20% change from the previous box size; there a few frames that exceed that threshold.
[ ]:
def find_prob_frames(lab_frame, obj="Vehicle:2", thresh=0.25):
    """
    Find potentially problematic frames via size differential
    """
    lframe_len = max(lab_frame["frameid"])
    ann_subframe = lab_frame[lab_frame.obj == obj]
    size_vec = np.zeros(lframe_len + 1)
    size_vec[ann_subframe["frameid"].values] = ann_subframe["height"] * ann_subframe["width"]
    size_diff = np.array(size_vec[:-1]) - np.array(size_vec[1:])
    norm_size_diff = size_diff / np.array(size_vec[:-1])
    norm_size_diff[np.where(np.isnan(norm_size_diff))[0]] = 0
    norm_size_diff[np.where(np.isinf(norm_size_diff))[0]] = 0
    problem_frames = (
        np.where(np.abs(norm_size_diff) > thresh)[0] + 1
    )  # adding 1 since we are are looking
    worst_frame = np.argmax(np.abs(norm_size_diff)) + 1
    return problem_frames, worst_frame


obj = "Vehicle:1"
problem_frames, worst_frame = find_prob_frames(label_frame, obj=obj, thresh=0.2)
print(f"Worst frame for {obj} is: {worst_frame}")
print("problem frames for", obj, ":", problem_frames.tolist())
View the frames with the largest size differential
With the indices for the frames with the largest size differential, you can view them in sequence. In the following frames, you can identify frames including Vehicle 1 where our labeler made a mistake. There was a large difference between frame 216 and frame 217, the subsequent frame, so frame 217 was flagged.
[ ]:
start_index = worst_frame - 1

# let's view our tracking labels
for j in range(start_index, start_index + 3):

    # Create figure and axes
    fig, ax = plt.subplots(1, figsize=(24, 12))
    ax.set_title(f"Frame {j}")

    # Display the image
    ax.imshow(imgs[j])

    for i, annot in enumerate(flawed_labels["tracking-annotations"][j]["annotations"]):
        rect = patches.Rectangle(
            (annot["left"], annot["top"]),
            annot["width"],
            annot["height"],
            linewidth=1,
            edgecolor="r",
            facecolor="none",
        )  # 50,100),40,30
        ax.add_patch(rect)
        plt.text(
            annot["left"] - 5,
            annot["top"] - 10,
            f"{annot['object-name']}",
            bbox=dict(facecolor="white", alpha=0.5),
        )  #

    plt.show()
Rolling IoU
IoU (Intersection over Union) is a commonly used evaluation metric for object detection. It’s calculated by dividing the area of overlap between two bounding boxes by the area of union for two bounding boxes. While it’s typically used to evaluate the accuracy of a predicted box against a ground truth box, you can use it to evaulate how much overlap a given bounding box has from one frame of a video to the next.
Since there are differences from one frame to the next, we would not expect a given bounding box for a single object to have 100% overlap with the corresponding bounding box from the next frame. However, depending on the frames per second (FPS) for the video, there often is only a small change between one frame and the next since the time elapsed between frames is only a fraction of a second. For higher FPS video, we would expect a substantial amount of overlap between frames. The MOT17 videos are all shot at 25 FPS, so these videos qualify. Operating with this assumption, you can use IoU to identify outlier frames where you see substantial differences between a bounding box in one frame to the next.
[ ]:
# calculate rolling intersection over union


def calc_frame_int_over_union(annot_frame, obj, i):
    lframe_len = max(annot_frame["frameid"])
    annot_frame = annot_frame[annot_frame.obj == obj]
    annot_frame.index = list(np.arange(len(annot_frame)))
    coord_vec = np.zeros((lframe_len + 1, 4))
    coord_vec[annot_frame["frameid"].values, 0] = annot_frame["left"]
    coord_vec[annot_frame["frameid"].values, 1] = annot_frame["top"]
    coord_vec[annot_frame["frameid"].values, 2] = annot_frame["width"]
    coord_vec[annot_frame["frameid"].values, 3] = annot_frame["height"]

    boxA = [
        coord_vec[i, 0],
        coord_vec[i, 1],
        coord_vec[i, 0] + coord_vec[i, 2],
        coord_vec[i, 1] + coord_vec[i, 3],
    ]
    boxB = [
        coord_vec[i + 1, 0],
        coord_vec[i + 1, 1],
        coord_vec[i + 1, 0] + coord_vec[i + 1, 2],
        coord_vec[i + 1, 1] + coord_vec[i + 1, 3],
    ]
    return bb_int_over_union(boxA, boxB)


# create list of objects
objs = list(np.unique(label_frame.obj))

# iterate through our objects to get rolling IoU values for each
iou_dict = {}
for obj in objs:
    iou_vec = np.ones(len(np.unique(label_frame.frameid)))
    ious = []
    for i in label_frame[label_frame.obj == obj].frameid[:-1]:
        iou = calc_frame_int_over_union(label_frame, obj, i)
        ious.append(iou)
        iou_vec[i] = iou
    iou_dict[obj] = iou_vec

fig, ax = plt.subplots(nrows=1, ncols=3, figsize=(24, 8), sharey=True)
ax[0].set_title(f"Rolling IoU {objs[0]}")
ax[0].set_xlabel("frames")
ax[0].set_ylabel("IoU")
ax[0].plot(iou_dict[objs[0]])
ax[1].set_title(f"Rolling IoU {objs[1]}")
ax[1].set_xlabel("frames")
ax[1].set_ylabel("IoU")
ax[1].plot(iou_dict[objs[1]])
ax[2].set_title(f"Rolling IoU {objs[2]}")
ax[2].set_xlabel("frames")
ax[2].set_ylabel("IoU")
ax[2].plot(iou_dict[objs[2]])
Identify low overlap frames
With the IoU for your objects, you can set an IoU threshold and identify objects below it. The following code snippet identifies frames in which the bounding box for a given object has less than 50% overlap.
[ ]:
## ID problem indices
iou_thresh = 0.5
vehicle = 1  # because index starts at 0, 0 -> vehicle:1, 1 -> vehicle:2, etc.

# use np.where to identify frames below our threshold.
inds = np.where(np.array(iou_dict[objs[vehicle]]) < iou_thresh)[0]
worst_ind = np.argmin(np.array(iou_dict[objs[vehicle]]))

print(objs[vehicle], "worst frame:", worst_ind)
Visualize low overlap frames
With low overlap frames identified by the IoU metric, you can see that there is an issue with Vehicle 2 on frame 102. The bounding box for Vehicle 2 does not go low enough and clearly needs to be extended.
[ ]:
start_index = worst_ind - 1

# let's view our tracking labels
for j in range(start_index, start_index + 3):

    # Create figure and axes
    fig, ax = plt.subplots(1, figsize=(24, 12))
    ax.set_title(f"Frame {j}")

    # Display the image
    ax.imshow(imgs[j])

    for i, annot in enumerate(flawed_labels["tracking-annotations"][j]["annotations"]):
        rect = patches.Rectangle(
            (annot["left"], annot["top"]),
            annot["width"],
            annot["height"],
            linewidth=1,
            edgecolor="r",
            facecolor="none",
        )
        ax.add_patch(rect)
        plt.text(
            annot["left"] - 5,
            annot["top"] - 10,
            f"{annot['object-name']}",
            bbox=dict(facecolor="white", alpha=0.5),
        )
    plt.show()
Embedding comparison (optional)
The preceding two methods work because they are simple and are based on the reasonable assumption that objects in high-FPS video won’t move too much from frame to frame. They can be considered more classical methods of comparison.
Can we improve upon them? Try something more experimental to identify outliers: Generate embeddings for bounding box crops with an image classification model like ResNet and compare these across frames.
Convolutional neural network image classification models have a final fully connected layer using a softmax function or another scaling activation function that outputs probabilities. If you remove the final layer of your network, your “predictions” are the image embedding that is essentially the neural network’s representation of the image. If you isolate objects by cropping images, you can compare the representations of these objects across frames to identify any outliers.
Start by importing a model from Torchhub and using a ResNet18 model trained on ImageNet. Since ImageNet is a very large and generic dataset, the network has learned information about images and is able to classify them into different categories. While a neural network more finely tuned on vehicles would likely perform better, a network trained on a large dataset like ImageNet should have learned enough information to indicate if images are similar.
Note: As mentioned at the beginning of the notebook, if you wish to run this section, you’ll need to use a PyTorch kernel.
[ ]:
import torch
import torch.nn as nn
import torchvision.models as models
import cv2
from torch.autograd import Variable
from scipy.spatial import distance

# download our model from torchhub
model = torch.hub.load("pytorch/vision:v0.6.0", "resnet18", pretrained=True)
model.eval()

# in order to get embeddings instead of a classification from a model we import, we need to remove the top layer of the network
modules = list(model.children())[:-1]
model = nn.Sequential(*modules)
Generate embeddings
Use your headless model to generate image embeddings for your object crops. The following code iterates through images, generates crops of labeled objects, resizes them to 224x224x3 to work with your headless model, and then predicts the image crop embedding.
[ ]:
img_crops = {}
img_embeds = {}

for j, img in tqdm(enumerate(imgs[:300])):
    img_arr = np.array(img)
    img_embeds[j] = {}
    img_crops[j] = {}
    for i, annot in enumerate(flawed_labels["tracking-annotations"][j]["annotations"]):

        # crop our image using our annotation coordinates
        crop = img_arr[
            annot["top"] : (annot["top"] + annot["height"]),
            annot["left"] : (annot["left"] + annot["width"]),
            :,
        ]

        # resize image crops to work with our model which takes in 224x224x3 sized inputs
        new_crop = np.array(Image.fromarray(crop).resize((224, 224)))
        img_crops[j][annot["object-name"]] = new_crop

        # reshape array so that it follows (batch dimension, color channels, image dimension, image dimension)
        new_crop = np.reshape(new_crop, (1, 224, 224, 3))
        new_crop = np.reshape(new_crop, (1, 3, 224, 224))

        torch_arr = torch.tensor(new_crop, dtype=torch.float)

        # return image crop embedding from headless model
        with torch.no_grad():
            embed = model(torch_arr)

        img_embeds[j][annot["object-name"]] = embed.squeeze()
View image crops
To generate image crops, use the bounding box label dimensions and then resize the cropped images. Look at a few of them in sequence.
[ ]:
def plot_crops(obj="Vehicle:1", start=0, figsize=(20, 12)):
    fig, ax = plt.subplots(nrows=1, ncols=5, figsize=figsize)
    for i, a in enumerate(ax):
        a.imshow(img_crops[i + start][obj])
        a.set_title(f"Frame {i+start}")


plot_crops(start=1)
Compute distance
Compare image embeddings by computing the distance between sequential embeddings for a given object.
[ ]:
def compute_dist(img_embeds, dist_func=distance.euclidean, obj="Vehicle:1"):
    dists = []
    inds = []
    for i in img_embeds:
        if (i > 0) & (obj in list(img_embeds[i].keys())):
            if obj in list(img_embeds[i - 1].keys()):
                dist = dist_func(
                    img_embeds[i - 1][obj], img_embeds[i][obj]
                )  # distance  between frame at t0 and t1
                dists.append(dist)
                inds.append(i)
    return dists, inds


obj = "Vehicle:2"
dists, inds = compute_dist(img_embeds, obj=obj)

# look for distances that are 2 standard deviation greater than the mean distance
prob_frames = np.where(dists > (np.mean(dists) + np.std(dists) * 2))[0]
prob_inds = np.array(inds)[prob_frames]
print(prob_inds)
print("The frame with the greatest distance is frame:", inds[np.argmax(dists)])
View outlier frames
In outlier frame crops, you can see that we were able to catch the issue on frame 102, where the bounding box was off-center.
While this method is fun to play with, it’s substantially more computationally expensive than the more generic methods and is not guaranteed to improve accuracy. Using such a generic model will inevitably produce false positives. Feel free to try a model fine-tuned on vehicles, which would likely yield better results!
[ ]:
def plot_crops(obj="Vehicle:1", start=0):
    fig, ax = plt.subplots(nrows=1, ncols=5, figsize=(20, 12))
    for i, a in enumerate(ax):
        a.imshow(img_crops[i + start][obj])
        a.set_title(f"Frame {i+start}")


plot_crops(obj=obj, start=np.argmax(dists))
Combining the metrics
Having explored several methods for identifying anomalous and potentially problematic frames, you can combine them and identify all of those outlier frames. While you might have a few false positives, they are likely to be in areas with a lot of action that you might want our annotators to review regardless.
[ ]:
def get_problem_frames(
    lab_frame,
    flawed_labels,
    size_thresh=0.25,
    iou_thresh=0.4,
    embed=False,
    imgs=None,
    verbose=False,
    embed_std=2,
):
    """
    Function for identifying potentially problematic frames using bounding box size, rolling IoU, and optionally embedding comparison.
    """
    if embed:
        model = torch.hub.load("pytorch/vision:v0.6.0", "resnet18", pretrained=True)
        model.eval()
        modules = list(model.children())[:-1]
        model = nn.Sequential(*modules)

    frame_res = {}
    for obj in list(np.unique(lab_frame.obj)):
        frame_res[obj] = {}
        lframe_len = max(lab_frame["frameid"])
        ann_subframe = lab_frame[lab_frame.obj == obj]
        size_vec = np.zeros(lframe_len + 1)
        size_vec[ann_subframe["frameid"].values] = ann_subframe["height"] * ann_subframe["width"]
        size_diff = np.array(size_vec[:-1]) - np.array(size_vec[1:])
        norm_size_diff = size_diff / np.array(size_vec[:-1])
        norm_size_diff[np.where(np.isnan(norm_size_diff))[0]] = 0
        norm_size_diff[np.where(np.isinf(norm_size_diff))[0]] = 0
        frame_res[obj]["size_diff"] = [int(x) for x in size_diff]
        frame_res[obj]["norm_size_diff"] = [int(x) for x in norm_size_diff]
        try:
            problem_frames = [int(x) for x in np.where(np.abs(norm_size_diff) > size_thresh)[0]]
            if verbose:
                worst_frame = np.argmax(np.abs(norm_size_diff))
                print("Worst frame for", obj, "in", frame, "is: ", worst_frame)
        except:
            problem_frames = []
        frame_res[obj]["size_problem_frames"] = problem_frames

        iou_vec = np.ones(len(np.unique(lab_frame.frameid)))
        for i in lab_frame[lab_frame.obj == obj].frameid[:-1]:
            iou = calc_frame_int_over_union(lab_frame, obj, i)
            iou_vec[i] = iou

        frame_res[obj]["iou"] = iou_vec.tolist()
        inds = [int(x) for x in np.where(iou_vec < iou_thresh)[0]]
        frame_res[obj]["iou_problem_frames"] = inds

        if embed:
            img_crops = {}
            img_embeds = {}

            for j, img in tqdm(enumerate(imgs)):
                img_arr = np.array(img)
                img_embeds[j] = {}
                img_crops[j] = {}
                for i, annot in enumerate(flawed_labels["tracking-annotations"][j]["annotations"]):
                    try:
                        crop = img_arr[
                            annot["top"] : (annot["top"] + annot["height"]),
                            annot["left"] : (annot["left"] + annot["width"]),
                            :,
                        ]
                        new_crop = np.array(Image.fromarray(crop).resize((224, 224)))
                        img_crops[j][annot["object-name"]] = new_crop
                        new_crop = np.reshape(new_crop, (1, 224, 224, 3))
                        new_crop = np.reshape(new_crop, (1, 3, 224, 224))
                        torch_arr = torch.tensor(new_crop, dtype=torch.float)
                        with torch.no_grad():
                            emb = model(torch_arr)
                        img_embeds[j][annot["object-name"]] = emb.squeeze()
                    except:
                        pass

            dists = compute_dist(img_embeds, obj=obj)

            # look for distances that are 2+ standard deviations greater than the mean distance
            prob_frames = np.where(dists > (np.mean(dists) + np.std(dists) * embed_std))[0]
            frame_res[obj]["embed_prob_frames"] = prob_frames.tolist()

    return frame_res


# if you want to add in embedding comparison, set embed=True
num_images_to_validate = 300
embed = False
frame_res = get_problem_frames(
    label_frame,
    flawed_labels,
    size_thresh=0.25,
    iou_thresh=0.5,
    embed=embed,
    imgs=imgs[:num_images_to_validate],
)

prob_frame_dict = {}
all_prob_frames = []
for obj in frame_res:
    prob_frames = list(frame_res[obj]["size_problem_frames"])
    prob_frames.extend(list(frame_res[obj]["iou_problem_frames"]))
    if embed:
        prob_frames.extend(list(frame_res[obj]["embed_prob_frames"]))
    all_prob_frames.extend(prob_frames)

prob_frame_dict = [int(x) for x in np.unique(all_prob_frames)]
prob_frame_dict
Command line interface
For use outside of a notebook, you can use the following command line interface.
[ ]:
# Usage for the CLI is like this

# !{sys.executable} quality_metrics_cli.py run-quality-check --bucket mybucket \
# --lab_path job_results/bag-track-mot20-test-tracking/annotations/consolidated-annotation/output/0/SeqLabel.json \
# --save_path example_quality_output/bag-track-mot20-test-tracking.json

# To get the help text
!{sys.executable} quality_metrics_cli.py run-quality-check --help
Launch a directed audit job
Take a look at how to create a Ground Truth video frame tracking adjustment job. Ground Truth provides a worker UI and infrastructure to streamline the process of creating this type of labeling job. All you have to do is specify the worker instructions, labels, and input data.
With problematic annotations identified, you can launch a new audit labeling job. You can do this in SageMaker using the console; however, when you want to launch jobs in a more automated fashion, using the Boto3 API is very helpful.
To create a new labeling job, first create your label categories so Ground Truth knows what labels to display for your workers. In this file, also specify the labeling instructions. You can use the outlier frames identified above to give directed instructions to your workers so they can spend less time reviewing the entire scene and focus more on potential problems.
[50]:
# create label categories

os.makedirs("tracking_manifests", exist_ok=True)

labelcats = {
    "document-version": "2020-08-15",
    "auditLabelAttributeName": "Person",
    "labels": [
        {
            "label": "Vehicle",
            "attributes": [
                {"name": "color", "type": "string", "enum": ["Silver", "Red", "Blue", "Black"]}
            ],
        },
        {
            "label": "Pedestrian",
        },
        {
            "label": "Other",
        },
    ],
    "instructions": {
        "shortInstruction": f"Please draw boxes around pedestrians, with a specific focus on the following frames {prob_frame_dict}",
        "fullInstruction": f"Please draw boxes around pedestrians, with a specific focus on the following frames {prob_frame_dict}",
    },
}

filename = "tracking_manifests/label_categories.json"
with open(filename, "w") as f:
    json.dump(labelcats, f)

s3.upload_file(Filename=filename, Bucket=bucket, Key="tracking_manifests/label_categories.json")

LABEL_CATEGORIES_S3_URI = f"s3://{bucket}/tracking_manifests/label_categories.json"
Generate manifests
SageMaker Ground Truth operates using manifests. When you use a modality like image classification, a single image corresponds to a single entry in a manifest and a given manifest contains paths for all of the images to be labeled. Because videos have multiple frames and you can have multiple videos in a single manifest, a manifest is instead organized with a JSON sequence file for each video that contains the paths to frames in Amazon S3. This allows a single manifest to contain multiple videos for a single job.
In this example, the image files are all split out, so you can just grab file paths. If your data is in the form of video files, you can use the Ground Truth console to split videos into video frames. To learn more, see Automated Video Frame Input Data Setup. You can also use other tools like ffmpeg to split video files into individual image frames. The following block stores file paths in a dictionary.
[51]:
# get our target MP4 files,
vids = glob("MOT17/MOT17/train/*")
vids.sort()

# we assume we have folders with the same name as the mp4 file in the same root folder
vid_dict = {}
for vid in vids:
    files = glob(f"{vid}/img1/*jpg")
    files.sort()
    files = files[:300]  # look at first 300 images
    fileset = []
    for fil in files:
        fileset.append("/".join(fil.split("/")[5:]))
    vid_dict[vid] = fileset
With your image paths, you can iterate through frames and create a list of entries for each in your sequence file.
[52]:
# generate sequences
all_vids = {}
for vid in vid_dict:
    frames = []
    for i, v in enumerate(vid_dict[vid]):
        frame = {
            "frame-no": i + 1,
            "frame": f"{v.split('/')[-1]}",
            "unix-timestamp": int(time.time()),
        }
        frames.append(frame)
    all_vids[vid] = {
        "version": "2020-07-01",
        "seq-no": np.random.randint(1, 1000),
        "prefix": f"s3://{bucket}/{'/'.join(vid.split('/')[1:])}/img1/",
        "number-of-frames": len(vid_dict[vid]),
        "frames": frames,
    }

# save sequences
for vid in all_vids:
    with open(f"tracking_manifests/{vid.split('/')[-1]}_seq.json", "w") as f:
        json.dump(all_vids[vid], f)

!cp SeqLabel.json tracking_manifests/SeqLabel.json
With your sequence file, you can create your manifest file. To create a new job with no existing labels, you can simply pass in a path to your sequence file. Since you already have labels and instead want to launch an adjustment job, point to the location of those labels in Amazon S3 and provide metadata for those labels in your manifest.
[ ]:
# create manifest
manifest_dict = {}
for vid in all_vids:
    source_ref = f"s3://{bucket}/tracking_manifests/{vid.split('/')[-1]}_seq.json"
    annot_labels = f"s3://{bucket}/tracking_manifests/SeqLabel.json"

    manifest = {
        "source-ref": source_ref,
        "Person": annot_labels,
        "Person-metadata": {
            "class-map": {"2": "Vehicle"},
            "human-annotated": "yes",
            "creation-date": "2020-05-25T12:53:54+0000",
            "type": "groundtruth/video-object-tracking",
        },
    }
    manifest_dict[vid] = manifest

# save videos as individual jobs
for vid in all_vids:
    with open(f"tracking_manifests/{vid.split('/')[-1]}.manifest", "w") as f:
        json.dump(manifest_dict[vid], f)

print("Example manifest: ", manifest)
[ ]:
# send data to s3
!aws s3 cp --recursive tracking_manifests s3://{bucket}/tracking_manifests/
Launch jobs (optional)
Now that you’ve created your manifests, you’re ready to launch your adjustment labeling job. Use this template for launching labeling jobs via boto3. In order to access the labeling job, make sure you followed the steps to create a private work team.
[ ]:
# generate jobs

job_names = []
outputs = []

arn_region_map = {
    "us-west-2": "081040173940",
    "us-east-1": "432418664414",
    "us-east-2": "266458841044",
    "eu-west-1": "568282634449",
    "eu-west-2": "487402164563",
    "ap-northeast-1": "477331159723",
    "ap-northeast-2": "845288260483",
    "ca-central-1": "918755190332",
    "eu-central-1": "203001061592",
    "ap-south-1": "565803892007",
    "ap-southeast-1": "377565633583",
    "ap-southeast-2": "454466003867",
}

region_account = arn_region_map[region]

LABELING_JOB_NAME = f"mot17-tracking-adjust-{int(time.time())}"
task = "AdjustmentVideoObjectTracking"
job_names.append(LABELING_JOB_NAME)
INPUT_MANIFEST_S3_URI = f"s3://{bucket}/tracking_manifests/MOT17-13-SDP.manifest"

human_task_config = {
    "PreHumanTaskLambdaArn": f"arn:aws:lambda:{region}:{region_account}:function:PRE-{task}",
    "MaxConcurrentTaskCount": 200,  # Maximum of 200 objects will be available to the workteam at any time
    "NumberOfHumanWorkersPerDataObject": 1,  # We will obtain and consolidate 1 human annotationsfor each frame.
    "TaskAvailabilityLifetimeInSeconds": 864000,  # Your workteam has 24 hours to complete all pending tasks.
    "TaskDescription": f"Please draw boxes around vehicles, with a specific focus around the following frames {prob_frame_dict}",
    # If using public workforce, specify "PublicWorkforceTaskPrice"
    "WorkteamArn": WORKTEAM_ARN,
    "AnnotationConsolidationConfig": {
        "AnnotationConsolidationLambdaArn": f"arn:aws:lambda:{region}:{region_account}:function:ACS-{task}"
    },
    "TaskKeywords": ["Image Classification", "Labeling"],
    "TaskTimeLimitInSeconds": 14400,
    "TaskTitle": LABELING_JOB_NAME,
    "UiConfig": {
        "HumanTaskUiArn": f"arn:aws:sagemaker:{region}:394669845002:human-task-ui/VideoObjectTracking"
    },
}


createLabelingJob_request = {
    "LabelingJobName": LABELING_JOB_NAME,
    "HumanTaskConfig": human_task_config,
    "InputConfig": {
        "DataAttributes": {
            "ContentClassifiers": ["FreeOfPersonallyIdentifiableInformation", "FreeOfAdultContent"]
        },
        "DataSource": {"S3DataSource": {"ManifestS3Uri": INPUT_MANIFEST_S3_URI}},
    },
    "LabelAttributeName": "Person-ref",
    "LabelCategoryConfigS3Uri": LABEL_CATEGORIES_S3_URI,
    "OutputConfig": {"S3OutputPath": f"s3://{bucket}/gt_job_results"},
    "RoleArn": role,
    "StoppingConditions": {"MaxPercentageOfInputDatasetLabeled": 100},
}
print(createLabelingJob_request)
out = sagemaker_cl.create_labeling_job(**createLabelingJob_request)
outputs.append(out)
print(out)
Conclusion
This notebook introduced how to measure the quality of annotations using statistical analysis and various quality metrics like IoU, rolling IoU, and embedding comparisons. It also demonstrated how to flag frames which may not be labeled properly using these quality metrics and how to send those frames for verification and audit jobs using SageMaker Ground Truth.
Using this approach, you can perform automated quality checks on the annotations at scale, which reduces the number of frames humans need to verify or audit. Please try the notebook with your own data and add your own quality metrics for different task types supported by SageMaker Ground Truth. With this process in place, you can generate high-quality datasets for a wide range of business use cases in a cost-effective manner without compromising the quality of annotations.
Cleanup
Use the following command to stop your labeling job.
[ ]:
# cleanup
sagemaker_cl.stop_labeling_job(LABELING_JOB_NAME)
Notebook CI Test Results
This notebook was tested in multiple regions. The test results are as follows, except for us-west-2 which is shown at the top of the notebook.