Building your own container as Algorithm / Model Package
This notebook’s CI test result for us-west-2 is as follows. CI test results in other regions can be found at the end of the notebook.
With Amazon SageMaker, you can package your own algorithms that can than be trained and deployed in the SageMaker environment. This notebook will guide you through an example that shows you how to build a Docker container for SageMaker and use it for training and inference.
This is an extension of the scikit-bring-your-own notebook. We append specific steps that help you create a new Algorithm / Model Package SageMaker entities, which can be sold on AWS Marketplace
By packaging an algorithm in a container, you can bring almost any code to the Amazon SageMaker environment, regardless of programming language, environment, framework, or dependencies.
Part 1: Packaging and Uploading your Algorithm for use with Amazon SageMaker
Part 2: Training and Hosting your Algorithm in Amazon SageMaker
Part 3: Package your resources as an Amazon SageMaker Algorithm
Part 4: Package your resources as an Amazon SageMaker ModelPackage
Part 5: Package your resources as an Amazon SageMaker Algorithm for Fine-tuning Large Models
When should I build my own algorithm container?
You may not need to create a container to bring your own code to Amazon SageMaker. When you are using a framework (such as Apache MXNet or TensorFlow) that has direct support in SageMaker, you can simply supply the Python code that implements your algorithm using the SDK entry points for that framework. This set of frameworks is continually expanding, so we recommend that you check the current list if your algorithm is written in a common machine learning environment.
Even if there is direct SDK support for your environment or framework, you may find it more effective to build your own container. If the code that implements your algorithm is quite complex on its own or you need special additions to the framework, building your own container may be the right choice.
If there isn’t direct SDK support for your environment, don’t worry. You’ll see in this walk-through that building your own container is quite straightforward.
Permissions
Running this notebook requires permissions in addition to the normal SageMakerFullAccess permissions. This is because we’ll creating new repositories in Amazon ECR. The easiest way to add these permissions is simply to add the managed policy AmazonEC2ContainerRegistryFullAccess to the role that you used to start your notebook instance. There’s no need to restart your notebook instance when you do this, the new permissions will be available immediately.
The example
Here, we’ll show how to package a simple Python example which showcases the decision tree algorithm from the widely used scikit-learn machine learning package. The example is purposefully fairly trivial since the point is to show the surrounding structure that you’ll want to add to your own code so you can train and host it in Amazon SageMaker.
The ideas shown here will work in any language or environment. You’ll need to choose the right tools for your environment to serve HTTP requests for inference, but good HTTP environments are available in every language these days.
In this example, we use a single image to support training and hosting. This is easy because it means that we only need to manage one image and we can set it up to do everything. Sometimes you’ll want separate images for training and hosting because they have different requirements. Just separate the parts discussed below into separate Dockerfiles and build two images. Choosing whether to have a single image or two images is really a matter of which is more convenient for you to develop and manage.
If you’re only using Amazon SageMaker for training or hosting, but not both, there is no need to build the unused functionality into your container.
The presentation
This presentation is divided into two parts: building the container and using the container.
Part 1: Packaging and Uploading your Algorithm for use with Amazon SageMaker
An overview of Docker
If you’re familiar with Docker already, you can skip ahead to the next section.
For many data scientists, Docker containers are a new concept, but they are not difficult, as you’ll see here.
Docker provides a simple way to package arbitrary code into an image that is totally self-contained. Once you have an image, you can use Docker to run a container based on that image. Running a container is just like running a program on the machine except that the container creates a fully self-contained environment for the program to run. Containers are isolated from each other and from the host environment, so the way you set up your program is the way it runs, no matter where you run it.
Docker is more powerful than environment managers like conda or virtualenv because (a) it is completely language independent and (b) it comprises your whole operating environment, including startup commands, environment variable, etc.
In some ways, a Docker container is like a virtual machine, but it is much lighter weight. For example, a program running in a container can start in less than a second and many containers can run on the same physical machine or virtual machine instance.
Docker uses a simple file called a Dockerfile to specify how the image is assembled. We’ll see an example of that below. You can build your Docker images based on Docker images built by yourself or others, which can simplify things quite a bit.
Docker has become very popular in the programming and devops communities for its flexibility and well-defined specification of the code to be run. It is the underpinning of many services built in the past few years, such as Amazon ECS.
Amazon SageMaker uses Docker to allow users to train and deploy arbitrary algorithms.
In Amazon SageMaker, Docker containers are invoked in a certain way for training and a slightly different way for hosting. The following sections outline how to build containers for the SageMaker environment.
Some helpful links:
`docker runreference <https://docs.docker.com/engine/reference/run/>`__
How Amazon SageMaker runs your Docker container
Because you can run the same image in training or hosting, Amazon SageMaker runs your container with the argument train or serve. How your container processes this argument depends on the container:
In the example here, we don’t define an
ENTRYPOINTin the Dockerfile so Docker will run the commandtrainat training time andserveat serving time. In this example, we define these as executable Python scripts, but they could be any program that we want to start in that environment.If you specify a program as an
ENTRYPOINTin the Dockerfile, that program will be run at startup and its first argument will betrainorserve. The program can then look at that argument and decide what to do.If you are building separate containers for training and hosting (or building only for one or the other), you can define a program as an
ENTRYPOINTin the Dockerfile and ignore (or verify) the first argument passed in.
Running your container during training
When Amazon SageMaker runs training, your train script is run just like a regular Python program. A number of files are laid out for your use, under the /opt/ml directory:
/opt/ml
|-- input
|   |-- config
|   |   |-- hyperparameters.json
|   |   `-- resourceConfig.json
|   `-- data
|       `-- <channel_name>
|           `-- <input data>
|-- model
|   `-- <model files>
`-- output
    `-- failure
The input
/opt/ml/input/configcontains information to control how your program runs.hyperparameters.jsonis a JSON-formatted dictionary of hyperparameter names to values. These values will always be strings, so you may need to convert them.resourceConfig.jsonis a JSON-formatted file that describes the network layout used for distributed training. Since scikit-learn doesn’t support distributed training, we’ll ignore it here./opt/ml/input/data/<channel_name>/(for File mode) contains the input data for that channel. The channels are created based on the call to CreateTrainingJob but it’s generally important that channels match what the algorithm expects. The files for each channel will be copied from S3 to this directory, preserving the tree structure indicated by the S3 key structure./opt/ml/input/data/<channel_name>_<epoch_number>(for Pipe mode) is the pipe for a given epoch. Epochs start at zero and go up by one each time you read them. There is no limit to the number of epochs that you can run, but you must close each pipe before reading the next epoch.
The output
/opt/ml/model/is the directory where you write the model that your algorithm generates. Your model can be in any format that you want. It can be a single file or a whole directory tree. SageMaker will package any files in this directory into a compressed tar archive file. This file will be available at the S3 location returned in theDescribeTrainingJobresult./opt/ml/outputis a directory where the algorithm can write a filefailurethat describes why the job failed. The contents of this file will be returned in theFailureReasonfield of theDescribeTrainingJobresult. For jobs that succeed, there is no reason to write this file as it will be ignored.
Running your container during hosting
Hosting has a very different model than training because hosting is reponding to inference requests that come in via HTTP. In this example, we use our recommended Python serving stack to provide robust and scalable serving of inference requests:
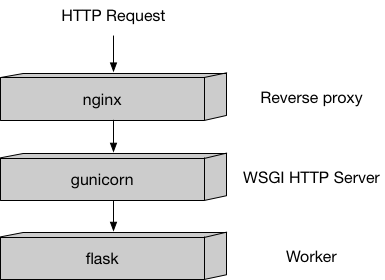
This stack is implemented in the sample code here and you can mostly just leave it alone.
Amazon SageMaker uses two URLs in the container:
/pingwill receiveGETrequests from the infrastructure. Your program returns 200 if the container is up and accepting requests./invocationsis the endpoint that receives client inferencePOSTrequests. The format of the request and the response is up to the algorithm. If the client suppliedContentTypeandAcceptheaders, these will be passed in as well.
The container will have the model files in the same place they were written during training:
/opt/ml
`-- model
    `-- <model files>
The parts of the sample container
In the container directory are all the components you need to package the sample algorithm for Amazon SageMager:
.
|-- Dockerfile
|-- build_and_push.sh
`-- decision_trees
    |-- nginx.conf
    |-- predictor.py
    |-- serve
    |-- train
    `-- wsgi.py
Let’s discuss each of these in turn:
``Dockerfile`` describes how to build your Docker container image. More details below.
``build_and_push.sh`` is a script that uses the Dockerfile to build your container images and then pushes it to ECR. We’ll invoke the commands directly later in this notebook, but you can just copy and run the script for your own algorithms.
``decision_trees`` is the directory which contains the files that will be installed in the container.
``local_test`` is a directory that shows how to test your new container on any computer that can run Docker, including an Amazon SageMaker notebook instance. Using this method, you can quickly iterate using small datasets to eliminate any structural bugs before you use the container with Amazon SageMaker. We’ll walk through local testing later in this notebook.
In this simple application, we only install five files in the container. You may only need that many or, if you have many supporting routines, you may wish to install more. These five show the standard structure of our Python containers, although you are free to choose a different toolset and therefore could have a different layout. If you’re writing in a different programming language, you’ll certainly have a different layout depending on the frameworks and tools you choose.
The files that we’ll put in the container are:
``nginx.conf`` is the configuration file for the nginx front-end. Generally, you should be able to take this file as-is.
``predictor.py`` is the program that actually implements the Flask web server and the decision tree predictions for this app. You’ll want to customize the actual prediction parts to your application. Since this algorithm is simple, we do all the processing here in this file, but you may choose to have separate files for implementing your custom logic.
``serve`` is the program started when the container is started for hosting. It simply launches the gunicorn server which runs multiple instances of the Flask app defined in
predictor.py. You should be able to take this file as-is.``train`` is the program that is invoked when the container is run for training. You will modify this program to implement your training algorithm.
``wsgi.py`` is a small wrapper used to invoke the Flask app. You should be able to take this file as-is.
In summary, the two files you will probably want to change for your application are train and predictor.py.
The Dockerfile
The Dockerfile describes the image that we want to build. You can think of it as describing the complete operating system installation of the system that you want to run. A Docker container running is quite a bit lighter than a full operating system, however, because it takes advantage of Linux on the host machine for the basic operations.
For the Python science stack, we will start from a standard Ubuntu installation and run the normal tools to install the things needed by scikit-learn. Finally, we add the code that implements our specific algorithm to the container and set up the right environment to run under.
Along the way, we clean up extra space. This makes the container smaller and faster to start.
Let’s look at the Dockerfile for the example:
[ ]:
!cat container/Dockerfile
Building and registering the container
The following shell code shows how to build the container image using docker build and push the container image to ECR using docker push. This code is also available as the shell script container/build-and-push.sh, which you can run as build-and-push.sh decision_trees_sample to build the image decision_trees_sample.
This code looks for an ECR repository in the account you’re using and the current default region (if you’re using an Amazon SageMaker notebook instance, this will be the region where the notebook instance was created). If the repository doesn’t exist, the script will create it.
[ ]:
%%sh

# The name of our algorithm
algorithm_name=decision-trees-sample

cd container

chmod +x decision_trees/train
chmod +x decision_trees/serve

account=$(aws sts get-caller-identity --query Account --output text)

# Get the region defined in the current configuration (default to us-west-2 if none defined)
region=$(aws configure get region)

fullname="${account}.dkr.ecr.${region}.amazonaws.com/${algorithm_name}:latest"

# If the repository doesn't exist in ECR, create it.

aws ecr describe-repositories --repository-names "${algorithm_name}" > /dev/null 2>&1

if [ $? -ne 0 ]
then
    aws ecr create-repository --repository-name "${algorithm_name}" > /dev/null
fi

# Get the login command from ECR and execute it directly
$(aws ecr get-login --region ${region} --no-include-email)

# Build the docker image locally with the image name and then push it to ECR
# with the full name.

docker build  -t ${algorithm_name} .
docker tag ${algorithm_name} ${fullname}

docker push ${fullname}
Testing your algorithm on your local machine or on an Amazon SageMaker notebook instance
While you’re first packaging an algorithm use with Amazon SageMaker, you probably want to test it yourself to make sure it’s working right. In the directory container/local_test, there is a framework for doing this. It includes three shell scripts for running and using the container and a directory structure that mimics the one outlined above.
The scripts are:
train_local.sh: Run this with the name of the image and it will run training on the local tree. You’ll want to modify the directorytest_dir/input/data/...to be set up with the correct channels and data for your algorithm. Also, you’ll want to modify the fileinput/config/hyperparameters.jsonto have the hyperparameter settings that you want to test (as strings).serve_local.sh: Run this with the name of the image once you’ve trained the model and it should serve the model. It will run and wait for requests. Simply use the keyboard interrupt to stop it.predict.sh: Run this with the name of a payload file and (optionally) the HTTP content type you want. The content type will default totext/csv. For example, you can run$ ./predict.sh payload.csv text/csv.
The directories as shipped are set up to test the decision trees sample algorithm presented here.
Part 2: Training, Batch Inference and Hosting your Algorithm in Amazon SageMaker
Once you have your container packaged, you can use it to train and serve models. Let’s do that with the algorithm we made above.
Set up the environment
Here we specify a bucket to use and the role that will be used for working with Amazon SageMaker.
[ ]:
# S3 prefix
common_prefix = "DEMO-scikit-byo-iris"
training_input_prefix = common_prefix + "/training-input-data"
batch_inference_input_prefix = common_prefix + "/batch-inference-input-data"

import os
from sagemaker import get_execution_role

role = get_execution_role()
Create the session
The session remembers our connection parameters to Amazon SageMaker. We’ll use it to perform all of our SageMaker operations.
[ ]:
import sagemaker as sage

sess = sage.Session()
Upload the data for training
When training large models with huge amounts of data, you’ll typically use big data tools, like Amazon Athena, AWS Glue, or Amazon EMR, to create your data in S3. For the purposes of this example, we’re using some the classic Iris dataset, which we have included.
We can use use the tools provided by the Amazon SageMaker Python SDK to upload the data to a default bucket.
[ ]:
TRAINING_WORKDIR = "data/training"

training_input = sess.upload_data(TRAINING_WORKDIR, key_prefix=training_input_prefix)
print("Training Data Location " + training_input)
Create an estimator and fit the model
In order to use Amazon SageMaker to fit our algorithm, we’ll create an Estimator that defines how to use the container to train. This includes the configuration we need to invoke SageMaker training:
The container name. This is constructed as in the shell commands above.
The role. As defined above.
The instance count which is the number of machines to use for training.
The instance type which is the type of machine to use for training.
The output path determines where the model artifact will be written.
The session is the SageMaker session object that we defined above.
Then we use fit() on the estimator to train against the data that we uploaded above.
[ ]:
account = sess.boto_session.client("sts").get_caller_identity()["Account"]
region = sess.boto_session.region_name
image = "{}.dkr.ecr.{}.amazonaws.com/decision-trees-sample:latest".format(account, region)
[ ]:
tree = sage.estimator.Estimator(
    image,
    role,
    1,
    "ml.c4.2xlarge",
    output_path="s3://{}/output".format(sess.default_bucket()),
    sagemaker_session=sess,
)
tree.fit(training_input)
Batch Transform Job
Now let’s use the model built to run a batch inference job and verify it works.
Batch Transform Input Preparation
The snippet below is removing the “label” column (column indexed at 0) and retaining the rest to be batch transform’s input.
NOTE: This is the same training data, which is a no-no from a statistical/ML science perspective. But the aim of this notebook is to demonstrate how things work end-to-end.
[ ]:
import pandas as pd

## Remove first column that contains the label
shape = pd.read_csv(TRAINING_WORKDIR + "/iris.csv", header=None).drop([0], axis=1)

TRANSFORM_WORKDIR = "data/transform"
shape.to_csv(TRANSFORM_WORKDIR + "/batchtransform_test.csv", index=False, header=False)

transform_input = (
    sess.upload_data(TRANSFORM_WORKDIR, key_prefix=batch_inference_input_prefix)
    + "/batchtransform_test.csv"
)
print("Transform input uploaded to " + transform_input)
Run Batch Transform
Now that our batch transform input is setup, we run the transformation job next
[ ]:
transformer = tree.transformer(instance_count=1, instance_type="ml.m4.xlarge")
transformer.transform(transform_input, content_type="text/csv")
transformer.wait()

print("Batch Transform output saved to " + transformer.output_path)
Inspect the Batch Transform Output in S3
[ ]:
from urllib.parse import urlparse

parsed_url = urlparse(transformer.output_path)
bucket_name = parsed_url.netloc
file_key = "{}/{}.out".format(parsed_url.path[1:], "batchtransform_test.csv")

s3_client = sess.boto_session.client("s3")

response = s3_client.get_object(Bucket=sess.default_bucket(), Key=file_key)
response_bytes = response["Body"].read().decode("utf-8")
print(response_bytes)
Deploy the model
Deploying the model to Amazon SageMaker hosting just requires a deploy call on the fitted model. This call takes an instance count, instance type, and optionally serializer and deserializer functions. These are used when the resulting predictor is created on the endpoint.
[ ]:
from sagemaker.predictor import csv_serializer

model = tree.create_model()
predictor = tree.deploy(1, "ml.m4.xlarge", serializer=csv_serializer)
Choose some data and use it for a prediction
In order to do some predictions, we’ll extract some of the data we used for training and do predictions against it. This is, of course, bad statistical practice, but a good way to see how the mechanism works.
[ ]:
shape = pd.read_csv(TRAINING_WORKDIR + "/iris.csv", header=None)

import itertools

a = [50 * i for i in range(3)]
b = [40 + i for i in range(10)]
indices = [i + j for i, j in itertools.product(a, b)]

test_data = shape.iloc[indices[:-1]]
test_X = test_data.iloc[:, 1:]
test_y = test_data.iloc[:, 0]
Prediction is as easy as calling predict with the predictor we got back from deploy and the data we want to do predictions with. The serializers take care of doing the data conversions for us.
[ ]:
print(predictor.predict(test_X.values).decode("utf-8"))
Cleanup Endpoint
When you’re done with the endpoint, you’ll want to clean it up.
[ ]:
sess.delete_endpoint(predictor.endpoint)
Part 3 - Package your resources as an Amazon SageMaker Algorithm
(If you looking to sell a pretrained model (ModelPackage), please skip to Part 4. If you are looking to sell a large model (Algorithm), please skip to part 5.)
Now that you have verified that the algorithm code works for training, live inference and batch inference in the above sections, you can start packaging it up as an Amazon SageMaker Algorithm.
[ ]:
import boto3

smmp = boto3.client("sagemaker")
Algorithm Definition
SageMaker Algorithm is comprised of 2 parts:
A training image
An inference image (optional)
The key requirement is that the training and inference images (if provided) remain compatible with each other. Specifically, the model artifacts generated by the code in training image should be readable and compatible with the code in inference image.
You can reuse the same image to perform both training and inference or you can choose to separate them.
This sample notebook has already created a single algorithm image that perform both training and inference. This image has also been pushed to your ECR registry at {{image}}. You need to provide the following details as part of this algorithm specification:
Training Specification
You specify details pertinent to your training algorithm in this section.
Supported Hyper-parameters
This section captures the hyper-parameters your algorithm supports, their names, types, if they are required, default values, valid ranges etc. This serves both as documentation for buyers and is used by Amazon SageMaker to perform validations of buyer requests in the synchronous request path.
Please Note: While this section is optional, we strongly recommend you provide comprehensive information here to leverage our validations and serve as documentation. Additionally, without this being specified, customers cannot leverage your algorithm for Hyper-parameter tuning.
*** NOTE: The code below has hyper-parameters hard-coded in the json present in src/training_specification.py. Until we have better functionality to customize it, please update the json in that file appropriately***
[ ]:
from src.training_specification import TrainingSpecification
from src.training_channels import TrainingChannels
from src.metric_definitions import MetricDefinitions
from src.tuning_objectives import TuningObjectives
import json

training_specification = TrainingSpecification().get_training_specification_dict(
    ecr_image=image,
    supports_gpu=True,
    supported_channels=[
        TrainingChannels(
            "training",
            description="Input channel that provides training data",
            supported_content_types=["text/csv"],
        )
    ],
    supported_metrics=[MetricDefinitions("validation:accuracy", "validation-accuracy: (\\S+)")],
    supported_tuning_job_objective_metrics=[TuningObjectives("Maximize", "validation:accuracy")],
)

print(json.dumps(training_specification, indent=2, sort_keys=True))
Inference Specification
You specify details pertinent to your inference code in this section.
[ ]:
from src.inference_specification import InferenceSpecification
import json

inference_specification = InferenceSpecification().get_inference_specification_dict(
    ecr_image=image,
    supports_gpu=True,
    supported_content_types=["text/csv"],
    supported_mime_types=["text/csv"],
)

print(json.dumps(inference_specification, indent=4, sort_keys=True))
Validation Specification
In order to provide confidence to the sellers (and buyers) that the products work in Amazon SageMaker before listing them on AWS Marketplace, SageMaker needs to perform basic validations. The product can be listed in AWS Marketplace only if this validation process succeeds. This validation process uses the validation profile and sample data provided by you to run the following validations:
Create a training job in your account to verify your training image works with SageMaker.
Once the training job completes successfully, create a Model in your account using the algorithm’s inference image and the model artifacts produced as part of the training job we ran.
Create a transform job in your account using the above Model to verify your inference image works with SageMaker
[ ]:
from src.algorithm_validation_specification import AlgorithmValidationSpecification
import json

validation_specification = (
    AlgorithmValidationSpecification().get_algo_validation_specification_dict(
        validation_role=role,
        training_channel_name="training",
        training_input=training_input,
        batch_transform_input=transform_input,
        content_type="text/csv",
        instance_type="ml.c4.xlarge",
        output_s3_location="s3://{}/{}".format(sess.default_bucket(), common_prefix),
    )
)

print(json.dumps(validation_specification, indent=4, sort_keys=True))
Putting it all together
Now we put all the pieces together in the next cell and create an Amazon SageMaker Algorithm
[ ]:
import json
import time

algorithm_name = "scikit-decision-trees-" + str(round(time.time()))

create_algorithm_input_dict = {
    "AlgorithmName": algorithm_name,
    "AlgorithmDescription": "Decision trees using Scikit",
    "CertifyForMarketplace": True,
}
create_algorithm_input_dict.update(training_specification)
create_algorithm_input_dict.update(inference_specification)
create_algorithm_input_dict.update(validation_specification)

print(json.dumps(create_algorithm_input_dict, indent=4, sort_keys=True))

print("Now creating an algorithm in SageMaker")

smmp.create_algorithm(**create_algorithm_input_dict)
Describe the algorithm
The next cell describes the Algorithm and waits until it reaches a terminal state (Completed or Failed)
[ ]:
import time
import json

while True:
    response = smmp.describe_algorithm(AlgorithmName=algorithm_name)
    status = response["AlgorithmStatus"]
    print(status)
    if status == "Completed" or status == "Failed":
        print(response["AlgorithmStatusDetails"])
        break
    time.sleep(5)
Part 4 - Package your resources as an Amazon SageMaker ModelPackage
In this section, we will see how you can package your artifacts (ECR image and the trained artifact from your previous training job) into a ModelPackage. Once you complete this, you can list your product as a pretrained model in the AWS Marketplace.
Model Package Definition
A Model Package is a reusable model artifacts abstraction that packages all ingredients necessary for inference. It consists of an inference specification that defines the inference image to use along with an optional model weights location.
[ ]:
smmp = boto3.client("sagemaker")
Inference Specification
You specify details pertinent to your inference code in this section.
[ ]:
from src.inference_specification import InferenceSpecification

import json

modelpackage_inference_specification = InferenceSpecification().get_inference_specification_dict(
    ecr_image=image,
    supports_gpu=True,
    supported_content_types=["text/csv"],
    supported_mime_types=["text/csv"],
)

# Specify the model data resulting from the previously completed training job
modelpackage_inference_specification["InferenceSpecification"]["Containers"][0][
    "ModelDataUrl"
] = tree.model_data
print(json.dumps(modelpackage_inference_specification, indent=4, sort_keys=True))
Validation Specification
In order to provide confidence to the sellers (and buyers) that the products work in Amazon SageMaker before listing them on AWS Marketplace, SageMaker needs to perform basic validations. The product can be listed in the AWS Marketplace only if this validation process succeeds. This validation process uses the validation profile and sample data provided by you to run the following validations:
Create a transform job in your account using the above Model to verify your inference image works with SageMaker.
[ ]:
from src.modelpackage_validation_specification import ModelPackageValidationSpecification
import json

modelpackage_validation_specification = (
    ModelPackageValidationSpecification().get_validation_specification_dict(
        validation_role=role,
        batch_transform_input=transform_input,
        content_type="text/csv",
        instance_type="ml.c4.xlarge",
        output_s3_location="s3://{}/{}".format(sess.default_bucket(), common_prefix),
    )
)

print(json.dumps(modelpackage_validation_specification, indent=4, sort_keys=True))
Putting it all together
Now we put all the pieces together in the next cell and create an Amazon SageMaker Model Package.
[ ]:
import json
import time

model_package_name = "scikit-iris-detector-" + str(round(time.time()))
create_model_package_input_dict = {
    "ModelPackageName": model_package_name,
    "ModelPackageDescription": "Model to detect 3 different types of irises (Setosa, Versicolour, and Virginica)",
    "CertifyForMarketplace": True,
}
create_model_package_input_dict.update(modelpackage_inference_specification)
create_model_package_input_dict.update(modelpackage_validation_specification)
print(json.dumps(create_model_package_input_dict, indent=4, sort_keys=True))

smmp.create_model_package(**create_model_package_input_dict)
Describe the ModelPackage
The next cell describes the ModelPackage and waits until it reaches a terminal state (Completed or Failed)
[ ]:
import time
import json

while True:
    response = smmp.describe_model_package(ModelPackageName=model_package_name)
    status = response["ModelPackageStatus"]
    print(status)
    if status == "Completed" or status == "Failed":
        print(response["ModelPackageStatusDetails"])
        break
    time.sleep(5)
Part 5 - Package your resources as an Amazon SageMaker Algorithm for Fine-tuning Large Models
(Use this notebook to see how to onboard machine learning models where the weights can be >= 100 GB. For example, if you are listing a large language model, follow these instructions.)
Now that you have verified that the algorithm code works for training, live inference and batch inference in the above sections, you can start packaging it up as an Amazon SageMaker Algorithm.
Create an Algorithm for Fine-tuning
You can use the create_algorithm API to create fine-tuning algorithms.
Note: the new API field
AdditionalS3DataSourceunderTrainingSpecificationandInferenceSpecificationthat accept the base model weights from your S3 location. This allows you to provide larger sized model weights.
The Training and Inference containers also need to read the from the enviroment variable ``SAGEMAKER_ADDITIONAL_S3_DATA_PATH`` to access the pre-trained base model weights. This enviroment variable is the local path to the extracted artifacts in your container. You do not have the ability to customize the local path.
As of now, Gzip is the only supported CompressionType. S3Object is the only supported S3DataType. S3Uri must end with
.tar.gzsuffix. UnderValidationSpecification,ValidationRole,TrainingJobDefinitionare required.TransfromJobDefinitionis optional.
During Algorithm creation, a Training Job with TrainingJobDefinition setup will be run with ValidationRole to do basic validation on the training job container. If TrainingJobDefinition is provided in ValidationSpecification. During Algorithm creation, Transform Job with TransformJobDefinition setup will be run with ValidationRole to do basic validation on the inference container. However, the transform inference Job run in this step will not have base weights downloaded
to the container
Thus, only the inference container needs to exit successfully without base weights or real fine-tuning.
[ ]:
import boto3

smmp = boto3.client("sagemaker")
Create the Algorithm using Boto3
For an exhaustive list of parameters see the CreateAlgorithm API.
The AdditionalS3DataSource artifacts are sent to your container. Your container can access them by reading the SAGEMAKER_ADDITIONAL_S3_DATA_PATH which contains the local path to the extracted artifacts.
[ ]:
response = sess.create_algorithm(
    AlgorithmName="<AlgorithmName>",
    AlgorithmDescription="<AlgorithmName>",
    TrainingSpecification={
        # 'TrainingImageDigest': 'string', #Optional
        "TrainingImage": "<ImageURI>",
        # new field to pass inference base weights
        "AdditionalS3DataSource": {
            "CompressionType": "Gzip",
            "S3DataType": "S3Object",
            # S3Uri for inference base model weights file
            "S3Uri": "<S3LocationOfBaseWeights>",  # must end with .tar.gz suffix
        },
        "SupportedTrainingInstanceTypes": [
            # "ml.p4.24xlarge",
            "<specify compatible instance type>"
        ],
        "SupportedHyperParameters": [
            {
                "Name": "<Name>",
                "Description": "<Description>",
                "Type": "String",  # Integer | Continuous | Categorical | FreeText
                "IsTunable": False,
                "IsRequired": False,
            },
            {
                "Name": "<Name>",
                "Description": "<Description>",
                "Type": "FreeText",  # Integer | Continuous | Categorical | FreeText
                "IsTunable": False,
                "IsRequired": False,
            },
            {
                "Name": "<Name>",
                "Description": "<Description>",
                "Type": "FreeText",  # Integer | Continuous | Categorical | FreeText
                "IsTunable": False,
                "IsRequired": False,
            },
        ],
        "SupportsDistributedTraining": True,
        "TrainingChannels": [
            {
                "Name": "<Name>",
                "Description": "<Description>",
                "IsRequired": False,
                "SupportedContentTypes": [
                    "application/json",
                ],
                "SupportedCompressionTypes": ["None", "Gzip"],
                "SupportedInputModes": ["Pipe", "File"],
            },
        ],
    },
    InferenceSpecification={
        "Containers": [  # Only Containers[0] can have AdditionalS3DataSource
            {
                "Image": "<ImageURI>",
                "AdditionalS3DataSource": {
                    "CompressionType": "Gzip",
                    "S3DataType": "S3Object",
                    "S3Uri": "<S3LocationOfBaseWeights>",  # must end with .tar.gz suffix
                },
            }
        ],
        "SupportedTransformInstanceTypes": ["ml.c5.xlarge", "<specify compatible instance type>"],
        "SupportedRealtimeInferenceInstanceTypes": [
            # "ml.p4.24xlarge",
            "<specify compatible instance type>",
        ],
        "SupportedContentTypes": [],
        "SupportedResponseMIMETypes": [
            "application/json",
        ],
    },
    ValidationSpecification={
        "ValidationRole": "<RoleARN>",
        "ValidationProfiles": [
            {
                "ProfileName": "<ProfileName>",
                "TrainingJobDefinition": {
                    "TrainingInputMode": "File",
                    "HyperParameters": {"num_epochs": "1"},
                    "InputDataConfig": [
                        {
                            "ChannelName": "<ChannelName>",
                            "DataSource": {
                                "S3DataSource": {
                                    "S3DataType": "S3Prefix",
                                    "S3Uri": "<S3DatasetLocation>",  # s3://mybucket/iris.csv,
                                    "S3DataDistributionType": "FullyReplicated",
                                }
                            },
                            "CompressionType": "None",
                            "RecordWrapperType": "None",
                        },
                    ],
                    "OutputDataConfig": {"KmsKeyId": "", "S3OutputPath": "<S3OutputPath>"},
                    "ResourceConfig": {
                        "InstanceType": "ml.m5.xlarge",
                        "InstanceCount": 1,
                        "VolumeSizeInGB": 10,
                    },
                    "StoppingCondition": {
                        "MaxRuntimeInSeconds": 1800,
                    },
                },
            }
        ],
    },
    CertifyForMarketplace=True,
)
Testing the Fine-tuning Algorithm
Once the Algorithm is created, you can follow the steps below to test the algorithm. > Note: that you can test it in the AWS account where the algorithm is created before listing it in the AWS Marketplace. Also, after you create a preview listing in the AWS Marketplace, you can verify it again from test accounts you specify in the listing, by subscribing to the listing and then follow the same steps.
Create Fine-Tuning training Job
Now you can use the Algorithm created for fine-tuning. Specify the AlgorithmName under AlgorithmSpecification . Before training container starts, base weights file will be downloaded to training instances and extracted under the path indicated by environmental variable SAGEMAKER_ADDITIONAL_S3_DATA_PATH.
For example, base weights are specified at s3://fine-tuning-models/model.tar.gz and model.tar.gz which contains files data1 and data2 in the model.tar.gz. These files will be available under $SAGEMAKER_ADDITIONAL_S3_DATA_PATH/data1 and $SAGEMAKER_ADDITIONAL_S3_DATA_PATH/data2 in the container.
Note: The
S3OutputPathpath will contain the fine-tuned weights in the end-user/customer’s account. Make sure your Algorithm Training container does not output anything sensitive to both CloudWatch Logs (std_err/std_out in the container) or the fine-tuned model weights in S3 (artifacts saved in the container to/opt/ml/modelduring Training)
[ ]:
response = sess.create_training_job(
    TrainingJobName="<TrainingJobName>",
    RoleArn="<RoleArn>",
    AlgorithmSpecification={
        # provide fine-tuning algorithm name here.
        "AlgorithmName": "<AlgorithmName>",
        "TrainingInputMode": "File",
    },
    InputDataConfig=[
        {
            "ChannelName": "<ChannelName>",
            "DataSource": {
                "S3DataSource": {
                    "S3DataType": "S3Prefix",
                    "S3Uri": "<S3DatasetLocation>",  # s3://mybucket/iris.csv,
                    "S3DataDistributionType": "FullyReplicated",
                }
            },
            "CompressionType": "None",
            "RecordWrapperType": "None",
        },
    ],
    OutputDataConfig={
        #  'KmsKeyId': 'string',
        "S3OutputPath": "<S3OutputPath>",
        # CompressionType needs to be Gzip so that the output weights can be used for
        # creating model package
        "CompressionType": "GZIP",
    },
    ResourceConfig={
        "InstanceCount": 1,
        "InstanceType": "ml.c4.xlarge",
        "VolumeSizeInGB": 40,
    },
    StoppingCondition={
        "MaxRuntimeInSeconds": 3600,
    },
)
Once training is completed, the fine-tuned weights will be uploaded to OutputDataConfig:S3OutputPath.
Create a Model Package
To create a model package resource that you can use to create deployable models in Amazon SageMaker. You can do the following:
[ ]:
# change this to a name you prefer, must be no more than 63 characters long
model_package_name = "string"

create_model_pkg_rsp = sess.create_model_package(
    ModelPackageName=model_package_name,
    SourceAlgorithmSpecification={
        "SourceAlgorithms": [
            {
                "AlgorithmName": "<AlgorithmName>",
                "ModelDataUrl": "<S3LocationOfFineTunedModelWeightsFromTrainingJob>",  # OutputDataConfig:S3OutputPath
            }
        ]
    },
)
print(create_model_pkg_rsp)

# check model package details
sess.describe_model_package(ModelPackageName=model_package_name)
Create SageMaker Model entity and Deploy to SageMaker Hosting
After the model package reaches a Completed status, you can use a model package to create a deployable model (SageMaker Model). You can then deploy this Model to am endpoint to get real-time inferences by creating a hosted endpoint (SageMaker Endpoint).
[ ]:
create_model_rsp = sess.create_model(
    ModelName=model_package_name,
    ExecutionRoleArn="<ExecutionRoleArn>",
    PrimaryContainer={
        "ModelPackageName": model_package_name,
    },
    EnableNetworkIsolation=True,
)

create_endpoint_config_rsp = sess.create_endpoint_config(
    EndpointConfigName=model_package_name,
    ProductionVariants=[
        {
            "VariantName": "<VariantName>",
            "ModelName": model_package_name,
            "InitialInstanceCount": 1,
            # e.g. ml.m5.2xlarge
            "InstanceType": "ml.c5.xlarge",
            "ContainerStartupHealthCheckTimeoutInSeconds": 3600,
            "ModelDataDownloadTimeoutInSeconds": 3600,
        }
    ],
)

create_endpoint_rsp = sess.create_endpoint(
    EndpointName=model_package_name, EndpointConfigName=model_package_name
)

# verify endpoint has been created
sess.describe_endpoint(EndpointName=model_package_name)
Invoke Endpoint for Inference
After the endpoint reaches InService status, you can invoke the endpoint for inference:
[ ]:
sage_runtime = sagemaker.client("sagemaker-runtime")

rsp = sage_runtime.invoke_endpoint(
    EndpointName=model_package_name,
    Body=b"<InferencetPayload>",
    ContentType="text/csv"  # any format your container supports
    # specify other attributes you need ... see help(invoke_endpoint)
)
rsp["Body"].read()
# process inference response in rsp body
Debugging Creation Issues
Entity creation typically never fails in the synchronous path. However, the validation process can fail for many reasons. If the above Algorithm creation fails, you can investigate the cause for the failure by looking at the “AlgorithmStatusDetails” field in the Algorithm object or “ModelPackageStatusDetails” field in the ModelPackage object. You can also look for the Training Jobs / Transform Jobs created in your account as part of our validation and inspect their logs for more hints on what went wrong.
If all else fails, please contact AWS Customer Support for assistance!
List on AWS Marketplace
Next, please go back to the Amazon SageMaker console, click on “Algorithms” (or “Model Packages”) and you’ll find the entity you created above. If it was successfully created and validated, you should be able to select the entity and “Publish new ML Marketplace listing” from SageMaker console.

After creating and validating your fine-tuning Algorithms in Amazon SageMaker, you can list your products on AWS Marketplace. The listing process makes your products available for model consumers in the AWS Marketplace and the SageMaker console.
Detailed steps can be found here: https://docs.aws.amazon.com/marketplace/latest/userguide/ml-publishing-your-product-in-aws-marketplace.html
Notebook CI Test Results
This notebook was tested in multiple regions. The test results are as follows, except for us-west-2 which is shown at the top of the notebook.