AWS Marketplace Product Usage Demonstration - Algorithms
This notebook’s CI test result for us-west-2 is as follows. CI test results in other regions can be found at the end of the notebook.
Using Algorithm ARN with Amazon SageMaker APIs
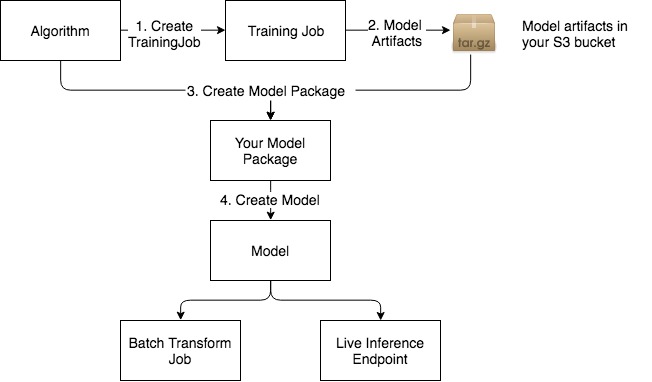
This sample notebook demonstrates two new functionalities added to Amazon SageMaker: 1. Using an Algorithm ARN to run training jobs and use that result for inference 2. Using an AWS Marketplace product ARN - we will use Scikit Decision Trees
Overall flow diagram

Compatibility
This notebook is compatible only with Scikit Decision Trees sample algorithm published to AWS Marketplace.
Pre-Requisite: Please subscribe to this free product before proceeding with this notebook
Set up the environment
[ ]:
import sagemaker as sage
from sagemaker import get_execution_role

role = get_execution_role()

# S3 prefixes
common_prefix = "DEMO-scikit-byo-iris"
training_input_prefix = common_prefix + "/training-input-data"
batch_inference_input_prefix = common_prefix + "/batch-inference-input-data"
Create the session
The session remembers our connection parameters to Amazon SageMaker. We’ll use it to perform all of our Amazon SageMaker operations.
[ ]:
sagemaker_session = sage.Session()
Upload the data for training
When training large models with huge amounts of data, you’ll typically use big data tools, like Amazon Athena, AWS Glue, or Amazon EMR, to create your data in S3. For the purposes of this example, we’re using some the classic Iris dataset, which we have included.
We can use use the tools provided by the Amazon SageMaker Python SDK to upload the data to a default bucket.
[ ]:
TRAINING_WORKDIR = "data/training"

training_input = sagemaker_session.upload_data(TRAINING_WORKDIR, key_prefix=training_input_prefix)
print("Training Data Location " + training_input)
Creating Training Job using Algorithm ARN
Please put in the algorithm arn you want to use below. This can either be an AWS Marketplace algorithm you subscribed to (or) one of the algorithms you created in your own account.
The algorithm arn listed below belongs to the Scikit Decision Trees product.
[ ]:
from src.scikit_product_arns import ScikitArnProvider

algorithm_arn = ScikitArnProvider.get_algorithm_arn(sagemaker_session.boto_region_name)
[ ]:
import json
import time
from sagemaker.algorithm import AlgorithmEstimator

algo = AlgorithmEstimator(
    algorithm_arn=algorithm_arn,
    role=role,
    train_instance_count=1,
    train_instance_type="ml.c4.xlarge",
    base_job_name="scikit-from-aws-marketplace",
)
Run Training Job
[ ]:
print(
    "Now run the training job using algorithm arn %s in region %s"
    % (algorithm_arn, sagemaker_session.boto_region_name)
)
algo.fit({"training": training_input})
Automated Model Tuning (optional)
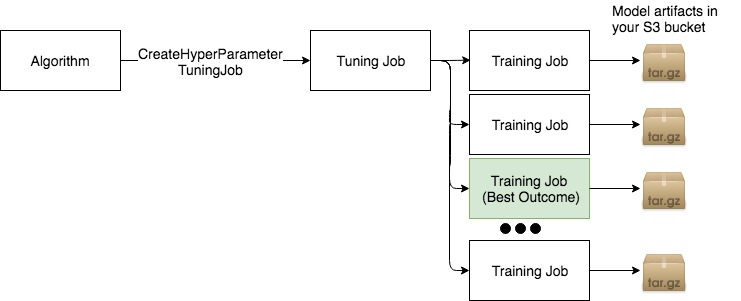
Since this algorithm supports tunable hyperparameters with a tuning objective metric, we can run a Hyperparameter Tuning Job to obtain the best training job hyperparameters and its corresponding model artifacts.

[ ]:
from sagemaker.tuner import HyperparameterTuner, IntegerParameter

## This demo algorithm supports max_leaf_nodes as the only tunable hyperparameter.
hyperparameter_ranges = {"max_leaf_nodes": IntegerParameter(1, 100000)}

tuner = HyperparameterTuner(
    estimator=algo,
    base_tuning_job_name="some-name",
    objective_metric_name="validation:accuracy",
    hyperparameter_ranges=hyperparameter_ranges,
    max_jobs=2,
    max_parallel_jobs=2,
)

tuner.fit({"training": training_input}, include_cls_metadata=False)
tuner.wait()
Batch Transform Job
Now let’s use the model built to run a batch inference job and verify it works.
Batch Transform Input Preparation
The snippet below is removing the “label” column (column indexed at 0) and retaining the rest to be batch transform’s input.
NOTE: This is the same training data, which is a no-no from a ML science perspective. But the aim of this notebook is to demonstrate how things work end-to-end.
[ ]:
import pandas as pd

## Remove first column that contains the label
shape = pd.read_csv(TRAINING_WORKDIR + "/iris.csv", header=None).drop([0], axis=1)

TRANSFORM_WORKDIR = "data/transform"
shape.to_csv(TRANSFORM_WORKDIR + "/batchtransform_test.csv", index=False, header=False)

transform_input = (
    sagemaker_session.upload_data(TRANSFORM_WORKDIR, key_prefix=batch_inference_input_prefix)
    + "/batchtransform_test.csv"
)
print("Transform input uploaded to " + transform_input)
[ ]:
transformer = algo.transformer(1, "ml.m4.xlarge")
transformer.transform(transform_input, content_type="text/csv")
transformer.wait()

print("Batch Transform output saved to " + transformer.output_path)
Inspect the Batch Transform Output in S3
[ ]:
from urllib.parse import urlparse

parsed_url = urlparse(transformer.output_path)
bucket_name = parsed_url.netloc
file_key = "{}/{}.out".format(parsed_url.path[1:], "batchtransform_test.csv")

s3_client = sagemaker_session.boto_session.client("s3")

response = s3_client.get_object(Bucket=sagemaker_session.default_bucket(), Key=file_key)
response_bytes = response["Body"].read().decode("utf-8")
print(response_bytes)
Live Inference Endpoint
Finally, we demonstrate the creation of an endpoint for live inference using this AWS Marketplace algorithm generated model
[ ]:
from sagemaker.predictor import csv_serializer

predictor = algo.deploy(1, "ml.m4.xlarge", serializer=csv_serializer)
Choose some data and use it for a prediction
In order to do some predictions, we’ll extract some of the data we used for training and do predictions against it. This is, of course, bad statistical practice, but a good way to see how the mechanism works.
[ ]:
shape = pd.read_csv(TRAINING_WORKDIR + "/iris.csv", header=None)

import itertools

a = [50 * i for i in range(3)]
b = [40 + i for i in range(10)]
indices = [i + j for i, j in itertools.product(a, b)]

test_data = shape.iloc[indices[:-1]]
test_X = test_data.iloc[:, 1:]
test_y = test_data.iloc[:, 0]
Prediction is as easy as calling predict with the predictor we got back from deploy and the data we want to do predictions with. The serializers take care of doing the data conversions for us.
[ ]:
print(predictor.predict(test_X.values).decode("utf-8"))
Cleanup the endpoint
[ ]:
algo.delete_endpoint()
Notebook CI Test Results
This notebook was tested in multiple regions. The test results are as follows, except for us-west-2 which is shown at the top of the notebook.